Table Profiling: Row count, Columns count, and View sample data
View Profiling: Row count, Columns count, View sample data
Column Profiling: Min, Max, Null count, distinct, top 50 values
Full Profiling
 | **Fields** | **Details** | |
| -------------------------- | ----------------------------------------------------------------------------------------------------------------------------------------------------------------------------------------------------------------------------------------------------------------------------------------------------------------------------------------------------------------------------------------------------------------------------------------------------------------------------------------------------------------------------------------------------------------------------------------------------------------------------------------------------------------------------------------------------------------------------------------------------------------------------------------------------------------------------------------------------------------------------------------------------------------------------------------------------------------------------------------------------------------------------------------------- | ------------------------------- |
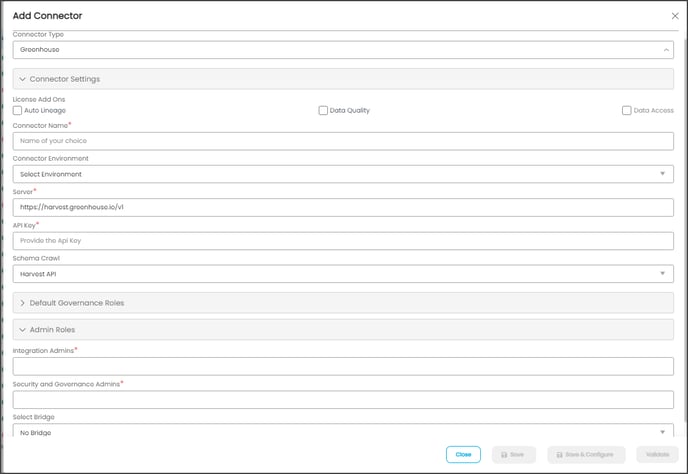
| Connection Type\* |
| **Fields** | **Details** | |
| -------------------------- | ----------------------------------------------------------------------------------------------------------------------------------------------------------------------------------------------------------------------------------------------------------------------------------------------------------------------------------------------------------------------------------------------------------------------------------------------------------------------------------------------------------------------------------------------------------------------------------------------------------------------------------------------------------------------------------------------------------------------------------------------------------------------------------------------------------------------------------------------------------------------------------------------------------------------------------------------------------------------------------------------------------------------------------------------- | ------------------------------- |
| Connection Type\* | The selected connection type ‘Greenhouse’ is displayed by default.
If required, the dropdown menu allows you to change the connector type and based on the selection of the connection type, the fields associated with the selected connection type are displayed.
| | | License Add-Ons\* |All the connectors will have a Base Connector License by default that allows you to crawl and profile to obtain the metadata and statistical information from a datasource.
OvalEdge supports various License Add-Ons, based on the connector’s functionality requirements.
The environment dropdown menu allows you to select the environment configured for the connector from the dropdown list. For example, PROD, or STG (based on the configured items in the OvalEdge configuration for the connector. environment).
The purpose of the environment field is to help you identify which connector is connecting what type of system environment (Production, STG, or QA).
Note: The steps to set up environment variables in explained in the prerequisite section.
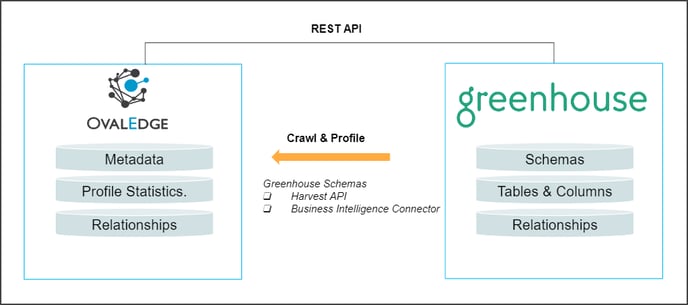
| | | Server\* | This is the hostname or IP address of the Harvest API endpoints. The base URL for the Harvest API is "You can select Schema Crawl from the dropdown menu below, Greenhouse supports two schemas to crawl.
Harvest API: The purpose of Harvest API is to fetch recruitment details such as Candidate, Job, and Organization information.
Business Intelligence Connector (BIC): The purpose of the BIC connector that contains the recruiting and onboarding data for analysis and reporting.
Note: To crawl both the API and the BIC in Greenhouse, you will need to set up two separate connectors.
| | | Default Governance Roles\* |You can select a specific user or a team from the governance roles (Steward, Custodian, Owner) that get assigned for managing the data asset.
Note: The dropdown list displays all the configurable roles (single user or a team) as per the configurations made in the OvalEdge Security | Governance Roles section.
| | Admin Roles |Select the required admin roles for this connector.
To add Security and Governance Admin roles, search for or select one or more roles from the list, and then click on the Apply button.
The security and Governance Admin is responsible for:
With the OvalEdge Bridge component, any cloud-hosted server can connect with any on-premise or public cloud data sources without modifying firewall rules. A bridge provides real-time control that makes it easy to manage data movement between any source and destination.
For more information, refer to Bridge Overview
| | \ 5\. Click on the **Validate** button to validate the connection details. 6\. Click on the **Save** button to save the connection. Alternatively, you can also directly click on the button that displays the Connection Settings pop-up window to configure the settings for the selected Connector. The **Save & Configure** button is displayed only for the Connectors for which the settings configuration is required. {% hint style="info" %} **Note:** \* (asterisk) indicates the mandatory field required to create a connection. Once the connection is validated and saved, it will be displayed on the Connectors home page. \ **Note:** It is up to your wish to save the connection details first and then validate them, or to validate the connection first and then save it. {% endhint %} **Connection Validation Errors** | **S.No** | **Error Message(s)** | **Description** | | -------- | -------------------------------------------------------------- | --------------------------------------------------------------------- | | 1 | Failed to establish a connection, please check the credentials | Invalid API Key. Enter the API Key which has access to Candidate API. | If you have any issues creating a connection, please contact your assigned OvalEdge Customer Success Management (CSM) team. #### **Connector Settings** Once the connection is validated successfully, various settings are provided to retrieve and display the information from the data source. The connection settings include Crawler, Profiler, Access Instruction, and Others. | **Connection Settings** | **Description** | | ---------------------------------- | ------------------------------------------------------------------------------------------------------------------------------------------------------------------------------------------------------------------------------------------------------------------------------------------------------------------------------------------------------------------------------------ | | Crawler |The Crawler setting allows you to set the crawling configuration that will collect the metadata and display it in the data catalog.
Crawler Settings include:
(i) Crawler Options
Tables, Views & Columns
Relationship
(ii) Crawler Rules
Profiler
Data profiling typically involves collecting statistics about data sources such as:
The Send Metadata Changes Notifications option is used to set the change notification about the metadata changes of the data objects.