(Production)
(Sandbox)
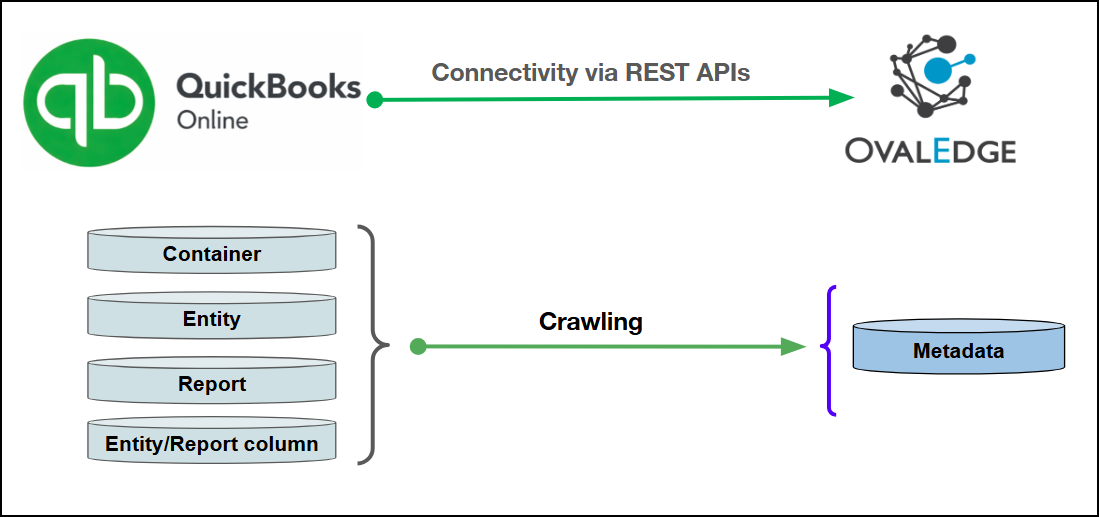
| {% hint style="info" %} Production is the live environment for real business data, while Sandbox is a non-production environment used for testing and development without affecting live records. {% endhint %} {% hint style="info" %} The QuickBooks Online connector has been validated with the mentioned "QuickBooks Online API Versions" and is expected to be compatible with other supported QuickBooks Online API Versions. If there are any issues with validation or metadata crawling, please submit a support ticket for investigation and feedback. {% endhint %} #### Connector Features | Feature | Availability | | ---------------------------------- | :----------: | | Crawling | ✅ | | Profiling | ❌ | | Query Sheet | ❌ | | Data Preview | ✅ | | Auto Lineage | ❌ | | Manual Lineage | ❌ | | Secure Authentication via (OAuth2) | ✅ | #### Metadata Mapping The following objects are crawled from QuickBooks Online and mapped to the corresponding UI assets.| Source | Object Type | OvalEdge Asset |
|---|---|---|
| QuickBooks company (Realm ID) | Container | Database for Tables Domain for Reports |
| QuickBooks entity type | Entity | Table |
| QuickBooks report name | Report | Report |
| Entity/Report column | Field | Table Column/ Report Column |
| Requirement | Description |
|---|---|
| QuickBooks Online Account | Must be active and accessible |
| OAuth2 Application | Client ID and Client Secret must be generated |
| Company Realm ID | Required to identify the QuickBooks Online company |
| Service Name | Description |
|---|---|
| Intuit OAuth Platform | Used for secure authentication and token issuance |
| QuickBooks Online REST API | Used for metadata discovery and data queries |
| Field Name | Description |
|---|---|
| Connector Type | By default, "QuickBooks Online" is displayed as the selected connector type. |
| Connector Name* | Enter a unique name for the QuickBooks Online connection (Example: "QuickBooks Online_Prod"). |
| Connector description | Enter a brief description of the connector. |
| Client ID* | Enter the QuickBooks OAuth2 Client ID. This identifier is required to authenticate the OvalEdge application with Intuit’s authorization platform. |
| Client Secret* | Enter the OAuth2 Client Secret associated with the Client ID. This secret is used to securely authenticate API requests and authorize access to the QuickBooks Online environment. |
| Company ID* | Enter the QuickBooks Online Realm ID (QuickBooks Company/Realm ID) that uniquely identifies the target QuickBooks Online company from which metadata and data will be retrieved. |
| Environment* | Select the target environment where the QuickBooks Online company resides, either Production or Sandbox, to ensure API calls are routed to the correct Intuit endpoint. |
| Access Token | Displays the OAuth2 Access Token used to authorize API requests to QuickBooks Online. This token is automatically refreshed by the system when expired and does not require manual updates. |
| Refresh Token | Displays the OAuth2 Refresh Token, which is used to automatically renew the Access Token when it expires, ensuring uninterrupted connectivity and secure API communication. |
| Default Governance Roles* | Select the appropriate users or teams for each governance role from the drop-down list. All users and teams configured in OvalEdge Security are displayed for selection. |
| Admin Roles* | Select one or more users from the dropdown list for Integration Admin and Security & Governance Admin. All users configured in OvalEdge Security are available for selection. |
| S.No. | Error Message(s) | Error Description & Resolution |
|---|---|---|
| 1 | 401 Unauthorized | Error Description: The access token or refresh token is invalid, expired, revoked, or not authorized for the specified QuickBooks Online company. This may occur if OAuth2 credentials were regenerated, revoked, or incorrectly configured. Resolution:
|
| 2 | Invalid Company ID (Realm ID) | Error Description: The specified Company ID (Realm ID) does not exist, is incorrect, or the authenticated user does not have permission to access the associated QuickBooks Online company. Resolution:
|
| 3 | Sandbox / Production Environment Mismatch | Error Description: The selected environment (Sandbox or Production) does not match the QuickBooks Online company environment, resulting in failed API calls or validation errors. Resolution:
|
| 4 | Entity Not Available | Error Description: Certain QuickBooks Online entity types may not be enabled for the company, leading to skipped or unavailable entities during metadata discovery. Resolution: This behavior is expected when entities are not supported by the company configuration. Review the enabled features in QuickBooks Online and proceed with supported entities. |