| Connector Category | Application |
| Connector Version | Release6.3.x |
| Releases Supported (Available from) | Legacy connector |
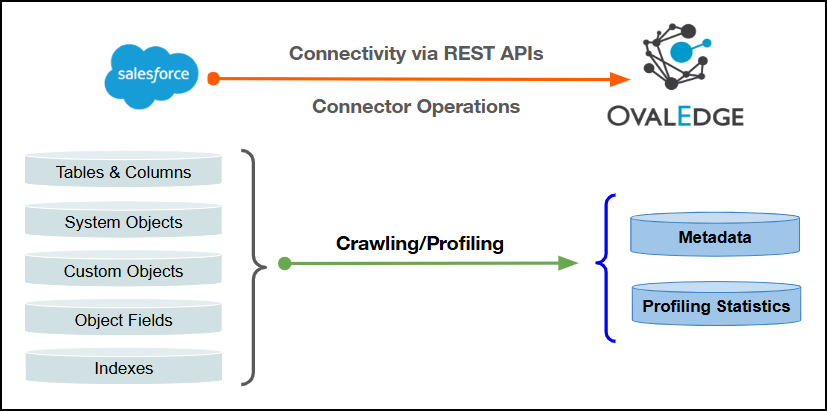
Connectivity [How the connection is established with RDBMS System] | REST APIs |
| Salesforce sales cloud Object | Salesforce sales cloud Attribute | OvalEdge Attribute | OvalEdge Category | OvalEdge Type |
|---|---|---|---|---|
| Objects (System & Custom) | Object Name | Table Name | Tables | Table |
| Objects (System & Custom) | Object Description | Table Comment | Tables | Table |
| Object Fields | Field Name | Column Name | Table Columns | Columns |
| Object Fields | Field Type | Data Type | Table Columns | Columns |
| Object Fields | Field Length | Data Type Size | Table Columns | Columns |
| Object Fields | Field Description | Source Description | Table Columns | Description |
| Object Fields | Field Name | Title | Table Columns | Columns |
| Indexes | Index Name | Index | Indexes | Index |
| Indexes | If Unique | Yes/No | Indexes | Index |
| Field Name | Description |
|---|---|
| Connector Type | By default, "Salesforce" is displayed as the selected connector type. |
| Credential Manager* | Select the desired credentials manager from the drop-down list. Relevant parameters will be displayed based on the selection. Supported Credential Managers:
|
| Authentication Type | The following two types of authentication are supported for Salesforce sales cloud:
|
| Field Name | Description |
|---|---|
| Connector Name* | Enter a unique name for the Salesforce sales cloud connection (Example: "Salesforce_Prod"). |
| Connector Description | Enter a description to identify the purpose of the connector. |
| Connector Environment | Select the environment (Example: PROD, STG) configured for the connector. |
| Username* | Enter the Salesforce sales cloud username for the user account used for API access. It is usually in the format of an email (e.g., apiuser@xxxx.com). |
| Password* | Enter the password for the Salesforce sales cloud user account used for API access. |
| Consumer Key* | It is generated when a Connected App is created in Salesforce sales cloud and is used to identify the client making the API request. |
| Consumer Secret* | It is generated with the Connected App in Salesforce sales cloud and is used along with the Customer Key to connect and authenticate the application securely. |
| Security token | A unique token generated by Salesforce sales cloud for API access. Required when logging in from untrusted IP addresses. It must be appended to the password during login if the IP address is not whitelisted. This can be obtained by using the "Reset My Security Token" option in Salesforce. |
| API version* | Enter the version of the Salesforce REST or SOAP API to be used (e.g., v59.0). This determines the available endpoints and features. |
| Sandbox Environment* | Select Yes if the Salesforce sales cloud environment is a sandbox (test environment), or No if it is a production environment. Sandbox environments usually have URLs like test.salesforce.com. |
| Proxy Enabled* | Select Yes to route API calls through a proxy server. Select No to bypass the proxy and connect directly. |
| Field Name | Description |
|---|---|
| Connector Name* | Enter a unique name for the Salesforce connection (Example: "Salesforce_Prod"). |
| Connector Description | Enter a description to identify the purpose of the connector. |
| Connector Environment | Select the environment (Example: PROD, STG) configured for the connector. |
| Username* | Enter the Salesforce username for the user account used for API access. It is usually in the format of an email (e.g., apiuser@xxxx.com). |
| Consumer Key* | It is generated when a Connected App is created in Salesforce and is used to identify the client making the API request. |
| API version* | Enter the version of the Salesforce REST or SOAP API to be used (e.g., v59.0). This determines the available endpoints and features. |
| Sandbox Environment* | Select Yes if the Salesforce environment is a sandbox (test environment), or No if it is a production environment. Sandbox environments usually have URLs like test.salesforce.com. |
| Alias name* | Enter the alias name used to identify the specific key entry within the keystore. Each key entry in the key store is associated with a unique alias. |
| Keystore password* | Enter the password used to access the keystore file. This password protects the keystore and ensures secure access to the stored certificates and keys. |
| Keystore file path* | Provide the full path and file name of the Java Keystore (jks) file. This file contains the security certificates and keys required for establishing a secure SSL/TLS connection. |
| Proxy Enabled* | Select Yes to route API calls through a proxy server. Select No to bypass the proxy and connect directly. |
| Default Governance Roles* | Select the appropriate users or teams for each governance role from the drop-down list. All users configured in the security settings are available for selection. |
| Admin Roles* | Select one or more users from the dropdown list for Integration Admin and Security & Governance Admin. All users configured in the security settings are available for selection. |
| Select Bridge* | Select the bridge from the drop-down list. The drop-down list displays all active bridges that have been configured. These bridges facilitate communication between data sources and the system without requiring changes to firewall rules. |