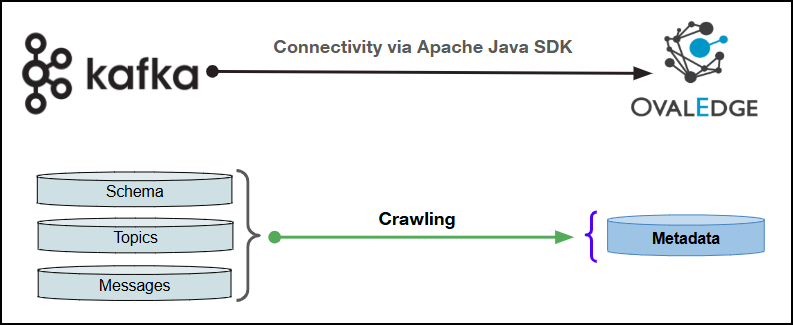
Connectivity
\[How the connection is established with the Apache Kafka system]
| Apache Java SDK | ### Connector Features | Feature | Availability | | -------------------------------------------- | :----------: | | Crawling | ✅ | | Delta Crawling | ❌ | | Profiling | ❌ | | Sample Profiling | ✅ | | Query Sheet | ❌ | | Data Preview | ✅ | | Auto Lineage | NA | | Manual Lineage | ✅ | | Secure Authentication via Credential Manager | ✅ | | Data Quality | ❌ | | DAM (Data Access Management) | ✅ | | Bridge | ✅ | {% hint style="info" %} 'NA' indicates that the respective feature is 'Not Applicable.' {% endhint %} ### Metadata Mapping The following objects are crawled from Apache Kafka and mapped to the corresponding UI assets.| Apache Kafka Object | Apache Kafka Attribute | OvalEdge Attribute | OvalEdge Category | OvalEdge Type |
|---|---|---|---|---|
| Schema | Cluster Name | Database Name | Database | Schema |
| Topics | Topic Name | Table | Tables | Table |
| Topics | Topic Data Type | Type | Tables | Table |
| Topics | Topic Comments | Source Description | Descriptions | Source Description |
| Messages | Message Key | Column | Table Columns | - |
| Messages | Message Type | Column Type | Table Columns | - |
| Field Name | Description |
|---|---|
| Connector Type | By default, "Kafka" is displayed as the selected connector type. |
| License Add Ons | Select the checkbox for Data Access Add-On to enable data access functionality. For more details, click here. |
| Credential Manager* | Select the desired credentials manager from the drop-down list. Relevant parameters will be displayed based on the selection. Supported Credential Managers:
For more details, click here. |
| Cluster Authentication Type* | The following three types of authentication are supported for Apache Kafka:
|
| Field Name | Description |
|---|---|
| Connector Description | Enter a brief description of the connector. |
| Connector Environment | Select the environment (Example: PROD, STG) configured for the connector. For more details, click here. |
| Connector Name* | Enter a unique name for the Apache Kafka connection (Example: "ApacheKafkadb"). |
| Broker URL* | Enter the comma-separated list of Kafka broker host: port addresses (e.g., broker1:9092,broker2:9092). |
| Cluster Name* | Enter the logical name for the Kafka cluster (e.g., "Cluster1"). Used for organization and identification in OvalEdge. |
| Consumer Group Id | Enter the consumer group identifier to coordinate consumers and manage offsets. If not provided, defaults to "OE-11" |
| JAAS Config Path* | Enter the File path to the JAAS (Java Authentication and Authorization Service) configuration file. Supports PLAIN and Kerberos (KRB5LoginModule)
|
| Security Protocol | Enter the security protocol for broker communication. Ex:
|
| SASL Mechanism | Enter the SASL mechanism for authentication Ex:
|
| Registry URL | Enter the URL of the Schema Registry (e.g., https://schema-registry.example.com:8081). Used for Avro, Protobuf, and JSON Schema serialization/deserialization |
| Schema Registry User | Enter the username for Schema Registry basic authentication. |
| Schema Registry Password | Enter the password for the Schema Registry basic authentication. |
| KRB5 Config Path | Enter the file path to the Kerberos configuration file (krb5.conf). |
| Field Name | Description |
|---|---|
| Connector Description | Enter a brief description of the connector. |
| Connector Environment | Select the environment (Example: PROD, STG) configured for the connector. For more details, click here. |
| Connector Name* | Enter a unique name for the Apache Kafka connection (Example: "ApacheKafkadb"). |
| Broker URL* | Enter the comma-separated list of Kafka broker host: port addresses (e.g., broker1:9092,broker2:9092). |
| Cluster Name* | Enter the logical name for the Kafka cluster (e.g., "Cluster1"). Used for organization and identification in OvalEdge. |
| Cluster Id* | Enter the unique identifier for the Kafka cluster, often from Confluent Cloud or the Kafka provider. It is used for cluster identification and management. |
| Consumer Group Id | Enter the consumer group identifier to coordinate consumers and manage offsets. If not provided, defaults to "OE-11" |
| App Key* | Enter the application key (username) for SASL PLAIN authentication. |
| Secret Key* | Enter the secret key (password) for SASL PLAIN authentication. |
| Security Protocol | Enter the security protocol for broker communication. Ex:
|
| SASL Mechanism | Enter the SASL mechanism for authentication Ex:
|
| Registry URL | Enter the URL of the Schema Registry (e.g., https://schema-registry.example.com:8081). Used for Avro, Protobuf, and JSON Schema serialization/deserialization |
| Schema Registry User | Enter the username for Schema Registry basic authentication. |
| Schema Registry Password | Enter the password for the Schema Registry basic authentication. |
| KRB5 Config Path | Enter the file path to the Kerberos configuration file (krb5.conf). |
| Field Name | Description |
|---|---|
| Connector Description | Enter a brief description of the connector. |
| Connector Environment | Select the environment (Example: PROD, STG) configured for the connector. For more details, click here. |
| Connector Name* | Enter a unique name for the Apache Kafka connection (Example: "ApacheKafkadb"). |
| Broker URL* | Enter the comma-separated list of Kafka broker host: port addresses (e.g., broker1:9092,broker2:9092). |
| Cluster Name* | Enter the logical name for the Kafka cluster (e.g., "Cluster1"). Used for organization and identification in OvalEdge. |
| Consumer Group Id | Enter the consumer group identifier to coordinate consumers and manage offsets. If not provided, defaults to "OE-11" |
| Registry URL | Enter the URL of the Schema Registry (e.g., https://schema-registry.example.com:8081). Used for Avro, Protobuf, and JSON Schema serialization/deserialization |
| Default Governance Roles* | Select the appropriate users or teams for each governance role from the drop-down list. All users configured in the security settings are available for selection. |
| Integration Admins* | Select one or more users from the dropdown list for Integration Admin and Security & Governance Admin. All users configured in the security settings are available for selection. |
| Select Bridge* | If applicable, select the bridge from the drop-down list. The drop-down list displays all active bridges that have been configured. These bridges facilitate communication between data sources and the system without requiring changes to firewall rules. |
| S.No. | Error Message(s) | Error Description & Resolution |
|---|---|---|
| 1 | TimeoutException / REQUEST_TIMED_OUT (code 7) | Error Description: The request did not complete within the configured time. Resolution: Increase timeout settings, such as request.timeout.ms, max.block.ms, and session.timeout.ms. Check broker responsiveness, network latency, and system load. |
| 2 | org.apache.kafka.common.errors.SaslAuthenticationException: Authentication failed due to: Invalid credentials | Error Description: The client attempted SASL-based login (SCRAM or PLAIN), but the broker rejected the credentials. Resolution: Verify the username and password. Confirm SCRAM credentials on the broker using kafka-configs.sh. Ensure the client’s sasl.mechanism matches the broker configuration and that the user exists and is configured correctly. |
| 3 | SSL certificate handshake / TLS Auth error (when using SSL or SASL_SSL) | Error Description: The client could not establish an SSL/TLS connection with the broker due to certificate or hostname issues. Resolution: Provide the correct truststore that includes the CA certificate used by the broker. Check the ssl.endpoint.identification.algorithm setting. Ensure the broker certificate’s SAN matches the client's hostname. |
| 4 | HTTP Status 403 Forbidden | Error Description: The client connected to the Schema Registry but does not have permission to perform the requested action. Resolution: Verify that the user or principal has the required ACLs for the Schema Registry resource. Review Schema Registry logs for denied operations. Confirm that basic.auth.user.info is correct and that the account has the necessary permissions. |
| 5 | SSL/TLS handshake failure when accessing Schema Registry over HTTPS | Error Description: The client failed to establish an SSL/TLS connection to the Schema Registry. Resolution: Use the correct truststore or keystore. Validate the ssl.endpoint.identification.algorithm setting. Ensure that the Schema Registry URL hostname matches the certificate’s subject or SAN entries. |