My Workspace
My Workspace in askEdgi provides a centralized environment for ingesting data, connecting catalog assets, organizing workspace content, and performing AI-assisted discovery and analysis. It unifies data ingestion, intelligent exploration, live data access, and automated insights, enabling users to interact with structured and file-based data, discover patterns, and build reusable analytical workflows within a scalable workspace.
The workspace interface supports clear separation between ingested data and live external sources, improved search and navigation, and enterprise-ready data management across uploaded files and catalog assets.
Interface Overview
The My Workspace interface consists of:
Data ingestion controls for uploading files and adding catalog assets
Structured Data Objects sections for Imported Objects and Live Sources
Unified search across workspace content
AI-driven exploration and chat workflows
Right-side dynamic panel for previews, outputs, and conversations.
Data Ingestion Controls
File Upload
Initiate File Selection
Navigate to the My Workspace interface.
Select the Files option to open the upload modal window.

Execute File Transfer
Utilize either of the following methods:
Drag and drop supported files directly into the designated area.
Select the 'Browse to Upload' button to open the system file browser, then choose and confirm the file for upload.

Complete Upload Process
The system validates file format and size automatically.
Once validation is complete, the file appears in the workspace data list, ready for analysis.
Supported File
Accepted Formats
CSV, PQT, XLSX, JSON
Maximum Capacity
1 GB per file
The modal window remains active during file processing to provide real-time upload status.
Catalog Integration in askEdgi
askEdgi enables users to add catalog data objects and supported file-based datasets directly into the workspace, ensuring consistent ingestion behavior across catalog and upload workflows.
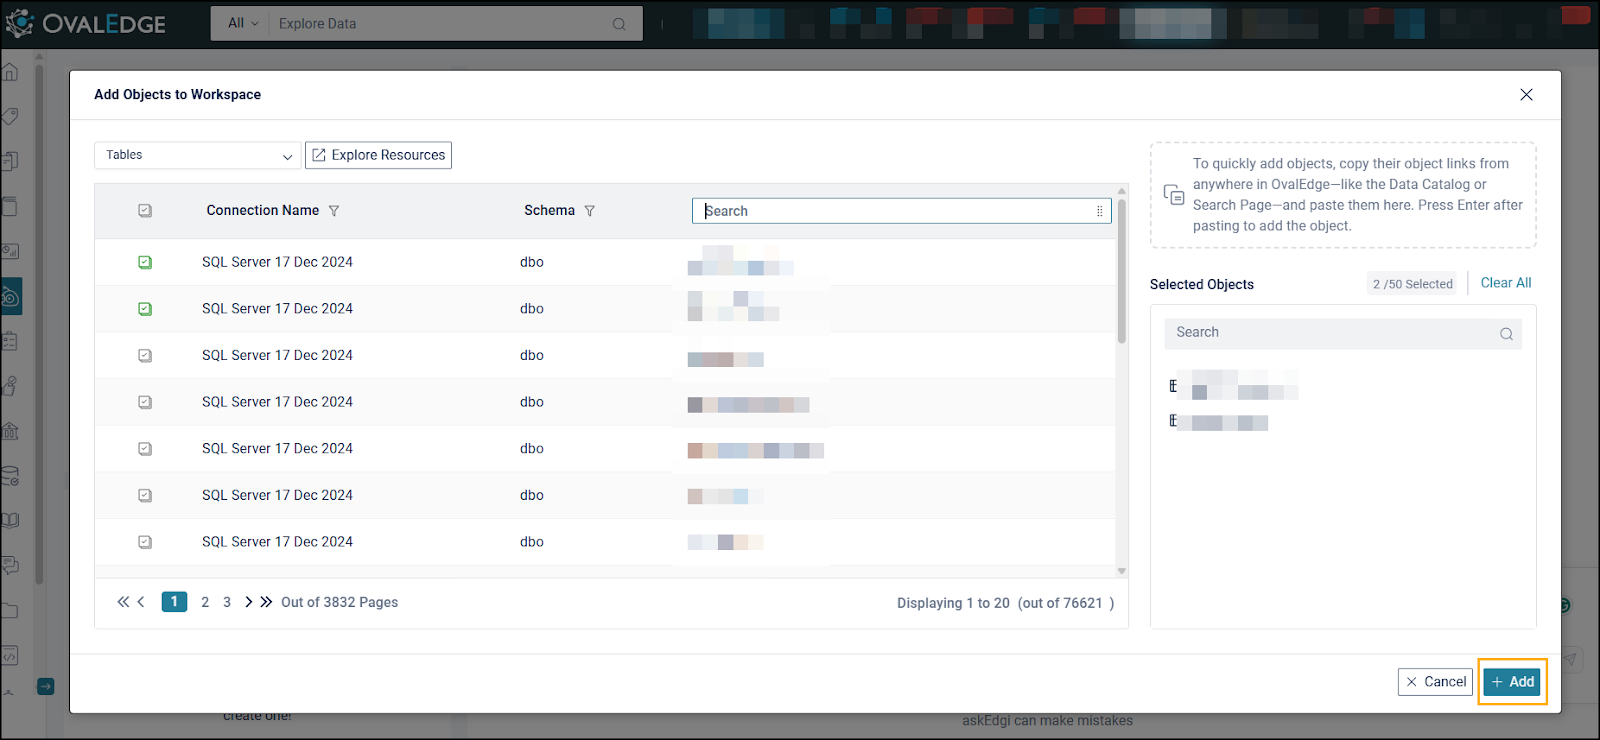
Initiate Catalog Selection
Navigate to the My Workspace interface
Select the + Catalog option to enable the Add Objects to Workspace modal.

This interface allows users to discover, filter, and select cataloged data assets as well as supported file uploads available through the Data Catalog.
Browse and Select Catalog Assets The Add Objects to Workspace window displays all crawled, indexed, and permissioned catalog assets, including supported file-based datasets.

Users can locate assets using either of the following methods:
Use the search bar or filtering options to quickly find specific catalog objects or file-based datasets. File types such as CSV, PQT, XLSX, and JSON.
Select Explore Resources to navigate to the Data Catalog interface, where users can browse catalog folders and datasets.
Select one or more desired assets using the checkbox selection control.
Click the + Add button to confirm and ingest the selected objects into the workspace.
Selected items become available for analysis, discovery, AI conversations, and downstream workflows without requiring duplicate uploads.
Supported File Types from Data Catalog
Users can add all file formats supported by askEdgi uploads directly from the Data Catalog widget, including:
CSV
PQT
XLSX
JSON
Data Objects Organization in My Workspace
Imported Objects
Imported Objects represent workspace-ingested data, including:
Files uploaded through Upload
Objects added from Catalog
Outputs generated through recipes
These objects:
Are stored inside the workspace engine
Support organization into folders
Can be moved within the Imported Objects section
Are fully available for search, discovery, transformation, and AI analysis
Objects cannot be moved to Live Sources, ensuring ingestion integrity.
Live Sources
Live Sources represent external connections that are not ingested into the workspace.
These sources:
Are queried live at runtime
Remain read-only external references
Do not support folder creation or object movement
Cannot be moved into Imported Objects
This maintains clear separation between stored workspace data and real-time external systems.

Unified Search Across Workspace Content
A single search bar under Data Objects enables scalable search across:
Imported Objects
Live Sources
Workspace tables
Files
Folders
Chats
Live connections
Access to catalog assets depends on the organization’s metadata governance and access control settings. Non-permissioned datasets remain hidden from view.
Catalog-linked datasets maintain metadata lineage and can be referenced directly in AI analysis or recipes without duplicating data.
Tooltip for Object Source Identification
To improve clarity in My Workspace, tooltips for uploaded or added objects now display the fully qualified object name in the format:
connection.schema.object.
This helps users quickly identify the original data source when multiple connections contain similar table names.
Behavior Details
Tooltip displays the connection name, schema name, and object name.
Applies only to tooltip display - no impact on recipe ingredients or underlying object mapping.
Enhances usability when working across multiple data connections.

Retry Upload for Failed Objects in My Workspace
askEdgi My Workspace supports uploading data objects from files and the Data Catalog. To improve resilience against temporary failures such as network interruptions or system timeouts, askEdgi now provides a Retry Upload option for failed ingestion attempts.
This enhancement eliminates the need to delete and re-add failed uploads, saving time and reducing repeated effort - especially for large datasets.
Upload Failure Handling Behavior
When an object upload fails in My Workspace, the system marks the object with a Failed status and exposes a Retry Upload action.
Common Failure Scenarios
Network interruptions
Temporary connectivity issues
Large dataset upload timeouts
System or service disruptions
Retry Upload Action
When an Upload Fails
The object status displays Failed
A Retry Upload button or icon appears next to the failed object
Users can retry without deleting or re-adding the object
Executing a Retry Upload
Steps to Retry a Failed Upload
Navigate to askEdgi → My Workspace
Locate the object with status Failed
Select the Retry Upload action next to the failed object

The system re-attempts ingestion, either:
Resuming from the last known progress (if supported), or
Restarting the upload gracefully
Upload progress is updated in real time
On success, the object becomes Available for Analysis
System Behavior During Retry
If Retry Succeeds
Upload completes successfully
Object status updates to Ready
Object becomes available for:
Discovery
Analysis
AI Chat
Recipes
Downstream workflows
If Retry Fails Again
Status remains Failed
User can retry again or choose to delete the object
Failure reason remains visible for troubleshooting
Global Search Across Workspace in askEdgi
The askEdgi search feature provides a unified interface for locating workspace assets, including data objects, folders, files, live connections, and previous chat interactions. This enhancement enables faster discovery across multiple content types while maintaining clear navigation and consistent behavior. Search results are grouped logically and support seamless redirection to the relevant view, improving efficiency and reducing time spent browsing the workspace.

Executing a Data Object Search
Navigate to the top section of the My Workspace panel where the primary navigation icons are located.
Select the Search icon to open the unified search panel.
View the list of recent items, grouped under time-based headers such as Yesterday and Older.
Enter the name of a data object, folder, file, live source, or chat in the search field.
Review the consolidated results list, where different result types are visually distinguished using appropriate icons.
If a data object is selected, the corresponding object view opens in the workspace.
If a folder is selected, the right panel updates to display the folder contents.
If a chat is selected, the associated conversation opens for review or continuation.

Data Catalog - Workspace Projects Integration
This section explains the functional details of the Workspace integration within AskEdgi and its behavior across modules, including Projects, Data Catalog, Business Glossary, Data Stories, and Search Results.
Operational Framework
The AskEdgi Workspace operates as a personal project within the Projects module and receives data objects from multiple areas, including the Data Catalog, Business Glossary, Data Stories, and Search Results. Tables and files can be added to the workspace from the AskEdgi interface. Still, direct workspace management actions from other modules are governed by clear rules to ensure consistent behavior and data governance.
“My Workspace” functions as a default personal project with defined validations, icon behavior, access checks, duplicate checks, workspace limits, and visual indicators. Only supported object types, including tables and files, can be added to the workspace. Other object types, such as glossary terms and data stories, remain restricted to standard projects.
Feature Details
Projects List View
Project Type
My Workspace displayed as Username Workspace
Description
Non-editable to maintain workspace integrity
Data Catalog List View
Tables and Files
Workspace icon visible
All other object types
The icon appears greyed out to indicate restriction
Manage Project navigation
Log in as an Administrator.
Navigate to the Data Catalog module from the main application menu.
Select one or more data objects from the list.

Click on the Nine-Dot menu.
Select the Manage Projects.
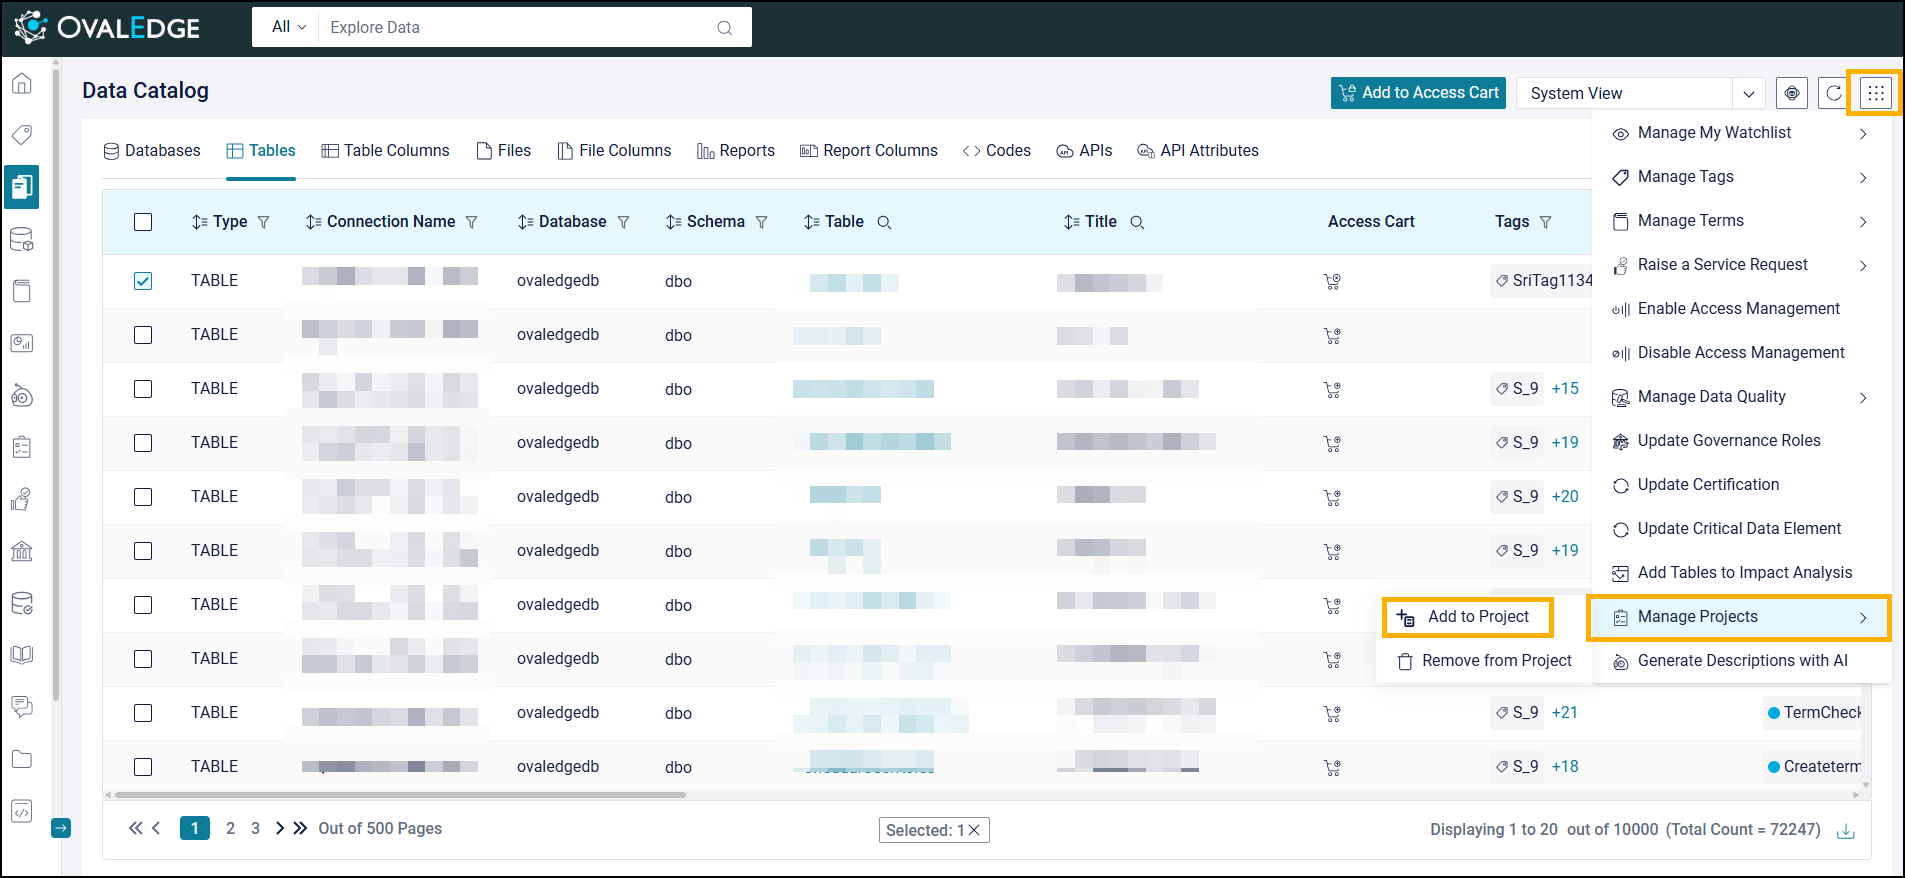
Click Add to Project.

The system displays the list of eligible projects based on the selected object types.
Choose a target project from the displayed list.
The system validates duplicate entries, data access, and workspace limits.
The system displays the relevant success or validation message.
Data objects where user has minimum Data Read access permission are added to the selected project.
Validation rules for adding to My Workspace
Duplicate Check
If the object already exists, it is skipped
Some table(s) or file(s) already exist in your workspace and will not be added again
Mixed Duplicate and New
Some exist, and some are new
X of the selected tables or files already exist in your workspace. The remaining Y have been added successfully
Access Check
Object added, but access flagged if Data Read Access is missing
Error message displayed
Workspace Limit
Workspace limit reached
X of Y objects added to the workspace. Workspace has reached its limit of N tables or files. Please remove some objects before adding new ones.
Connector availability is validated before adding objects to ensure AskEdgi access readiness
3. Data Catalog Summary View
Add to Project behavior
Only non-table or file objects
My Workspace is not displayed when Add to Project is clicked
Only tables or files
My Workspace displayed
Validation
Messages match those shown in Data Catalog List View
Examples
The selected table(s) or file(s) already exist in your workspace and will not be added again.
Workspace limit exceeded: Workspace has reached its limit of X tables or files. Please remove some objects before adding new ones.
4. Business Glossary, Data Stories, and Impact Analysis
Add to Project behavior
Default Project is My Workspace
Only tables and files are supported
Business Glossary Terms and Data Stories
Cannot be added to My Workspace
Alternate routes, including bulk selection
My Workspace is not shown
Icon behavior
From the Business Glossary List View, the default project icon changes to a greyed-out state.
Only data objects, including tables and files, are allowed in My Workspace.
Glossary terms, Data Stories, and Impact Analysis items remain associated with standard projects.
5. Search Page Results
For Tables and Files
My Workspace icon is displayed.
Validation checks performed including
Duplicate check
Access check
Workspace limit check
For other object types
The " Add to Project” button is greyed out.

askEdgi Workspace Health, Controls, and Upgrade Options
This section describes the required improvements to the AskEdgi Workspace to provide real-time visibility into system performance and the ability to take corrective actions when the workspace becomes slow or unresponsive.
Business Context and Problem
Users experience situations where the AskEdgi Workspace becomes unresponsive or takes extended time to load. The current interface does not display detailed workspace health information, and no recovery actions are available. Workspace stability, responsiveness, and management flexibility are critical for uninterrupted analysis and productivity.
The enhanced interface introduces health insights, session controls, and upgrade capabilities directly within the Workspace Status panel.
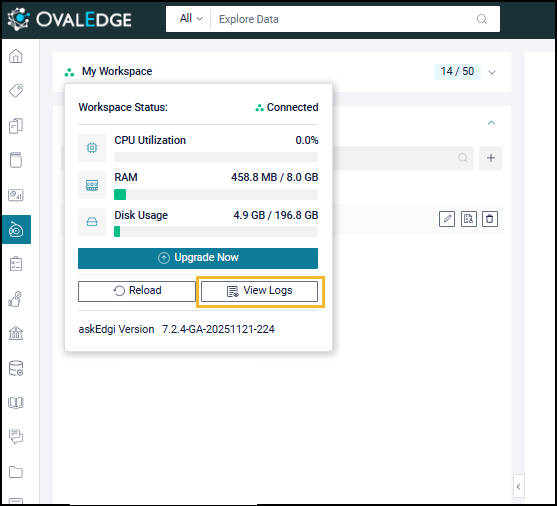
Workspace Status Interface:
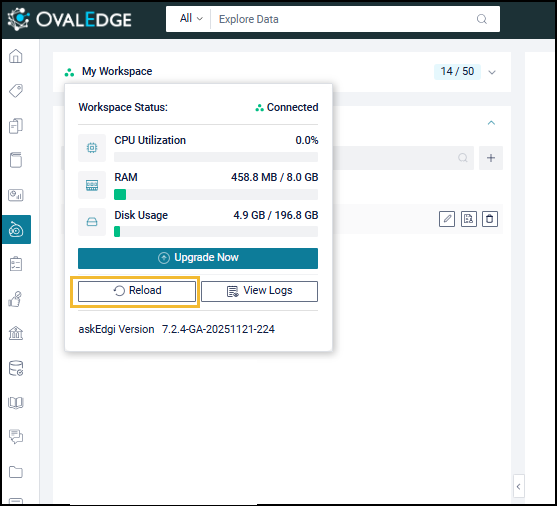
Click the Connected icon on the left side of the workspace. The workspace Status Interface will appear.

Feature Details
Enhanced Workspace Status Interface The existing Workspace Status panel displays only the connection state and CPU utilization. The panel is expanded to include additional workspace management actions.

Workspace Status Options
View Logs
Opens a modal with recent workspace logs including last N operations such as queries, uploads, joins, failures with timestamps and severity levels including info, warning, error
Displayed below the CPU Utilization bar
Restart
Restarts the workspace session. Clears DuckDB cache, reloads objects, and resets the state without removing uploaded files
Displayed beside the Logs button
Upgrade
Opens a modal or dropdown that offers workspace configuration upgrades including table limits, memory allocation, CPU quota. Initiates backend provisioning workflow
Displayed below the CPU Utilization
These actions provide transparency, control, and scalability within the workspace environment.
Force Restart Mechanism
The Reload action performs a controlled restart of the DuckDB session.
On the Workspace status interface, click the “Reload” button. Reload Container pop-up will appear.
On the Reload Container pop-up, click the Reload Container button.
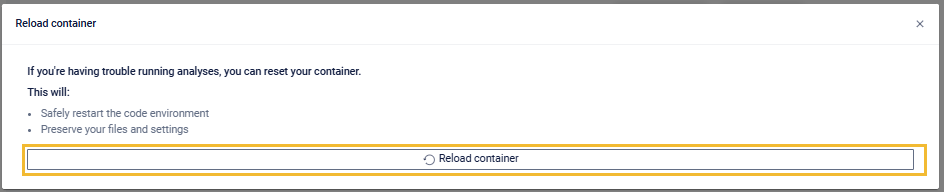
System Behavior
Gracefully terminates the current DuckDB session
Clears temporary workspace cache
Reloads workspace metadata
Displays a confirmation prompt
Completion Toast
Workspace reloaded successfully
Restart actions do not remove files uploaded by the user.
Logs Management
A dedicated Logs Modal provides operational history for diagnostics.
On the Workspace status interface, click the “View Logs” button.
Logs pop-up will appear.
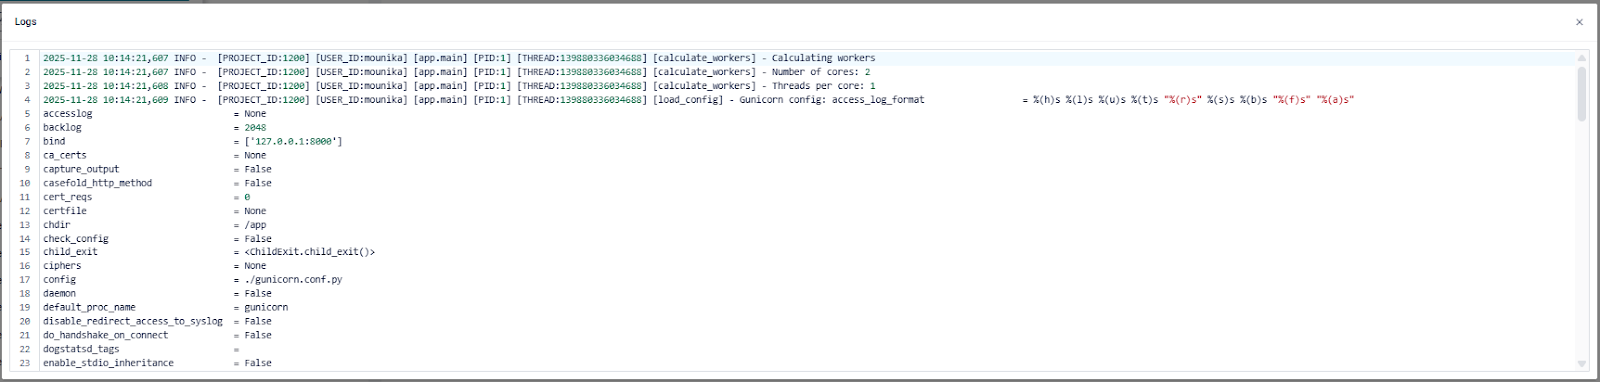
Logs assist in identifying performance issues and operational failures.
Upgrade Mechanism
The Upgrade option allows users to increase workspace capacity when limits are reached.
Upgrade Behavior
Opening the Upgrade modal displays available configuration enhancements
Selecting a container applies an upgrade to the workspace
The upgrade is chargeable to the end user
Upgrades adjust workspace performance factors such as storage, table capacity, memory, and processing power.
Workspace Upgrade Steps
On the Workspace status interface, click the “Upgrade Now” button.
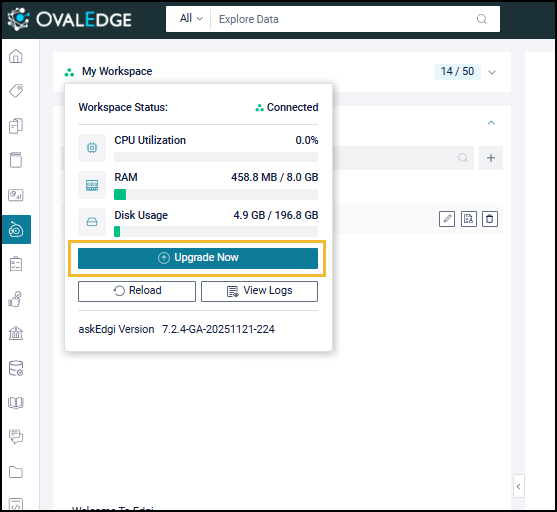
The Upgrade modal appears displaying available container options.
Select the required container type: Standard, Medium, or Large.

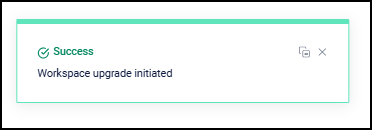
Click the Select button to apply the chosen upgrade.
A Workspace upgrade initiated message pop-up appears confirming the action.
Visual and UX Enhancements
The Workspace Status section includes animated indicators to reflect the live state of the workspace.
🟢 Connected
Workspace is active and available
🟠 Restarting…
Workspace is in restart or reload mode
🔴 Disconnected
Workspace is unavailable or failed to load

These indicators improve awareness of workspace responsiveness and system health.
Context Focus Selection
The Context Focus Selection feature enables targeted analysis by allowing users to pin specific workspace objects. This action directs the AI assistant to reference the selected items during interactions. The focused context remains persistent across sessions and supports multi-object analysis when multiple items are pinned.
Initiate Analysis Focus
Locate the pin icon labeled "Pin to focus your analysis" adjacent to each file or data catalog object within the workspace.
Select the pin icon for each relevant item to focus analysis on that specific dataset.

Execute Context Limitation
The AI chat system automatically detects all pinned items.
The assistant restricts its analysis exclusively to the selected objects.
All subsequent queries and operations reference only the pinned dataset.
When multiple items are pinned, the AI assistant performs cross-object analysis and identifies relationships within the selected dataset. The focus remains active until manually cleared by deselecting all pinned items.
Folder Structure
The Folder Structure feature in askEdgi Workspace allows efficient organization of tables, files, and other objects. It enables logical grouping, simplifies navigation, and supports workspace management by allowing actions at both the object and folder levels. This functionality enhances workspace usability and provides a scalable foundation for managing various assets in a structured manner.
Objects must be successfully added to the workspace before they can be moved into folders.
Folder Creation
Folders can be created inside the workspace and assigned custom names.
Naming Conventions:
Each folder name must be unique.
Maximum length: 256 characters
Minimum length: 1 character (empty spaces are not valid)
Allowed characters: Letters, numbers, spaces, and special characters _ (underscore), - (hyphen), . (period), () (parentheses), [] (square brackets), @ (at sign), and # (hashtag).
Steps to Create a Folder
Navigate to askEdgi > Workspace.
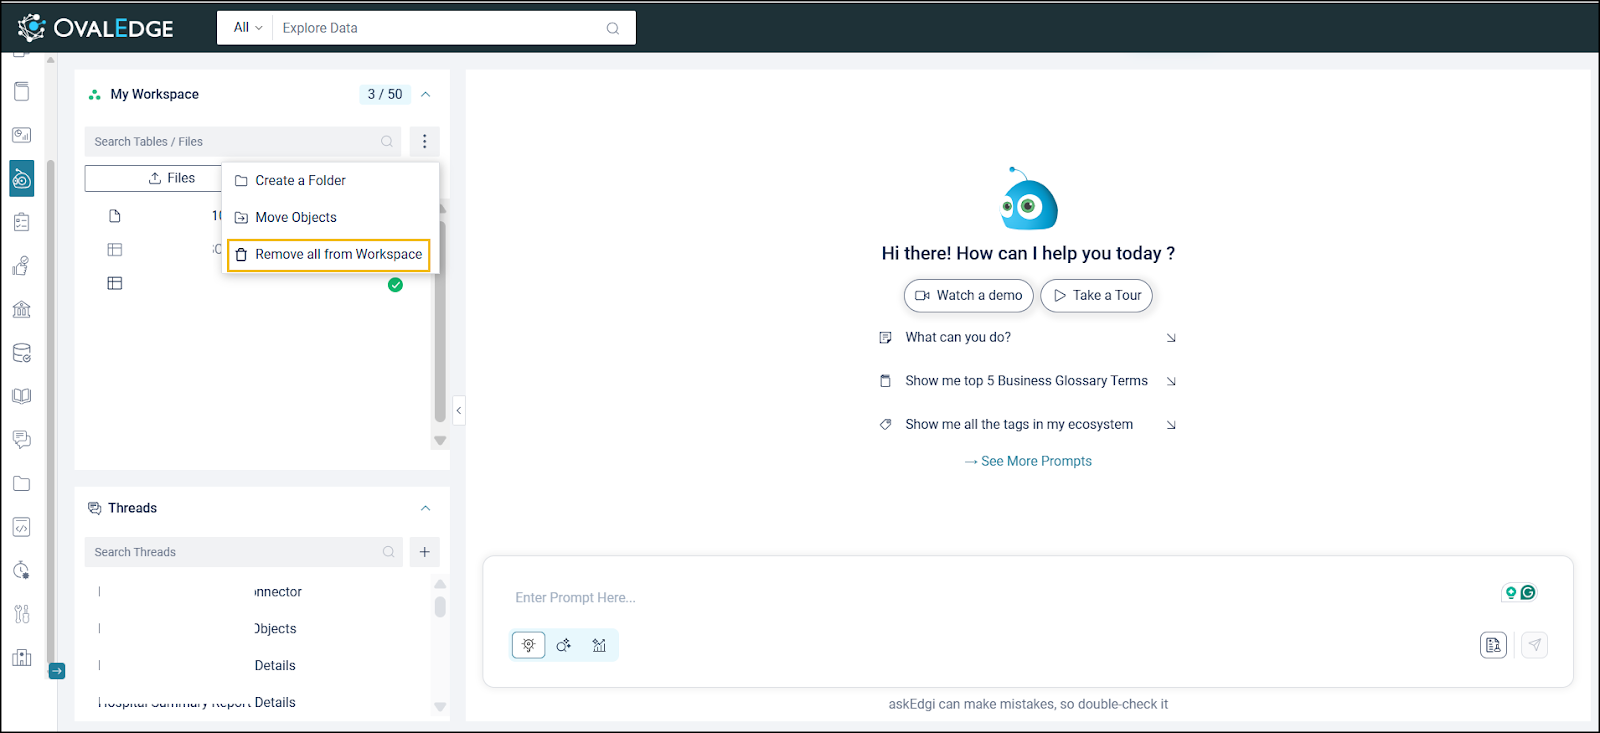
Click the three-dot menu beside My Workspace Search.
Select Create a Folder.

Enter the desired folder name.
Click the tick mark icon to save and create the folder.

Object Management within Folders
Moving Objects into a Folder
Objects such as tables or files can be added to folders using drag-and-drop or selection options.
Steps to Move Objects
Select one or more objects in the workspace.
Drag and drop them into the desired folder.
Objects are automatically sorted alphabetically within the folder.

Removing Objects from a Folder
Objects can be moved out of folders using drag-and-drop actions.
Steps to Remove Objects:
Hold and drag the object from the folder.
Release it outside the folder area.
The object will no longer belong to that folder but will remain in the workspace.
Moving Multiple Objects between Folders
Click the three-dot menu.
Select Move Objects.

The Move Objects pop-up modal will appear.
Choose the target folder.
Confirm the move in the pop-up confirmation window.
The selected objects will be moved to the specified folder.
Folder Deletion
Folders can be deleted from the workspace with confirmation.
Steps to Delete a Folder:
Hover over the folder name to display the Delete icon.
Click the Delete icon.
A confirmation pop-up will appear.
Confirm whether to delete the folder or move the contained objects to another folder.
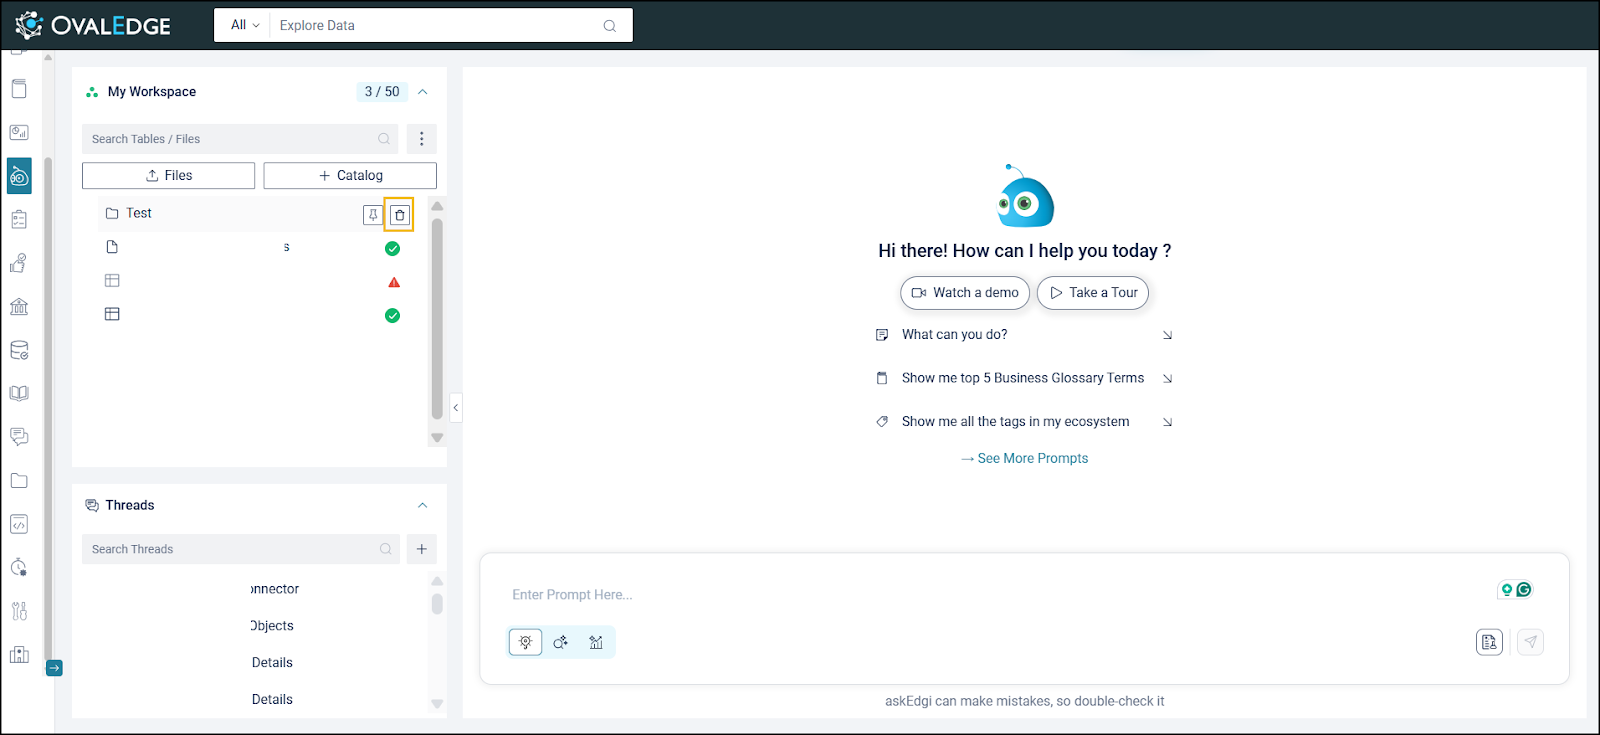
Removing All Objects from Workspace
Click Remove All from Workspace.
Confirm the action in the pop-up window.
All folders and objects will be removed from the workspace.
Pinning Behaviour
When an object inside a folder is pinned, only that object is moved to the top of the folder.
The entire folder does not move to the top of the workspace.
Copyright © 2025, OvalEdge LLC, Peachtree Corners, GA USA
Last updated
Was this helpful?