> For the complete documentation index, see [llms.txt](https://docs.ovaledge.com/llms.txt). Markdown versions of documentation pages are available by appending `.md` to page URLs; this page is available as [Markdown](https://docs.ovaledge.com/release8.1/installation-and-settings/integrations-with-enterpirse-apps/jira-integration.md).
# Jira Integration
OvalEdge supports integration with JIRA, allowing users to track and approve service requests efficiently. JIRA fields can be mapped to corresponding Service Desk fields in OvalEdge, with the flexibility of one-to-one, one-to-many, or many-to-one mappings.
{% hint style="info" %}
The minimum supported JIRA version for OvalEdge integration is JIRA R8.0 or higher.
{% endhint %}
Once integrated, JIRA can be configured as part of the workflow to act as an approver, where requests require JIRA approval to proceed, or simply to track service requests in JIRA without requiring approval.
In OvalEdge, JIRA can be integrated into a specific Service Desk Template using the integration functionality. Once JIRA is set up, metadata from JIRA is fetched, and Service Desk Template fields in OvalEdge are mapped to the corresponding JIRA fields. After mapping, workflows are configured to either use JIRA as an Approver or as a Tracker:
* **Approver:**
* When JIRA is set as an approver, the service request in OvalEdge will not progress until it is approved in JIRA.
* If a service request is created in OvalEdge, it awaits approval in JIRA and displays the JIRA ticket ID and status.
* Once approved or rejected in JIRA, the status is synced back to OvalEdge either by an automated job that runs every 30 minutes or by a manual sync.
* If approved, the service request is fulfilled in OvalEdge.
* If rejected, the service request is either reopened for further approval or closed.
* A reopened request will undergo the same approval process in JIRA until it is approved or rejected.
* **Tracker:**
* If JIRA is used as a tracker, the service request in OvalEdge is mirrored in JIRA without affecting the approval flow in OvalEdge.
* A JIRA ticket is created, and its ID is displayed in the service request in OvalEdge for reference. However, there is no dependency on JIRA for approval; the ticket is tracked independently in JIRA.
## Set up JIRA in OvalEdge
To configure JIRA in OvalEdge, follow these steps:
1. **Log in to OvalEdge:**
1. Access the OvalEdge application using your credentials.
2. **Navigate to Integrations:**
1. Go to **Administration** > **Integrations**.
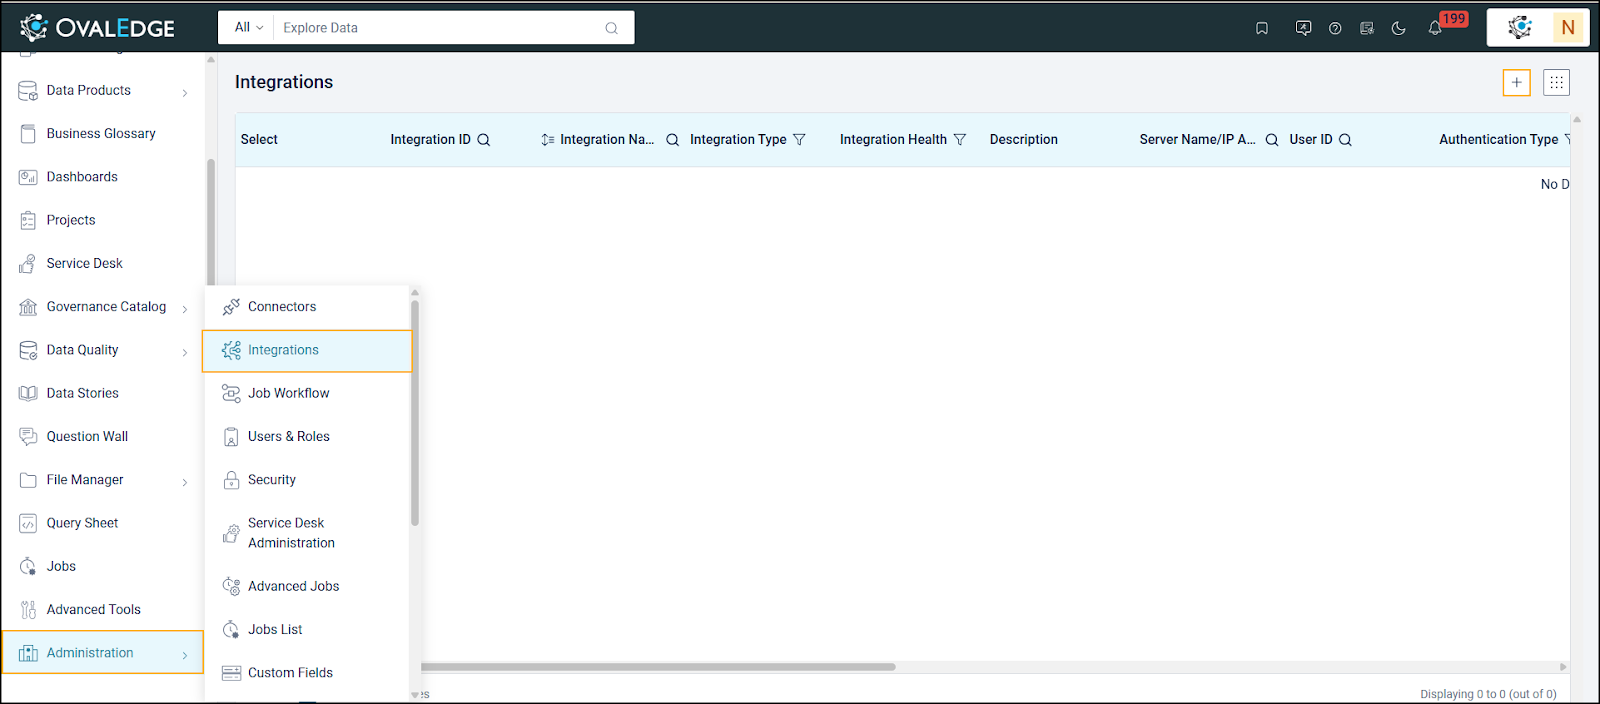 2. Click **+ (Add Integration)** button at the top right corner of the page.
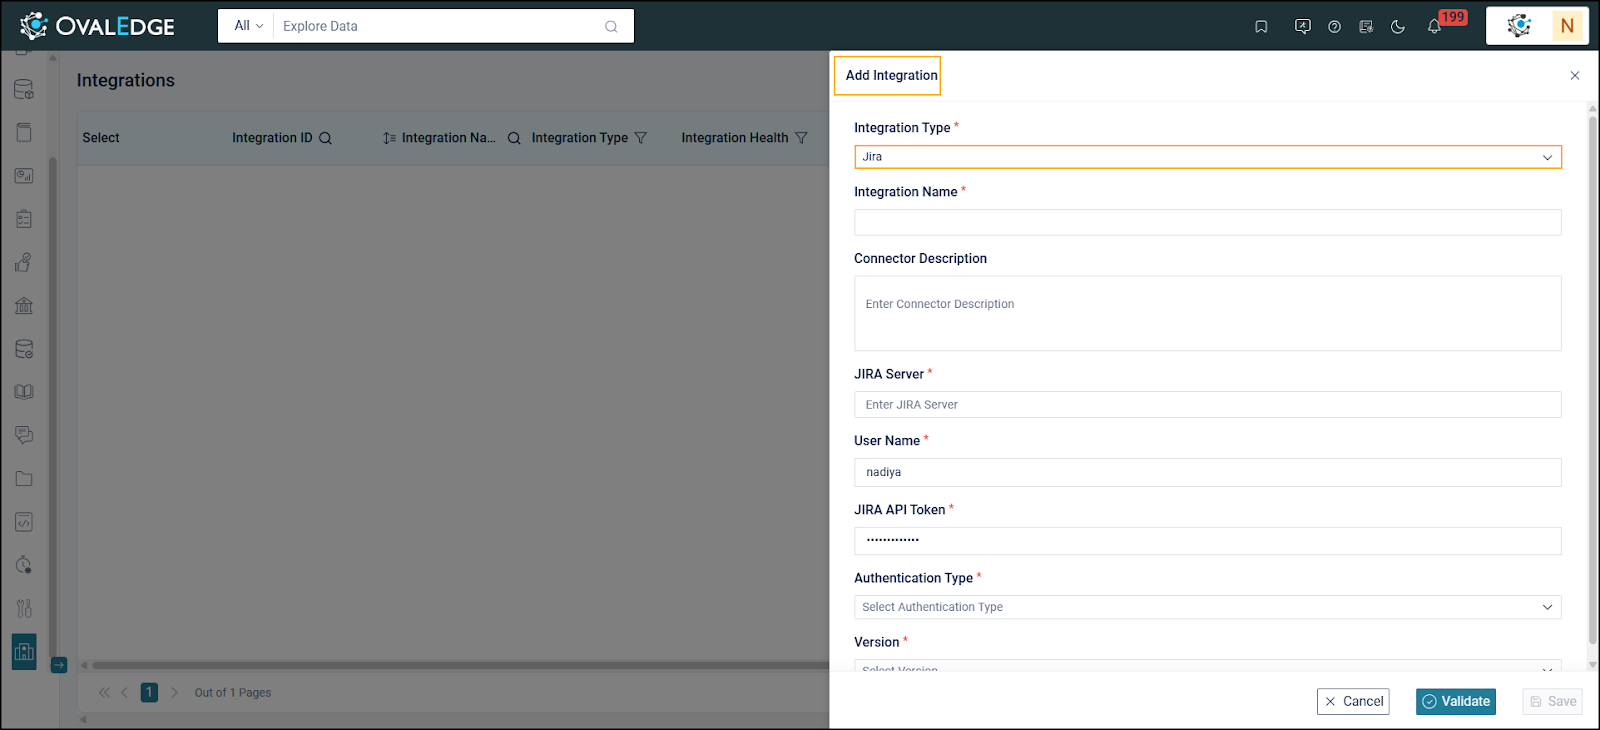
3. An **Add Integration** shutter is displayed. Select the **Integration Type** as Jira from the dropdown lists.
2. Click **+ (Add Integration)** button at the top right corner of the page.
3. An **Add Integration** shutter is displayed. Select the **Integration Type** as Jira from the dropdown lists.
 3. **Enter Integration Details:**
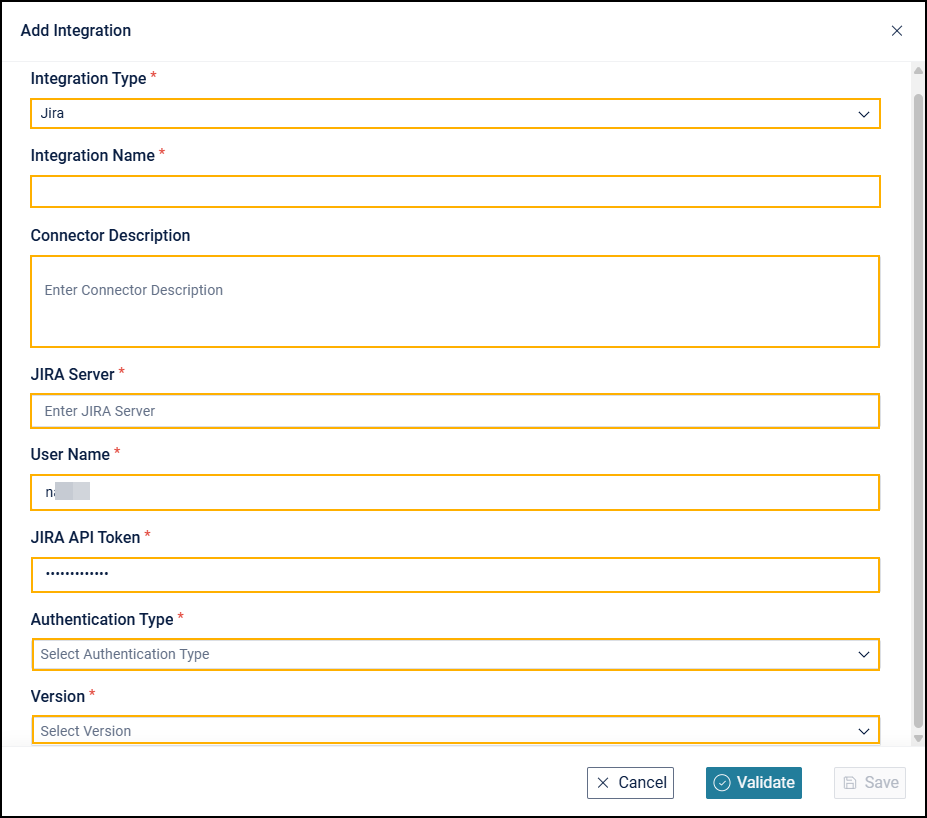 1. **Integration Name**: Provide a name for the integration (e.g., JIRA).
2. **Connector Description**: Add the connector description.
3. **JIRA Server**: Enter the JIRA instance URL (e.g., ).
4. **Username**: Input the username associated with the JIRA server.\
\
**Note**: To integrate JIRA with OvalEdge, the user linked to the API token must at least have Create Issues or Browse Projects permissions. These permissions allow the user to create issues and perform other actions through the API.
5. **JIRA API Token**: Provide the secure token for accessing the JIRA API.\
\
**Note**: The provided token is exclusive to the OvalEdge application and is not valid for other applications.
6. **Select Authentication Type**:
1. Choose the authentication type for verifying user identity:
1. Basic
2. Bearer
7. **Version**: Enter the JIRA server version details, whether installed on a dedicated server (on-premise) or in the cloud.\
\
**Note**: The minimum TLS version must be 1.2 for the two applications to integrate. For Basic and Bearer authentication, use the same configurations and parameters.
4. **Validate and Save:**
1. Click **Validate** to verify the connection details.
1. **Integration Name**: Provide a name for the integration (e.g., JIRA).
2. **Connector Description**: Add the connector description.
3. **JIRA Server**: Enter the JIRA instance URL (e.g., ).
4. **Username**: Input the username associated with the JIRA server.\
\
**Note**: To integrate JIRA with OvalEdge, the user linked to the API token must at least have Create Issues or Browse Projects permissions. These permissions allow the user to create issues and perform other actions through the API.
5. **JIRA API Token**: Provide the secure token for accessing the JIRA API.\
\
**Note**: The provided token is exclusive to the OvalEdge application and is not valid for other applications.
6. **Select Authentication Type**:
1. Choose the authentication type for verifying user identity:
1. Basic
2. Bearer
7. **Version**: Enter the JIRA server version details, whether installed on a dedicated server (on-premise) or in the cloud.\
\
**Note**: The minimum TLS version must be 1.2 for the two applications to integrate. For Basic and Bearer authentication, use the same configurations and parameters.
4. **Validate and Save:**
1. Click **Validate** to verify the connection details.
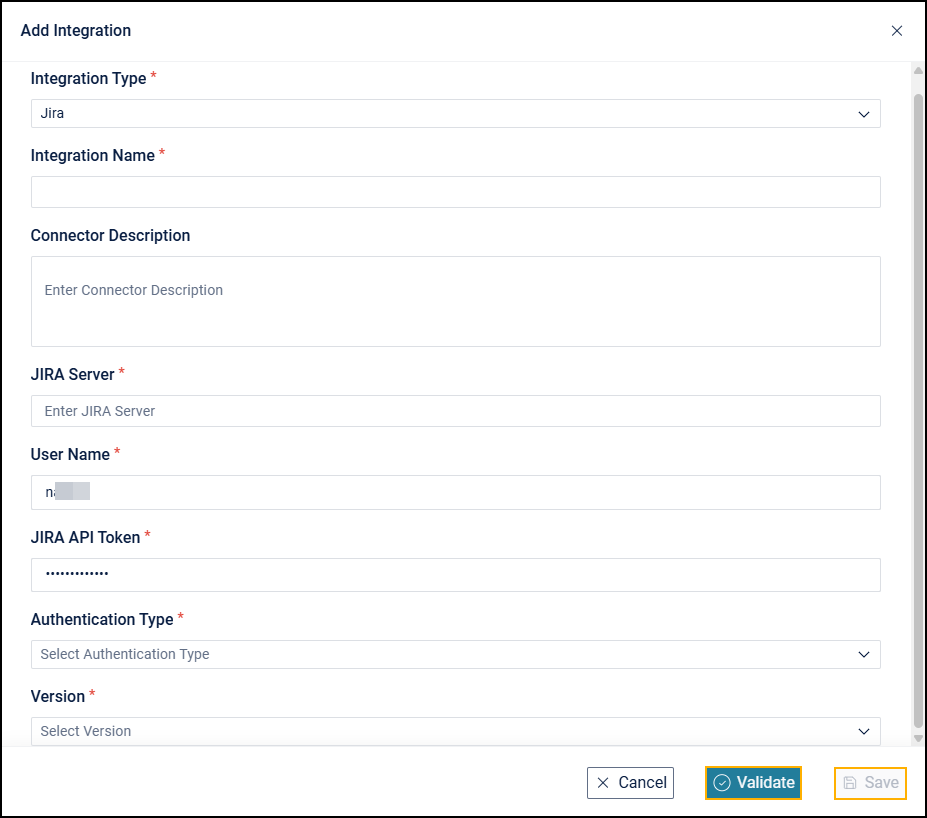 2. Click **Save** to store the integration. The saved details will be displayed under the JIRA tab.
3. After the integration is saved, metadata from the JIRA server will be fetched.
4. Map the **Service Desk Template fields** with corresponding **JIRA fields**.
5. Add the mapped fields to approval workflows as needed.
## Mapping Fields
### **Mapping JIRA Fields with Service Desk Template Fields in OvalEdge**
The mapping process in OvalEdge links JIRA fields to the fields in the Service Desk Template within OvalEdge. This allows service requests raised in OvalEdge to be pushed to JIRA, ensuring consistency between both systems. Depending on the use case, the mapping can be one-to-one, one-to-many, or many-to-one.
### **Steps to Map JIRA Fields with Service Desk Template Fields**
#### **Access Service Desk Templates**
1. Go to **Administration > Service Desk Administration > Service Desk Templates**.
2. Click **Save** to store the integration. The saved details will be displayed under the JIRA tab.
3. After the integration is saved, metadata from the JIRA server will be fetched.
4. Map the **Service Desk Template fields** with corresponding **JIRA fields**.
5. Add the mapped fields to approval workflows as needed.
## Mapping Fields
### **Mapping JIRA Fields with Service Desk Template Fields in OvalEdge**
The mapping process in OvalEdge links JIRA fields to the fields in the Service Desk Template within OvalEdge. This allows service requests raised in OvalEdge to be pushed to JIRA, ensuring consistency between both systems. Depending on the use case, the mapping can be one-to-one, one-to-many, or many-to-one.
### **Steps to Map JIRA Fields with Service Desk Template Fields**
#### **Access Service Desk Templates**
1. Go to **Administration > Service Desk Administration > Service Desk Templates**.
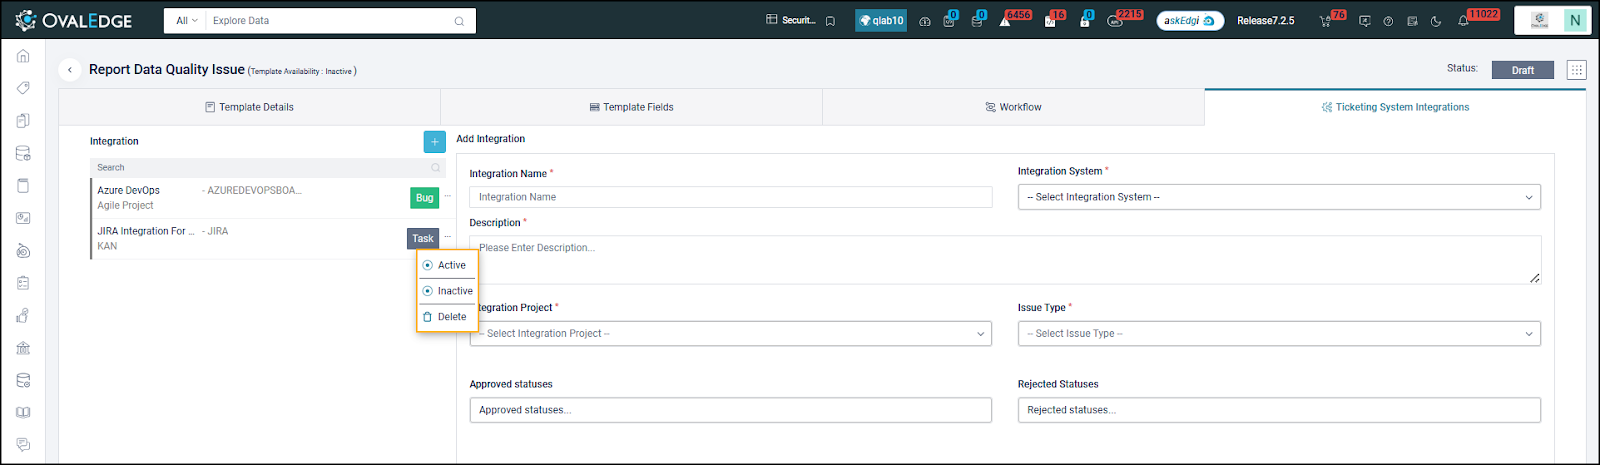
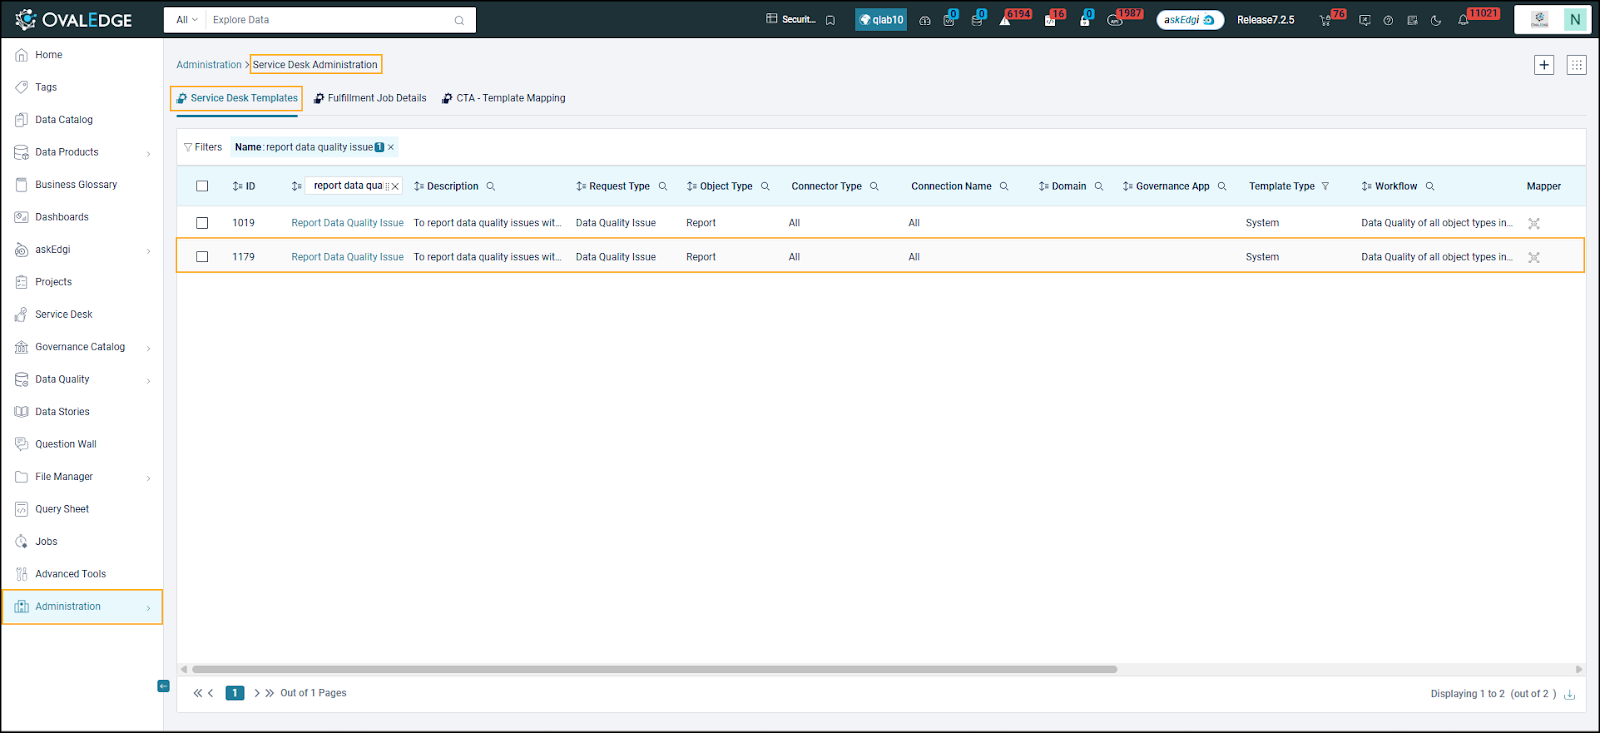 2. Click on the template name to configure the field mapping. This opens the template page displaying **Template Details**. Click the **Ticketing System Integration** tab.
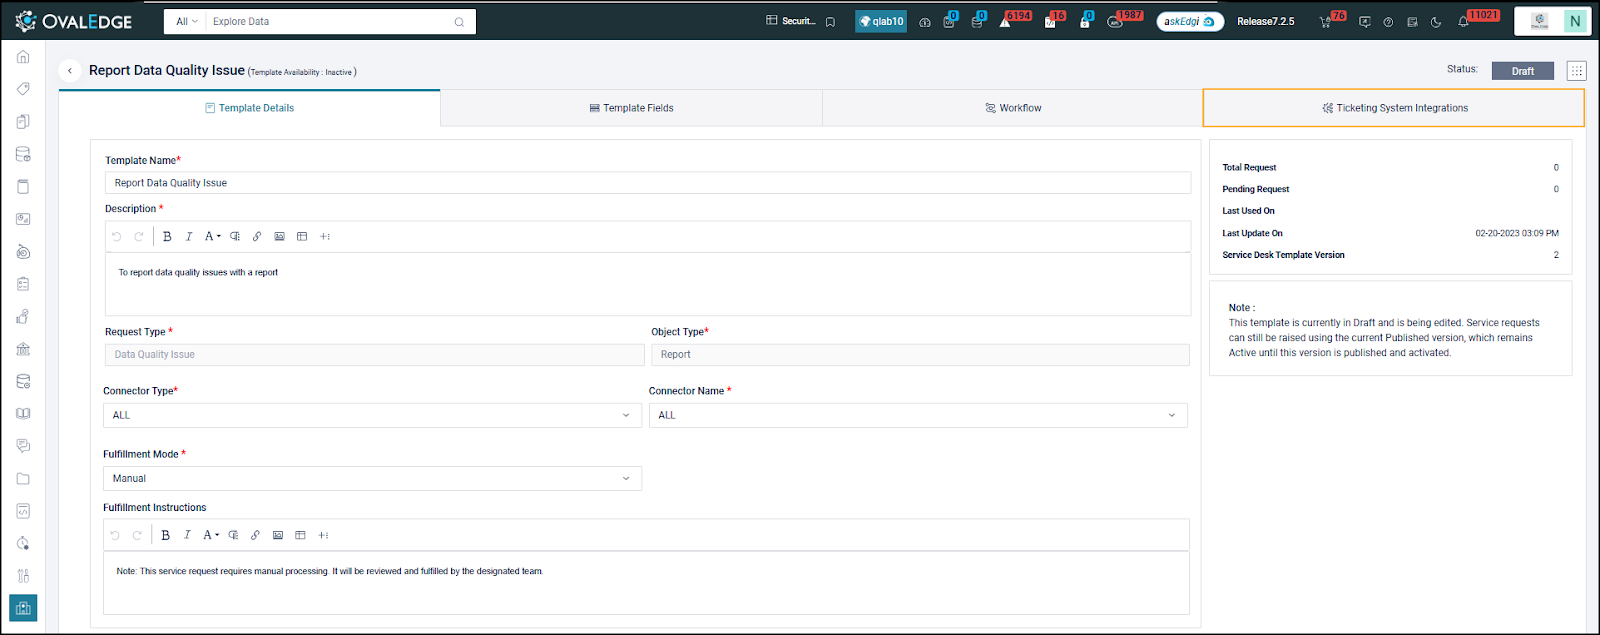 #### **Open Integration Settings**
1. Click on the Integrations Button:
1. On the template page, click the **Integrations** button in the top right corner. This opens the **Add Integration** window.
#### **Open Integration Settings**
1. Click on the Integrations Button:
1. On the template page, click the **Integrations** button in the top right corner. This opens the **Add Integration** window.
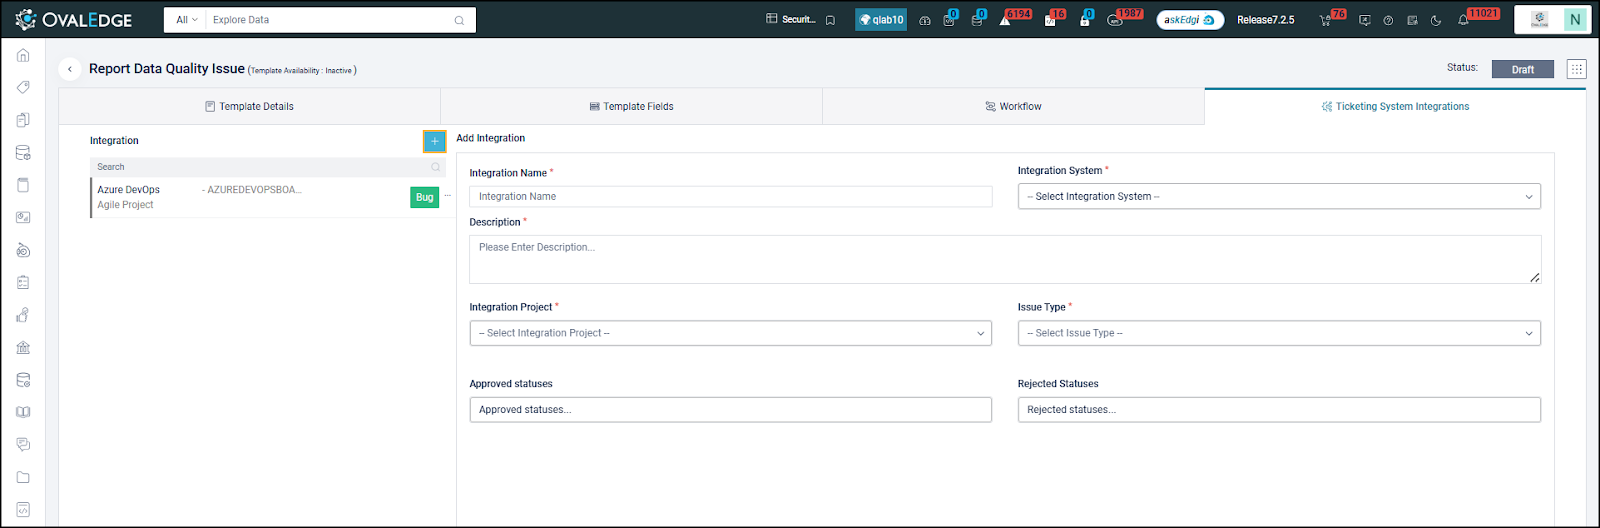 #### **Configure Integration Details**
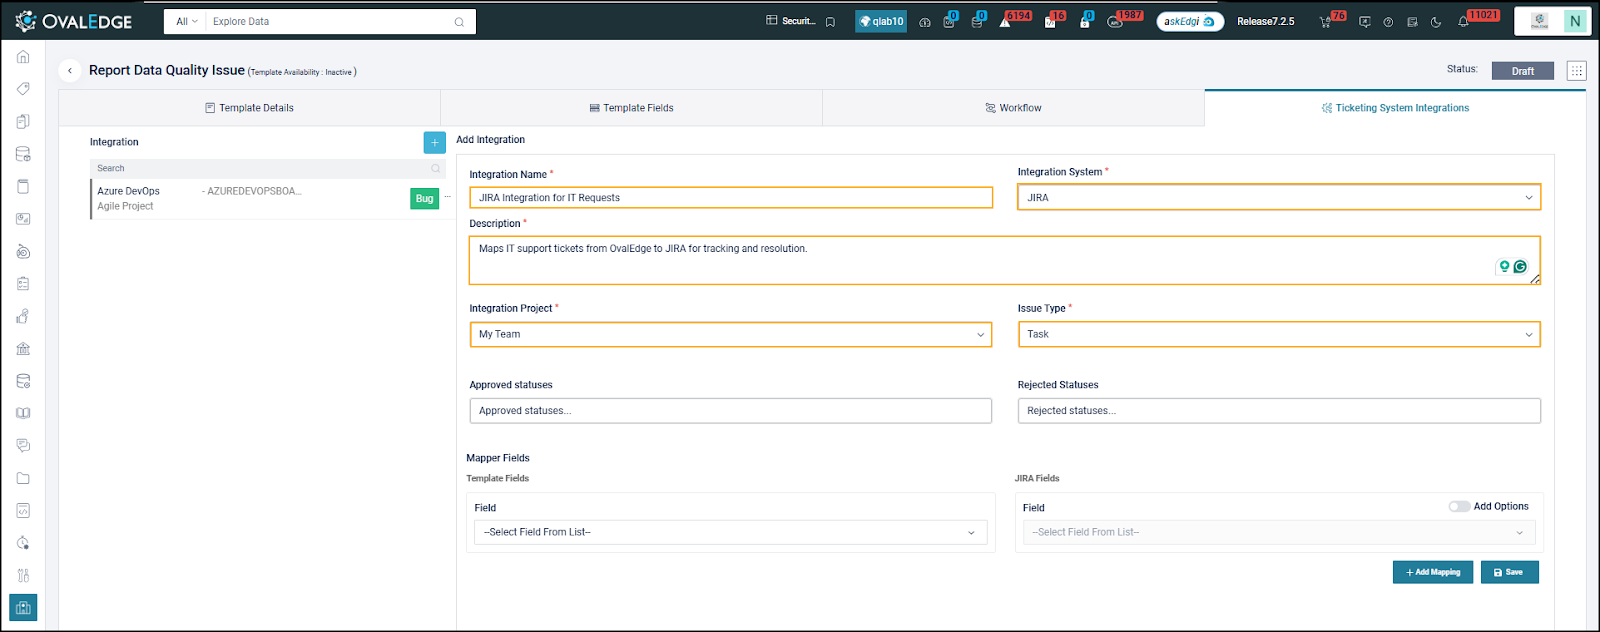 1. Enter Integration Name:
1. In the Integration Name field, enter the name of the integration (e.g., "JIRA Integration for IT Requests").\`
2. Enter Description:
1. In the Description field, briefly explain the integration (e.g., "Maps IT support tickets from OvalEdge to JIRA for tracking and resolution").
3. Select Integration System:
1. From the Integration System dropdown, select **JIRA**. Other available options might include ServiceNow and Azure DevOps.
4. Select Integration Project Mapping:
1. Select the relevant project in JIRA to which the integration should be linked.
5. Select the Issue Type Specification:
1. Specify the type of issue associated with the integration within JIRA, such as Task, Bug, Gap, Feature, etc.
#### **Define Statuses**
1. Enter Integration Name:
1. In the Integration Name field, enter the name of the integration (e.g., "JIRA Integration for IT Requests").\`
2. Enter Description:
1. In the Description field, briefly explain the integration (e.g., "Maps IT support tickets from OvalEdge to JIRA for tracking and resolution").
3. Select Integration System:
1. From the Integration System dropdown, select **JIRA**. Other available options might include ServiceNow and Azure DevOps.
4. Select Integration Project Mapping:
1. Select the relevant project in JIRA to which the integration should be linked.
5. Select the Issue Type Specification:
1. Specify the type of issue associated with the integration within JIRA, such as Task, Bug, Gap, Feature, etc.
#### **Define Statuses**
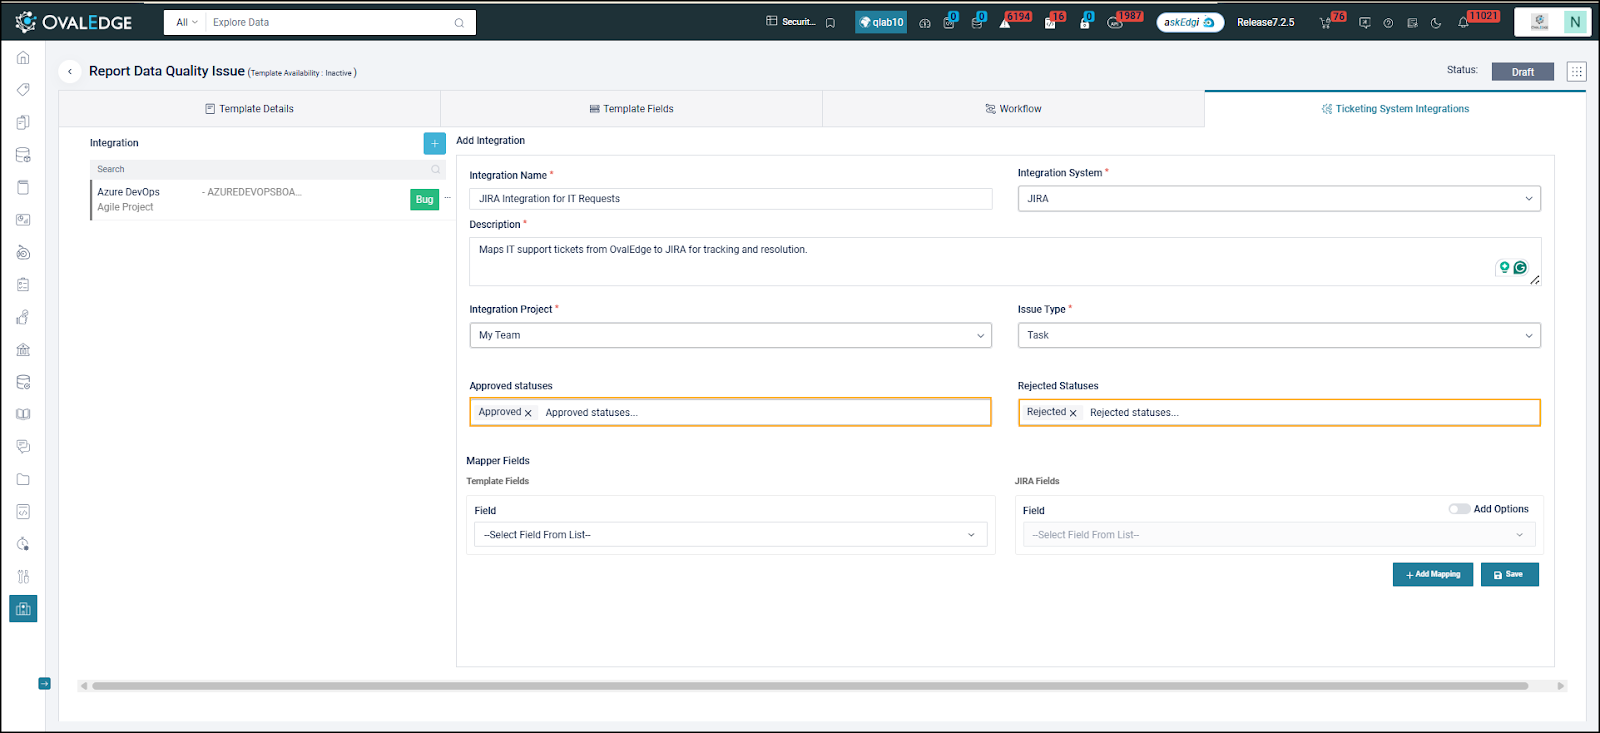 1. Approved Statuses:
1. In the Approved Statuses field, specify the statuses that signify approval (e.g., Approved).
2. Rejected Statuses:
1. In the Rejected Statuses field, specify the statuses that signify rejection (e.g., Rejected).
#### **Map Fields Between OvalEdge and JIRA**
1. Approved Statuses:
1. In the Approved Statuses field, specify the statuses that signify approval (e.g., Approved).
2. Rejected Statuses:
1. In the Rejected Statuses field, specify the statuses that signify rejection (e.g., Rejected).
#### **Map Fields Between OvalEdge and JIRA**
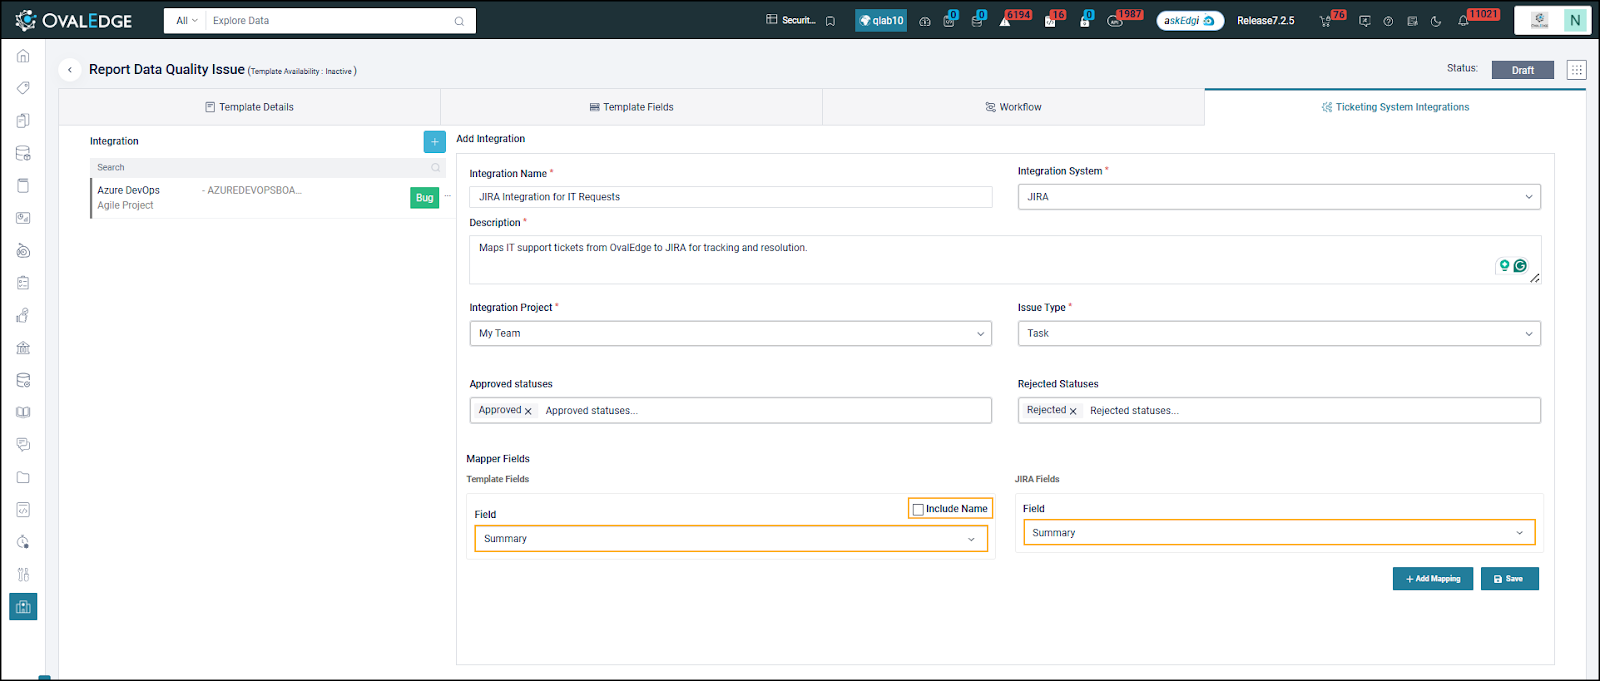 1. Select Service Desk Template Fields:
1. From the dropdown in the Mapper Fields section, select fields from the Service Desk Template. These are the fields defined in the OvalEdge template (e.g., Priority, Request Type).\
\
**Example**: To map the "Priority" field in OvalEdge to the JIRA field, select Priority from the dropdown.
2. Include Name Option:
1. Select the Include Name checkbox to use the selected Service Desk field as a label in JIRA.\
\
**Example**: If the OvalEdge field Priority is mapped to the JIRA field Ticket Type, and Include Name is checked, it will appear in JIRA as **Priority: High**.
3. Select JIRA Fields:
1. From the dropdown, select the JIRA fields to map (e.g., Ticket Type, Request Priority).\
\
**Example**: To map the Priority field in OvalEdge to the Ticket Type field in JIRA, select Ticket Type.
#### **Add Mappings**
1. Click on Add Mapping:
1. Once both the Service Desk Template and JIRA fields are selected, click **Add Mapping**. This establishes the connection between the two fields.
1. Select Service Desk Template Fields:
1. From the dropdown in the Mapper Fields section, select fields from the Service Desk Template. These are the fields defined in the OvalEdge template (e.g., Priority, Request Type).\
\
**Example**: To map the "Priority" field in OvalEdge to the JIRA field, select Priority from the dropdown.
2. Include Name Option:
1. Select the Include Name checkbox to use the selected Service Desk field as a label in JIRA.\
\
**Example**: If the OvalEdge field Priority is mapped to the JIRA field Ticket Type, and Include Name is checked, it will appear in JIRA as **Priority: High**.
3. Select JIRA Fields:
1. From the dropdown, select the JIRA fields to map (e.g., Ticket Type, Request Priority).\
\
**Example**: To map the Priority field in OvalEdge to the Ticket Type field in JIRA, select Ticket Type.
#### **Add Mappings**
1. Click on Add Mapping:
1. Once both the Service Desk Template and JIRA fields are selected, click **Add Mapping**. This establishes the connection between the two fields.
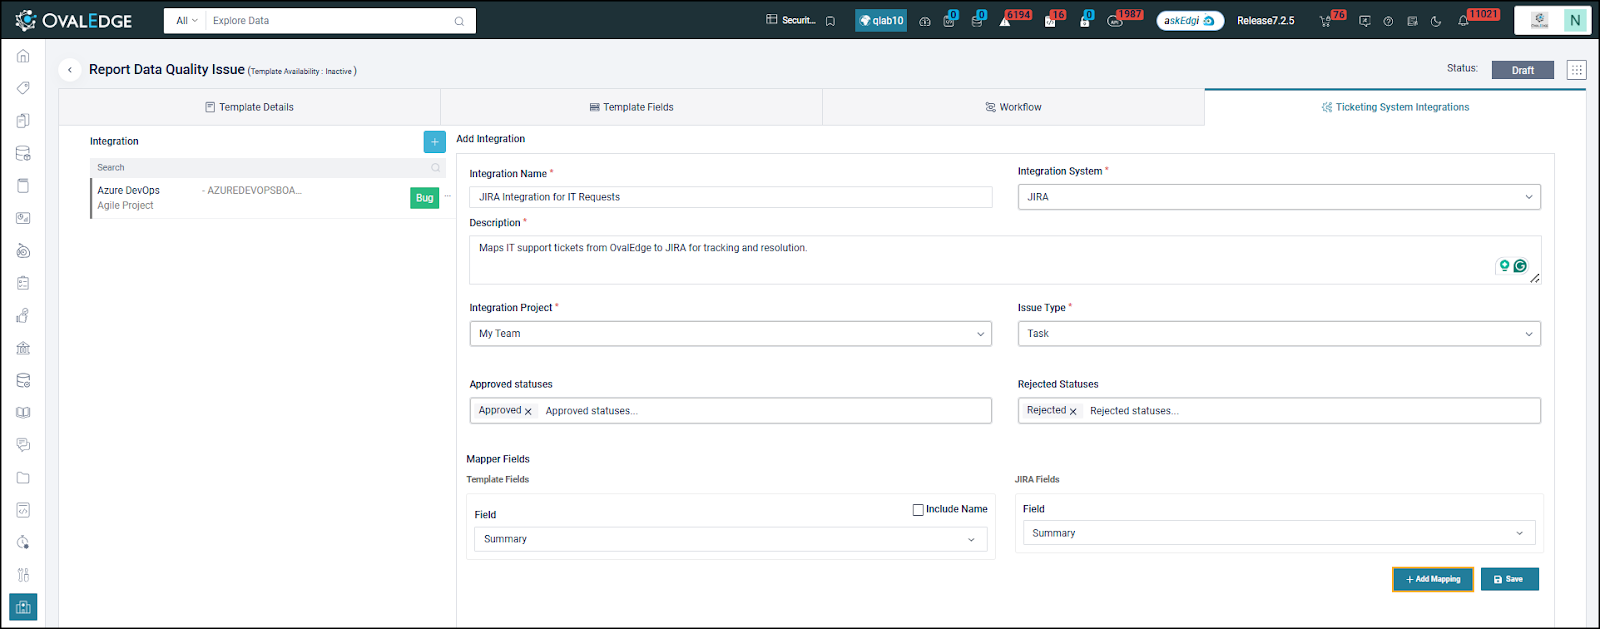 2. Mapping can be done as follows:
* One Service Desk field to One JIRA field.
* One Service Desk field to Multiple JIRA fields.
* Multiple Service Desk fields to one JIRA field.
#### **Save the Mapping**
2. Mapping can be done as follows:
* One Service Desk field to One JIRA field.
* One Service Desk field to Multiple JIRA fields.
* Multiple Service Desk fields to one JIRA field.
#### **Save the Mapping**
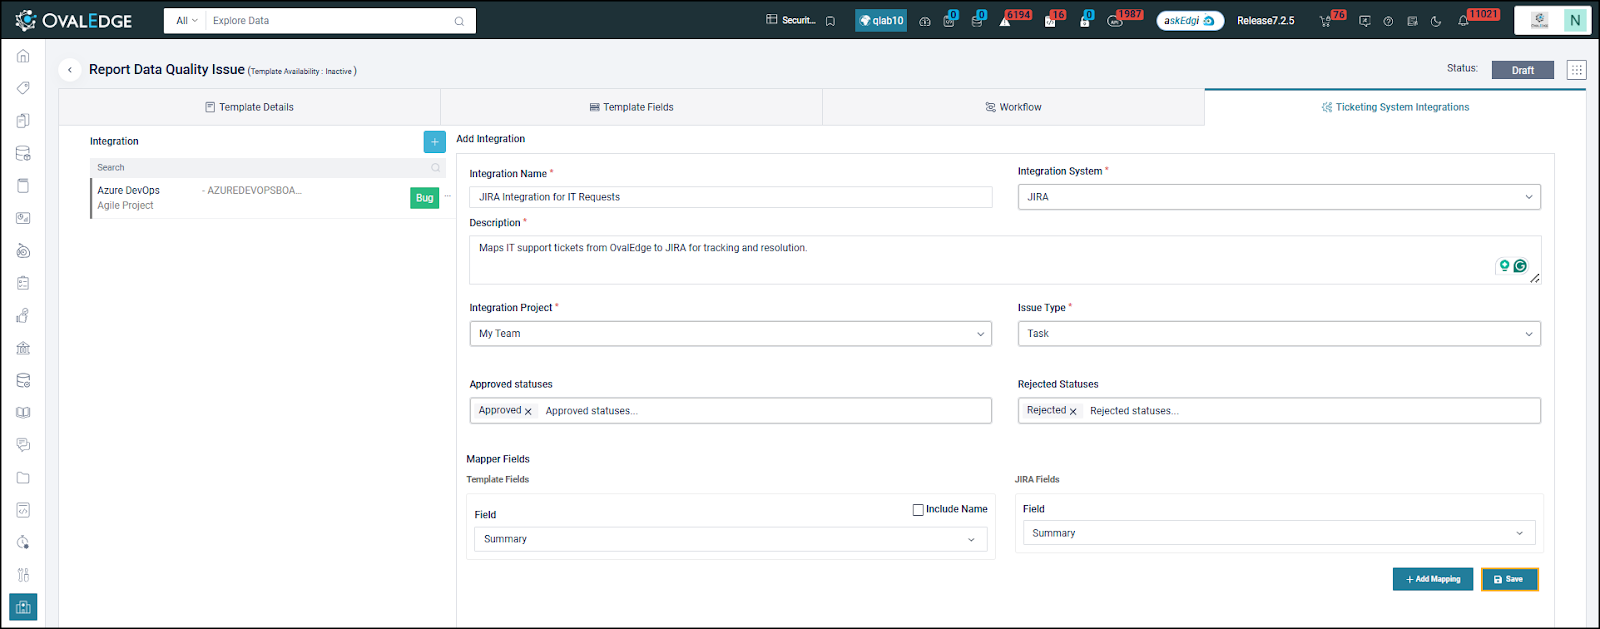 1. Verify and Save:
1. Review the field mappings to ensure accuracy.
2. Click **Save** to save the integration and mapping details. These will now be displayed under the Integration section of the template.
#### **Manage Integration Settings**
1. Edit, Inactivate, or Delete Integration:
1. After saving, inactivate or delete the integration as needed.
1. Verify and Save:
1. Review the field mappings to ensure accuracy.
2. Click **Save** to save the integration and mapping details. These will now be displayed under the Integration section of the template.
#### **Manage Integration Settings**
1. Edit, Inactivate, or Delete Integration:
1. After saving, inactivate or delete the integration as needed.
 ### **Example of Field Mapping**
* **Service Desk Field**: Priority (e.g., High, Medium, Low)
* **Mapped JIRA Field**: Priority
* **Result in JIRA**: If the Priority is set to High in the Service Request for that template, the corresponding JIRA ticket will have the Priority field set to High.
## Configuring Workflows
### **Configuring Workflows for JIRA in Service Desk Templates**
Workflows in Service Desk Templates allow specifying approvers for service requests. A new workflow can be created, or an existing one can be utilized. JIRA and other external tools, such as Azure DevOps, can be integrated into the workflow. These external tools can function either as approvers for service requests or simply as tools to track the requests from OvalEdge.
**JIRA in Workflows:**
* **JIRA as Approver**: The service request will not progress until approved.
* **JIRA for Ticket Tracking**: The service request information is captured in JIRA, but the request proceeds independently without waiting for approval.
### Steps to Configure JIRA for Approvals or Ticket Tracking
#### Access the Template Workflow
1. Navigate to Service Desk Templates.
### **Example of Field Mapping**
* **Service Desk Field**: Priority (e.g., High, Medium, Low)
* **Mapped JIRA Field**: Priority
* **Result in JIRA**: If the Priority is set to High in the Service Request for that template, the corresponding JIRA ticket will have the Priority field set to High.
## Configuring Workflows
### **Configuring Workflows for JIRA in Service Desk Templates**
Workflows in Service Desk Templates allow specifying approvers for service requests. A new workflow can be created, or an existing one can be utilized. JIRA and other external tools, such as Azure DevOps, can be integrated into the workflow. These external tools can function either as approvers for service requests or simply as tools to track the requests from OvalEdge.
**JIRA in Workflows:**
* **JIRA as Approver**: The service request will not progress until approved.
* **JIRA for Ticket Tracking**: The service request information is captured in JIRA, but the request proceeds independently without waiting for approval.
### Steps to Configure JIRA for Approvals or Ticket Tracking
#### Access the Template Workflow
1. Navigate to Service Desk Templates.
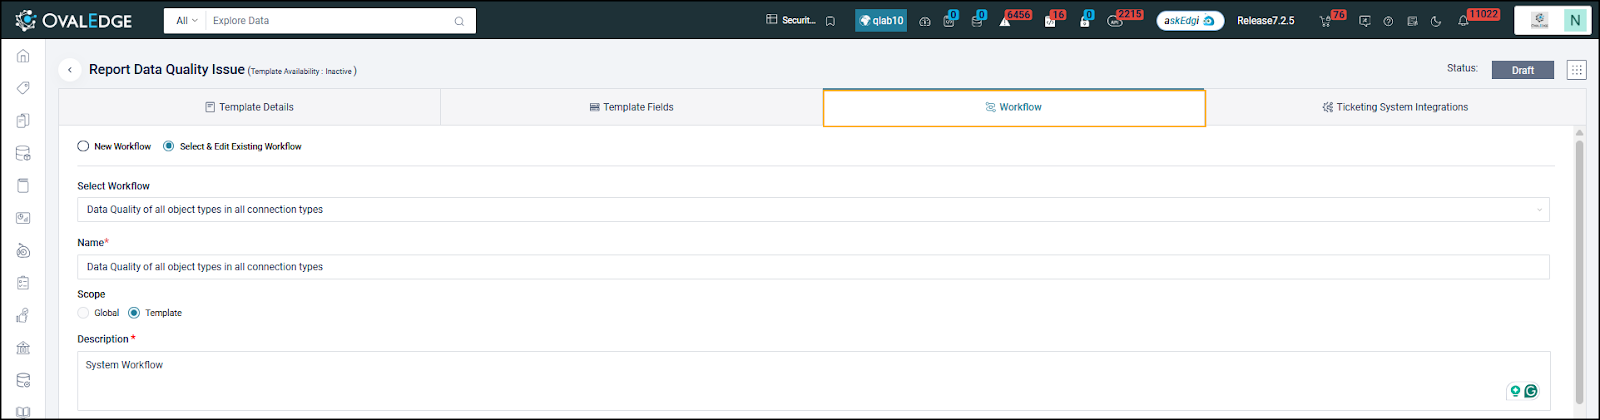 1. Go to **Administration > Service Desk Administration > Service Desk Templates**.
2. Select the template that includes the JIRA integration.
3. Click on the **Workflow** tab in the template.
2. Configure JIRA as an Approver.
1. Go to **Administration > Service Desk Administration > Service Desk Templates**.
2. Select the template that includes the JIRA integration.
3. Click on the **Workflow** tab in the template.
2. Configure JIRA as an Approver.
 1. Add JIRA as an Approver:
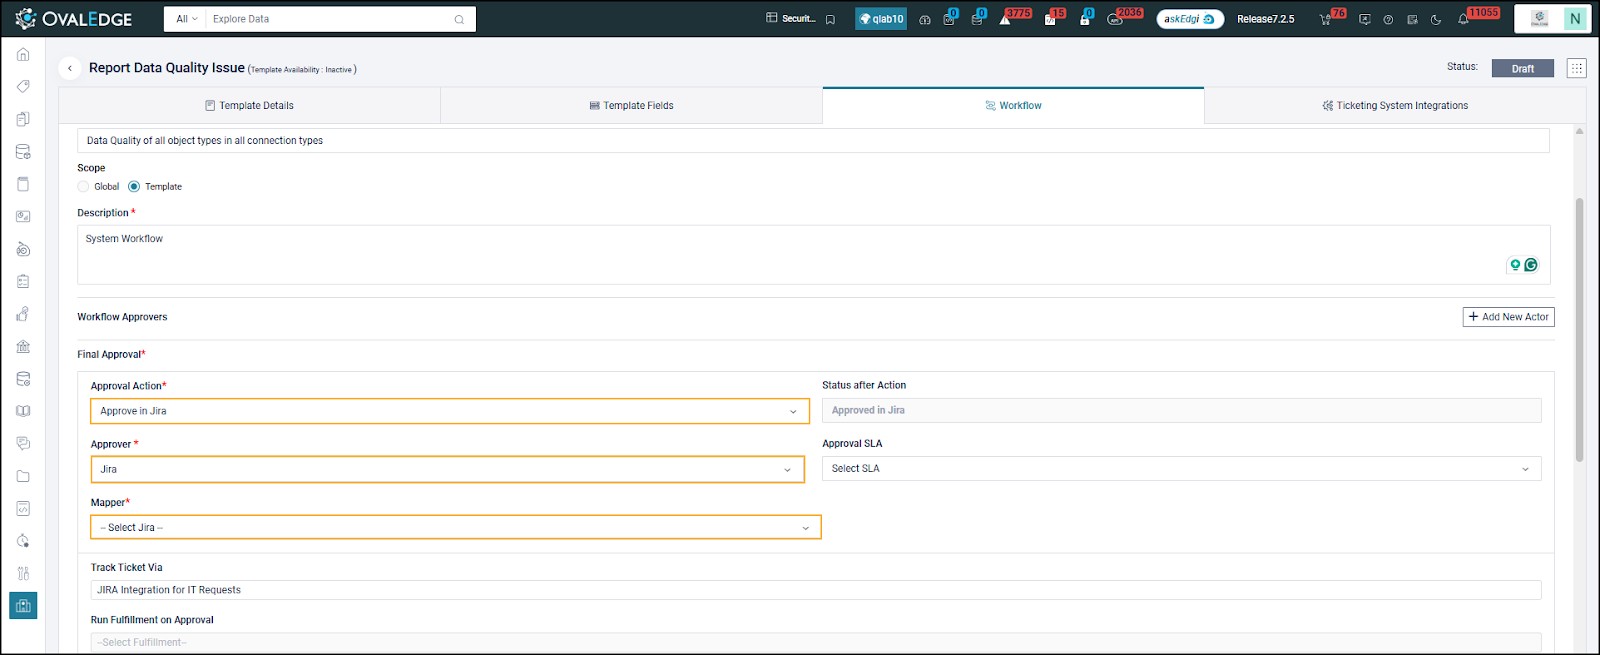
* In the workflow, for the approval level where the ticket should be approved in Jira, select the approval action as “Approve in Jira”.
* Upon selecting **Approve** in JIRA, the **Status** field is automatically updated based on the selected action.
2. Select Jira as Approver:
1. In the **Approver** dropdown, choose **Jira** as the approver.
3. Map JIRA:
1. In the Mapper dropdown, select the Jira mapper that was configured for this template. This links the service request to the JIRA system for approval.
4. Save the Configuration:
1. After entering all the details, click Save. JIRA is now set as the approver for all service requests of this template. The requests will not proceed until the selected approver approves them.
3. Alternate Step: Configure JIRA for Ticket Tracking Only
1. Add JIRA as an Approver:
* In the workflow, for the approval level where the ticket should be approved in Jira, select the approval action as “Approve in Jira”.
* Upon selecting **Approve** in JIRA, the **Status** field is automatically updated based on the selected action.
2. Select Jira as Approver:
1. In the **Approver** dropdown, choose **Jira** as the approver.
3. Map JIRA:
1. In the Mapper dropdown, select the Jira mapper that was configured for this template. This links the service request to the JIRA system for approval.
4. Save the Configuration:
1. After entering all the details, click Save. JIRA is now set as the approver for all service requests of this template. The requests will not proceed until the selected approver approves them.
3. Alternate Step: Configure JIRA for Ticket Tracking Only
 1. Track Service Requests in JIRA:
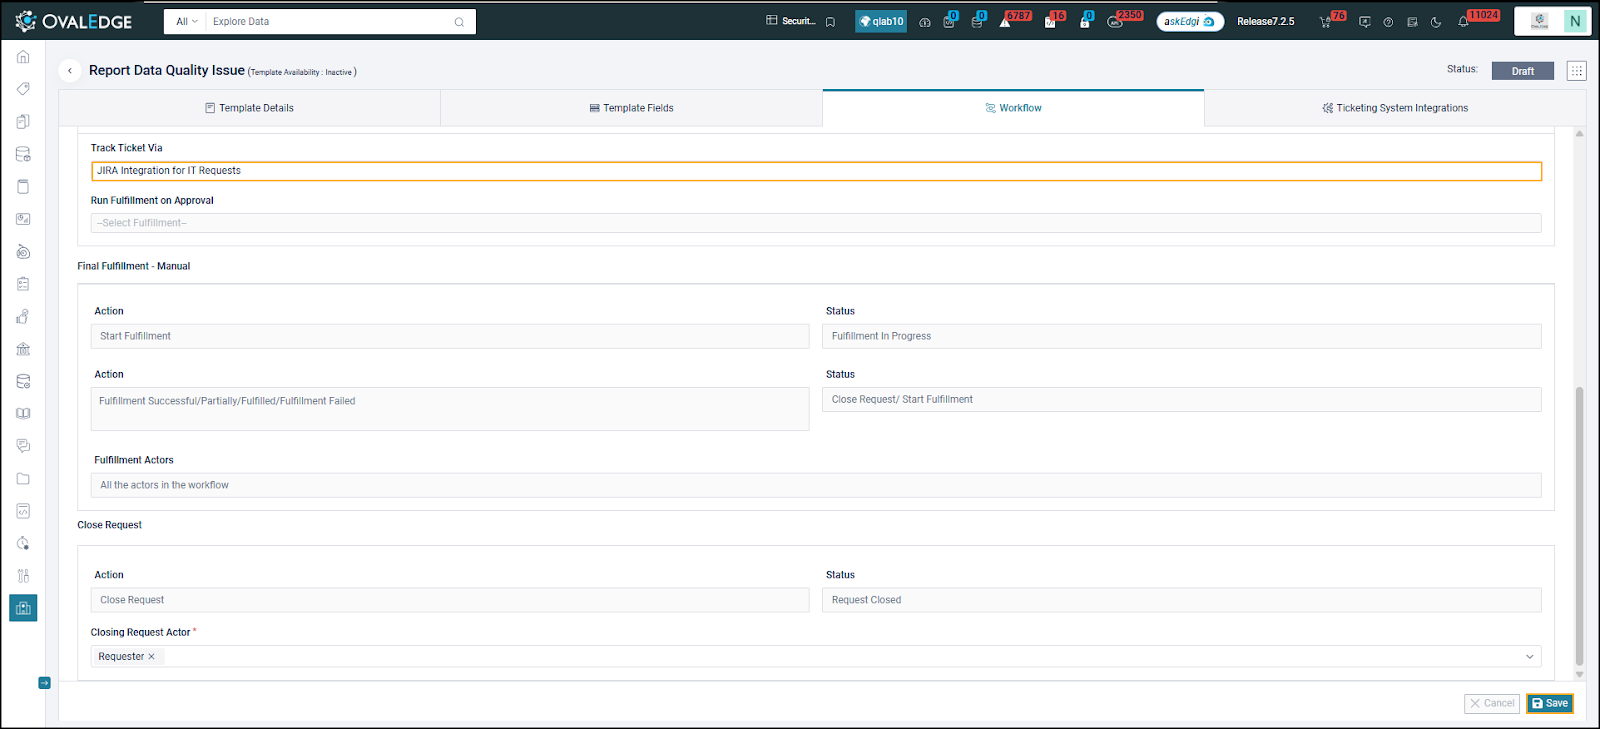
1. If tracking of the service request in JIRA is required without an approval step, the approval action and actor can be anyone.
2. In the **Track Ticket Via** dropdown, select JIRA.
2. Save the Configuration:
1. After entering the required information, click Save. The service requests raised in OvalEdge will be tracked in JIRA, but there will be no dependency on JIRA for the request to proceed.
## Verify the JIRA Integration in OvalEdge
This process ensures that the JIRA integration in OvalEdge is functioning correctly by verifying:
1. **Automatic Ticket Creation in JIRA** – When a service request is raised in OvalEdge, a corresponding ticket should be created in JIRA.
2. **Status Synchronization** – When the status of a JIRA ticket is updated, the corresponding service request status in OvalEdge should reflect the exact change.
### Raise a Service Request in OvalEdge
1. Log in to **OvalEdge** and navigate to the **Data Catalog** module.
2. Locate and select the **data object** (e.g., a Report) for which a service request needs to be created. Example: **Report – Group By Threshold**
1. Track Service Requests in JIRA:
1. If tracking of the service request in JIRA is required without an approval step, the approval action and actor can be anyone.
2. In the **Track Ticket Via** dropdown, select JIRA.
2. Save the Configuration:
1. After entering the required information, click Save. The service requests raised in OvalEdge will be tracked in JIRA, but there will be no dependency on JIRA for the request to proceed.
## Verify the JIRA Integration in OvalEdge
This process ensures that the JIRA integration in OvalEdge is functioning correctly by verifying:
1. **Automatic Ticket Creation in JIRA** – When a service request is raised in OvalEdge, a corresponding ticket should be created in JIRA.
2. **Status Synchronization** – When the status of a JIRA ticket is updated, the corresponding service request status in OvalEdge should reflect the exact change.
### Raise a Service Request in OvalEdge
1. Log in to **OvalEdge** and navigate to the **Data Catalog** module.
2. Locate and select the **data object** (e.g., a Report) for which a service request needs to be created. Example: **Report – Group By Threshold**
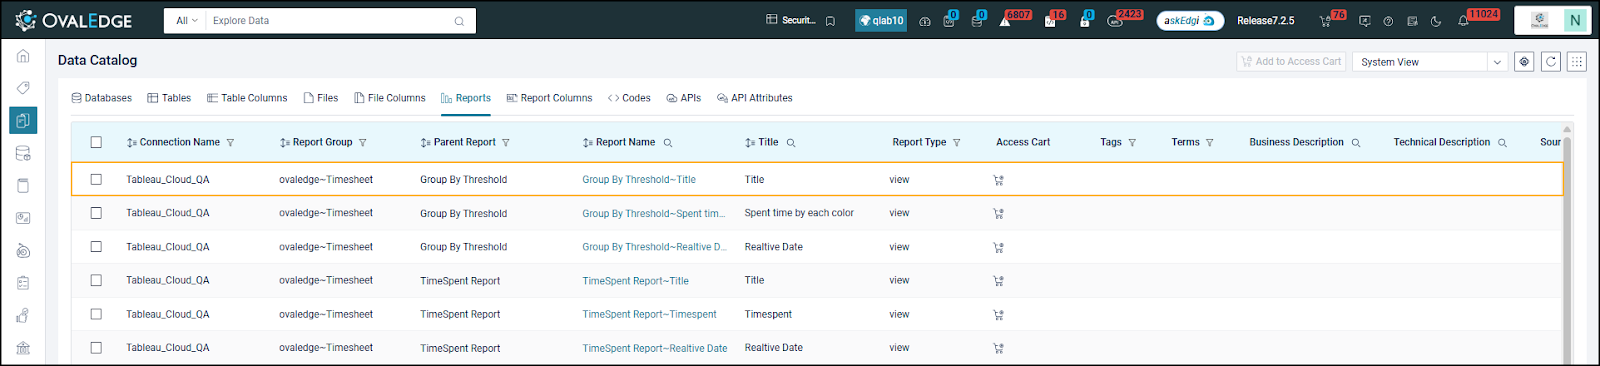 3. Click on the selected **data object** to open its **summary page**.
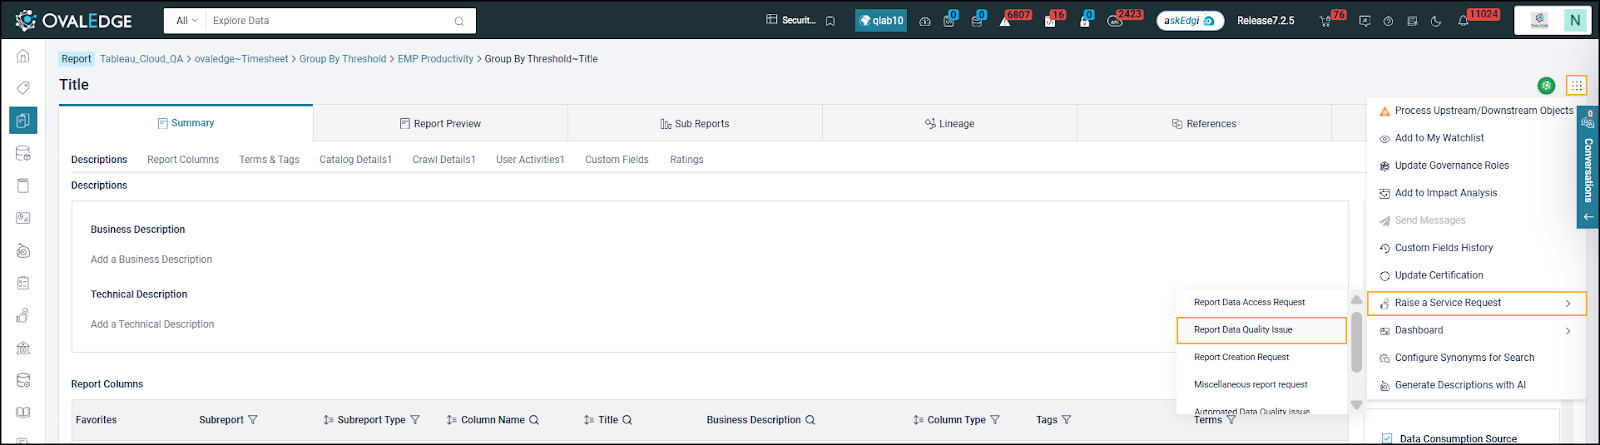 4. Click on the **9 Dots** Menu and select Raise a **Service Request > Report Data Quality Issue**.
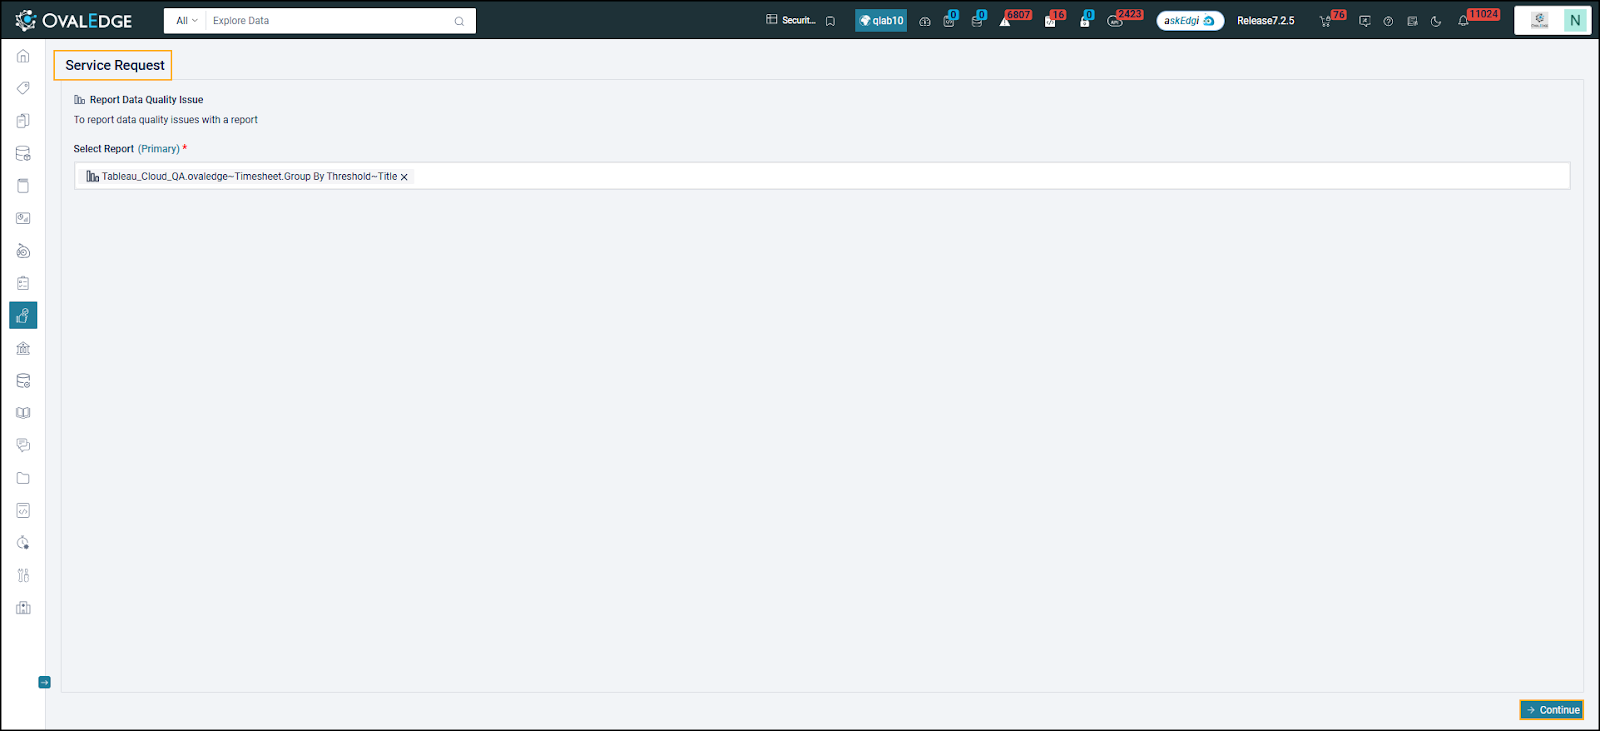
5. The **Service Request** page is displayed. Click **Continue**.
4. Click on the **9 Dots** Menu and select Raise a **Service Request > Report Data Quality Issue**.
5. The **Service Request** page is displayed. Click **Continue**.
 6. Enter the required information in the service request form, including:
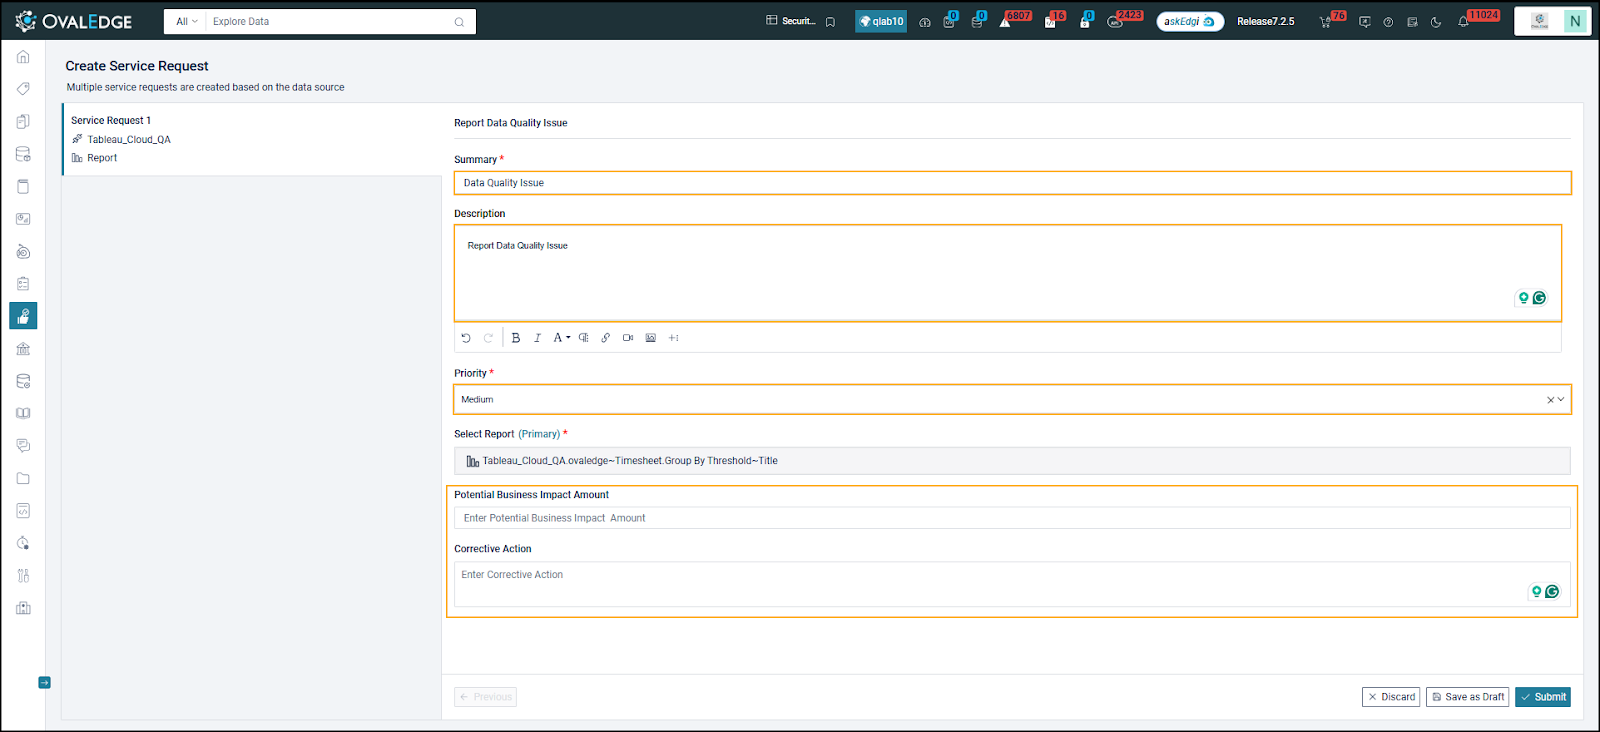 1. **Summary** – Provide a clear title for the request.
2. **Description** – Add details explaining the purpose of the request.
3. **Priority** – Set the urgency of the request (High, Medium, Low).
4. Other template fields are filled as needed by the requester.
7. Click **Submit** to create the service request in OvalEdge.
1. **Summary** – Provide a clear title for the request.
2. **Description** – Add details explaining the purpose of the request.
3. **Priority** – Set the urgency of the request (High, Medium, Low).
4. Other template fields are filled as needed by the requester.
7. Click **Submit** to create the service request in OvalEdge.
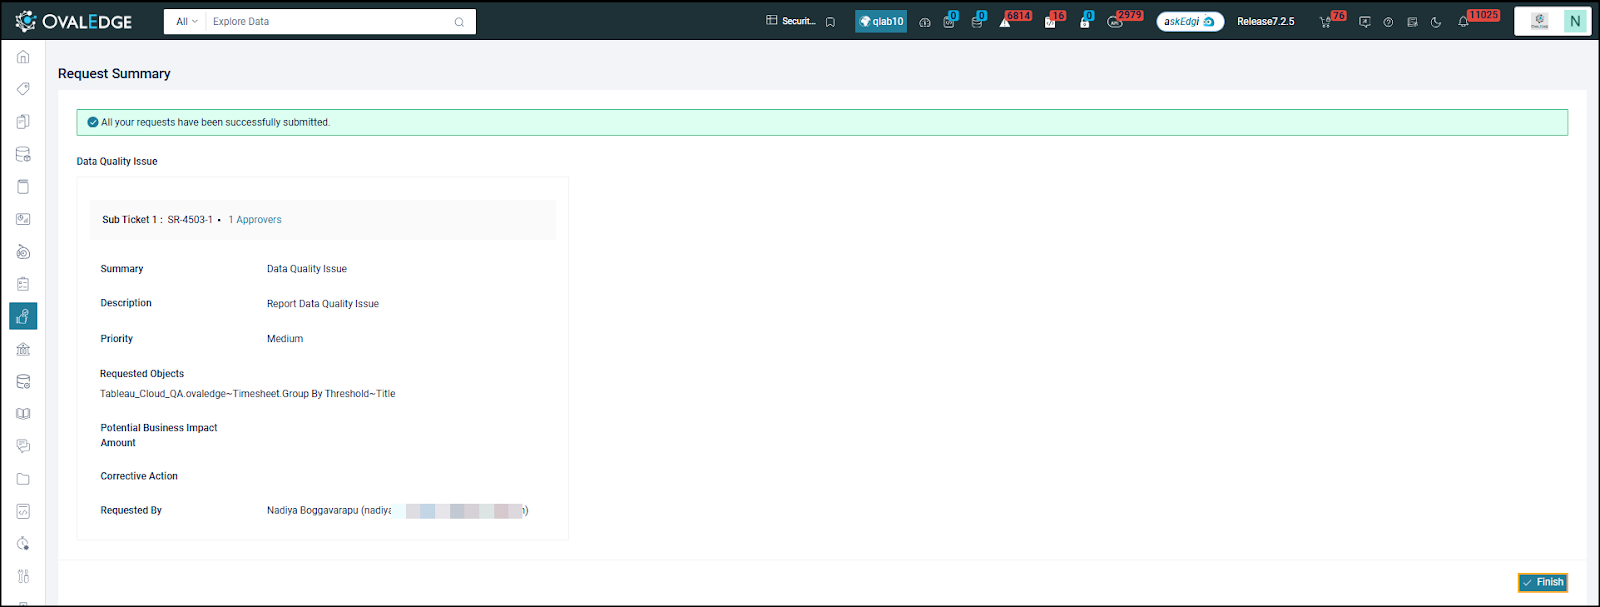
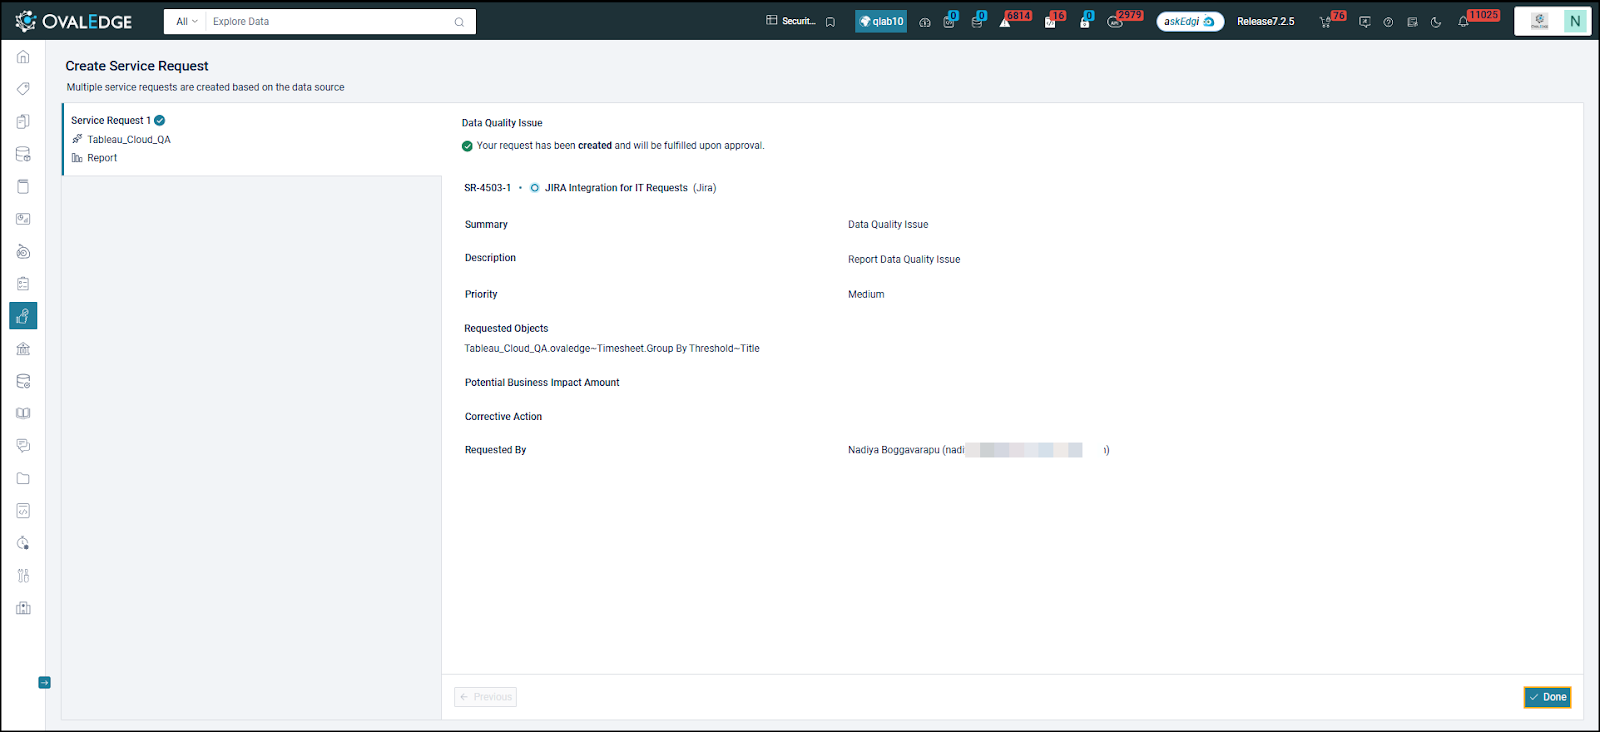 8. Click **Done** to generate the Request Summary. Later, click **Finish**.
 ### Verify JIRA Ticket Creation
1. After the service request is created, navigate to the **Service Desk > My Requests** in OvalEdge.
### Verify JIRA Ticket Creation
1. After the service request is created, navigate to the **Service Desk > My Requests** in OvalEdge.
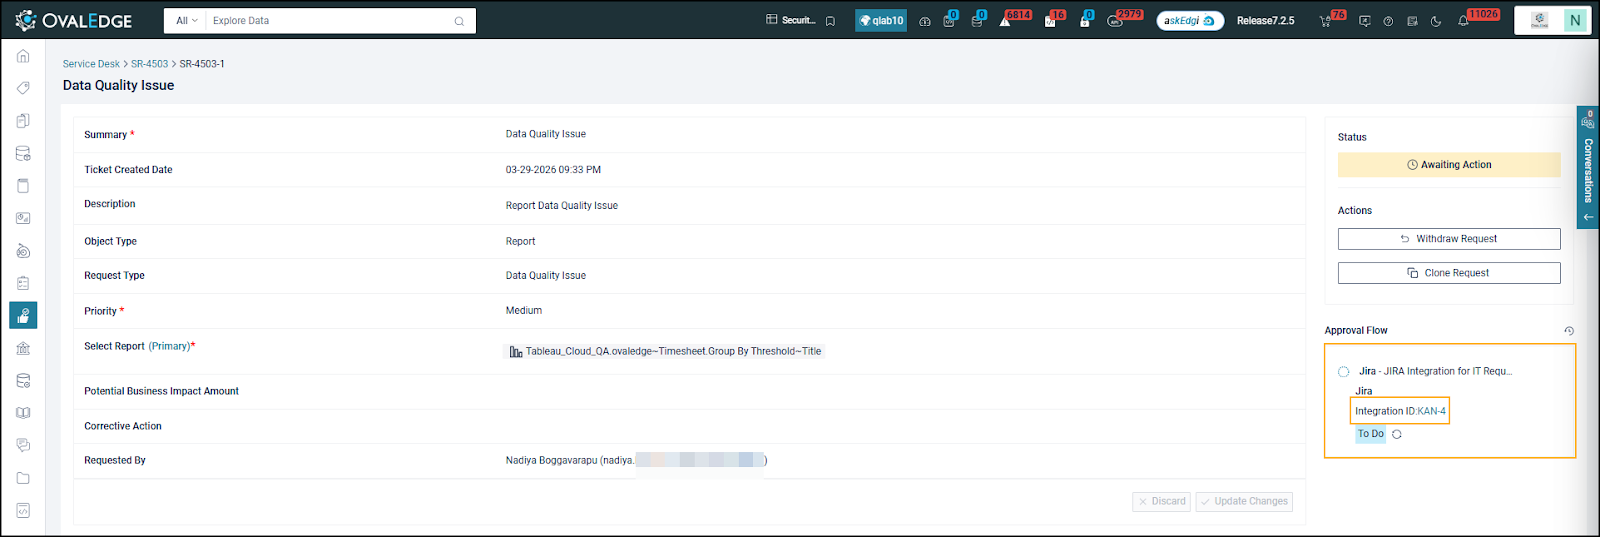
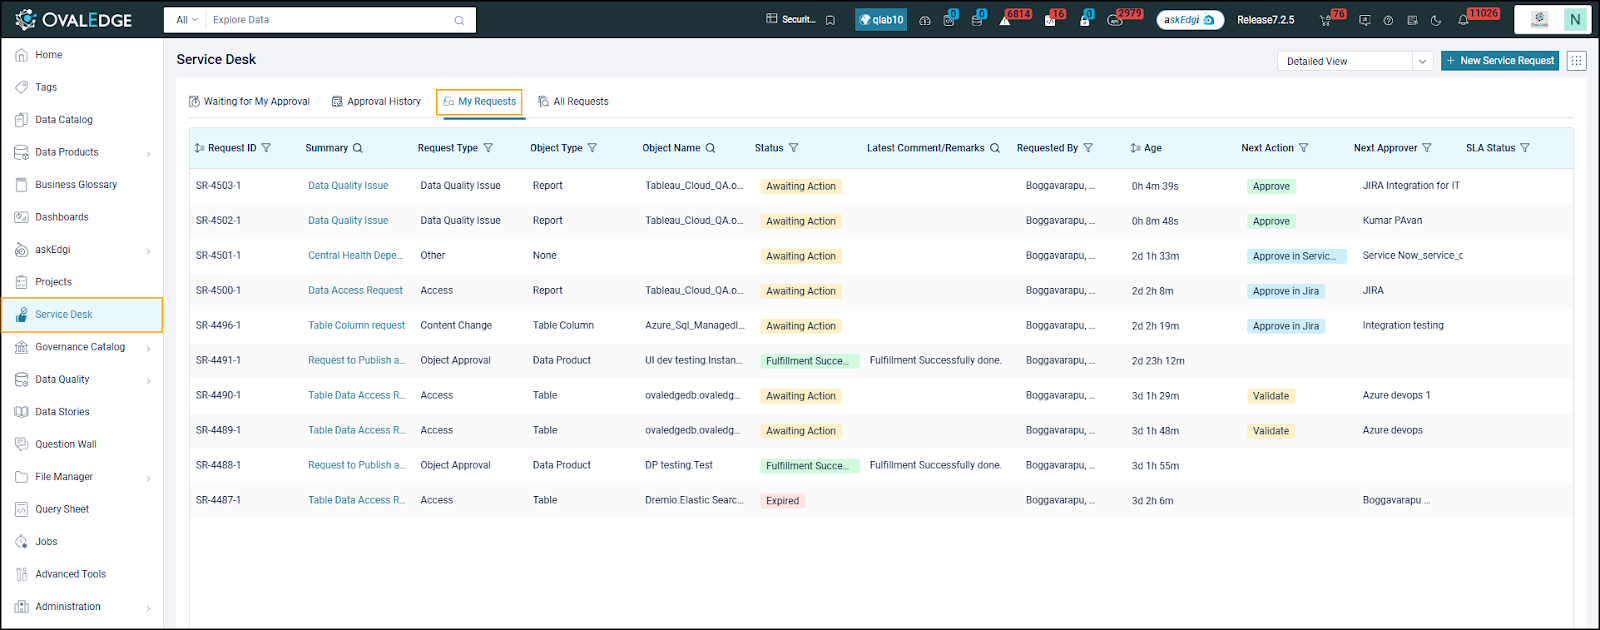 2. Open the newly created **Service Request ID** to review the details.
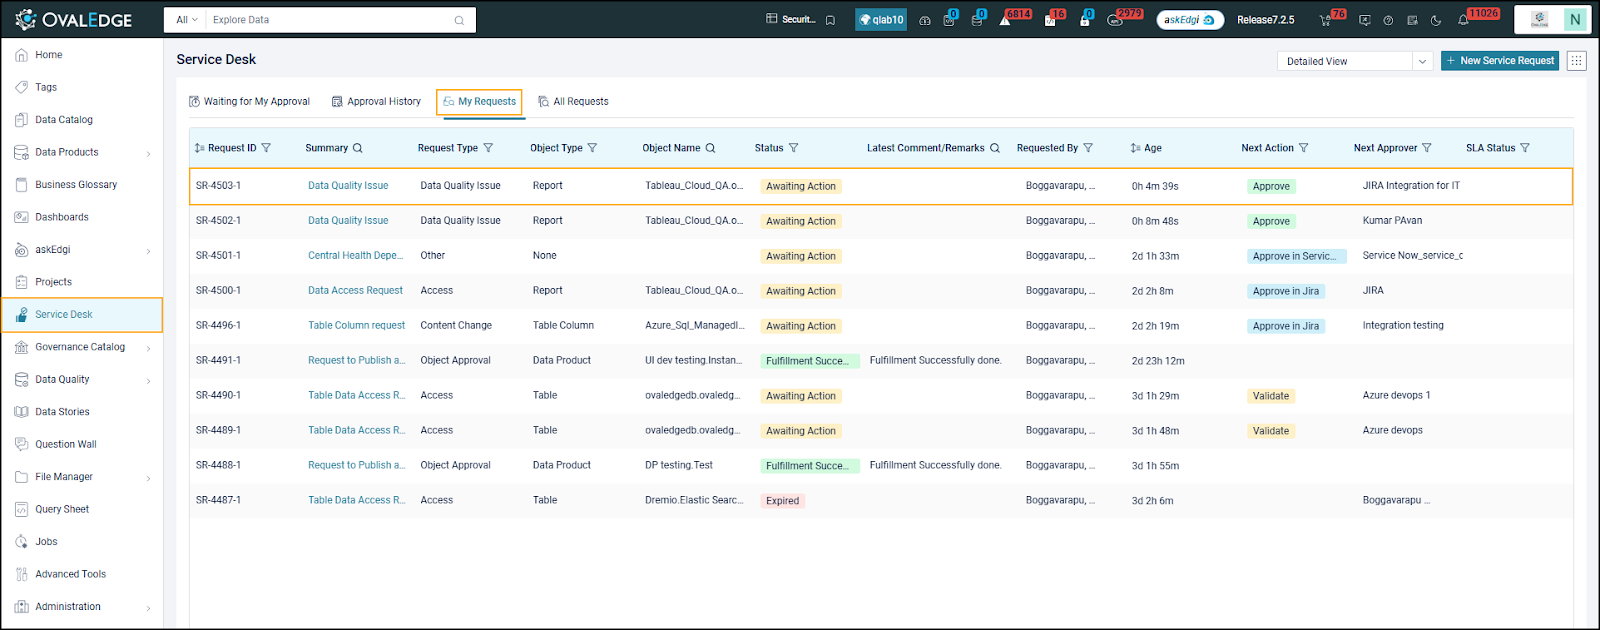 3. Check if a corresponding **JIRA ticket** has been automatically created.
1. The JIRA **Integration ID** should be displayed in the service request details.
3. Check if a corresponding **JIRA ticket** has been automatically created.
1. The JIRA **Integration ID** should be displayed in the service request details.
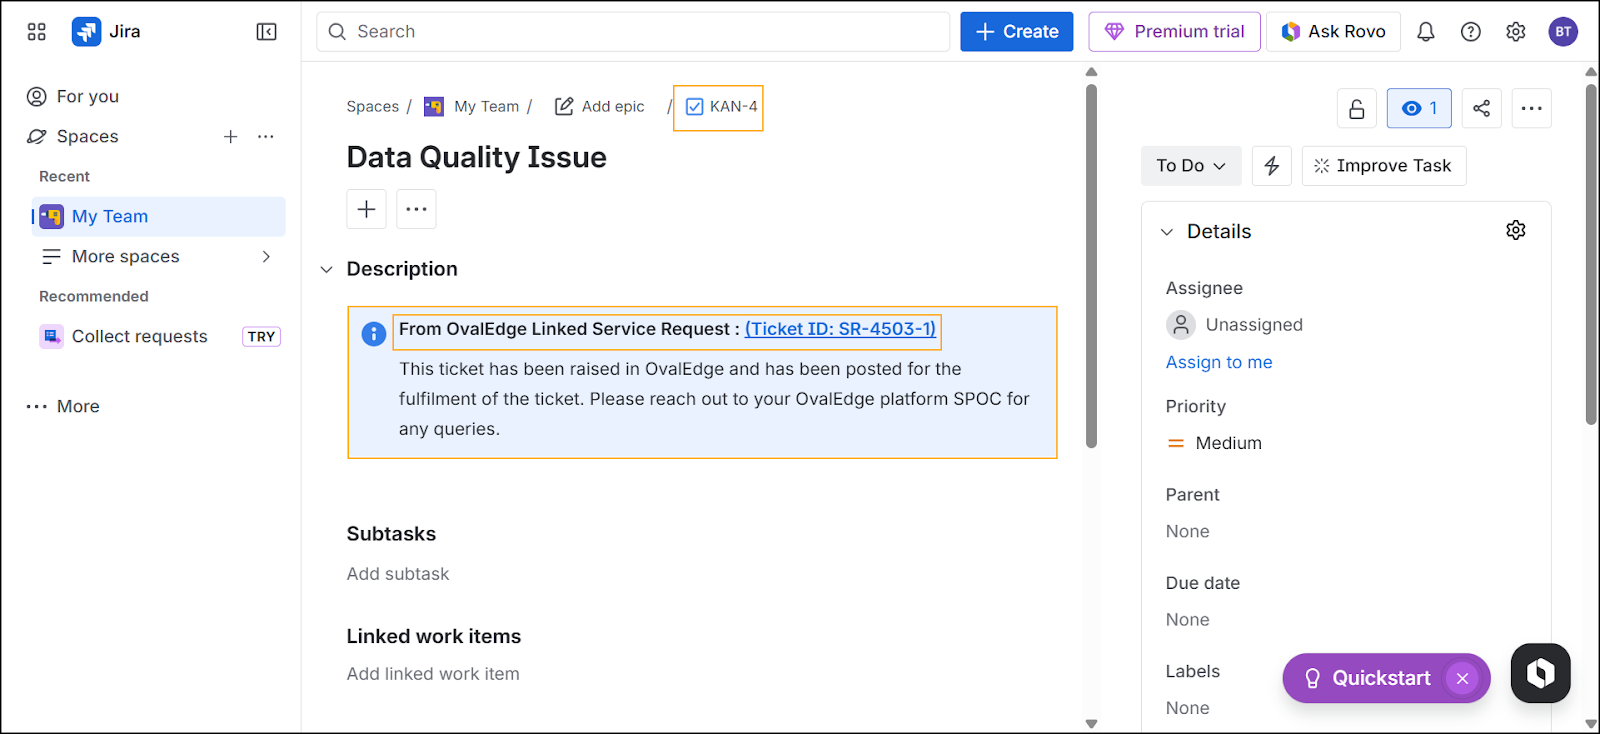
 2. Navigate to **JIRA** and verify that the ticket exists under the specified **JIRA project**.
 ### Verify Status Synchronization
1. In **JIRA**, locate the ticket created from the OvalEdge service request.
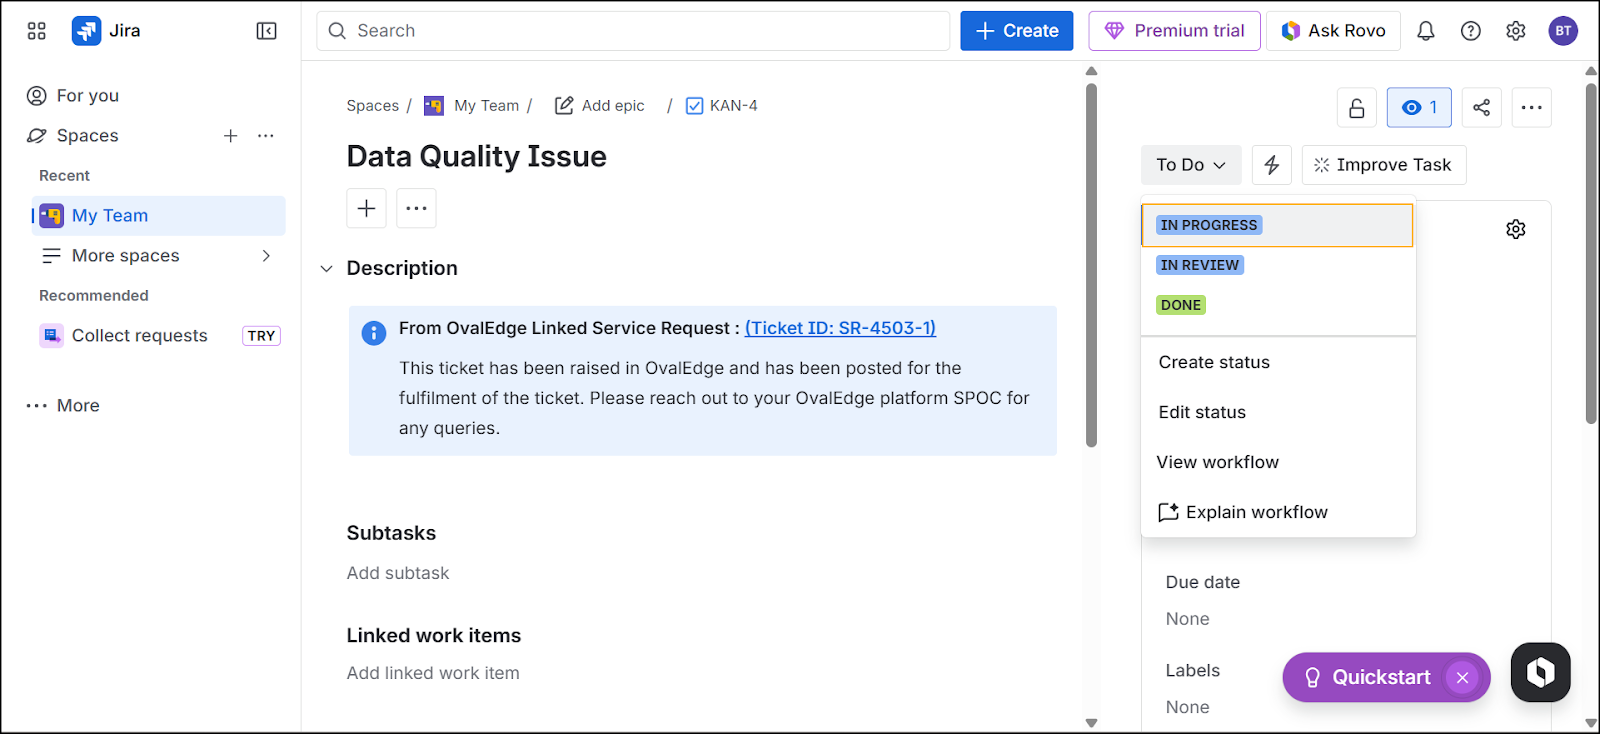
2. Change the ticket status from **To Do** to **In Progress**.
### Verify Status Synchronization
1. In **JIRA**, locate the ticket created from the OvalEdge service request.
2. Change the ticket status from **To Do** to **In Progress**.
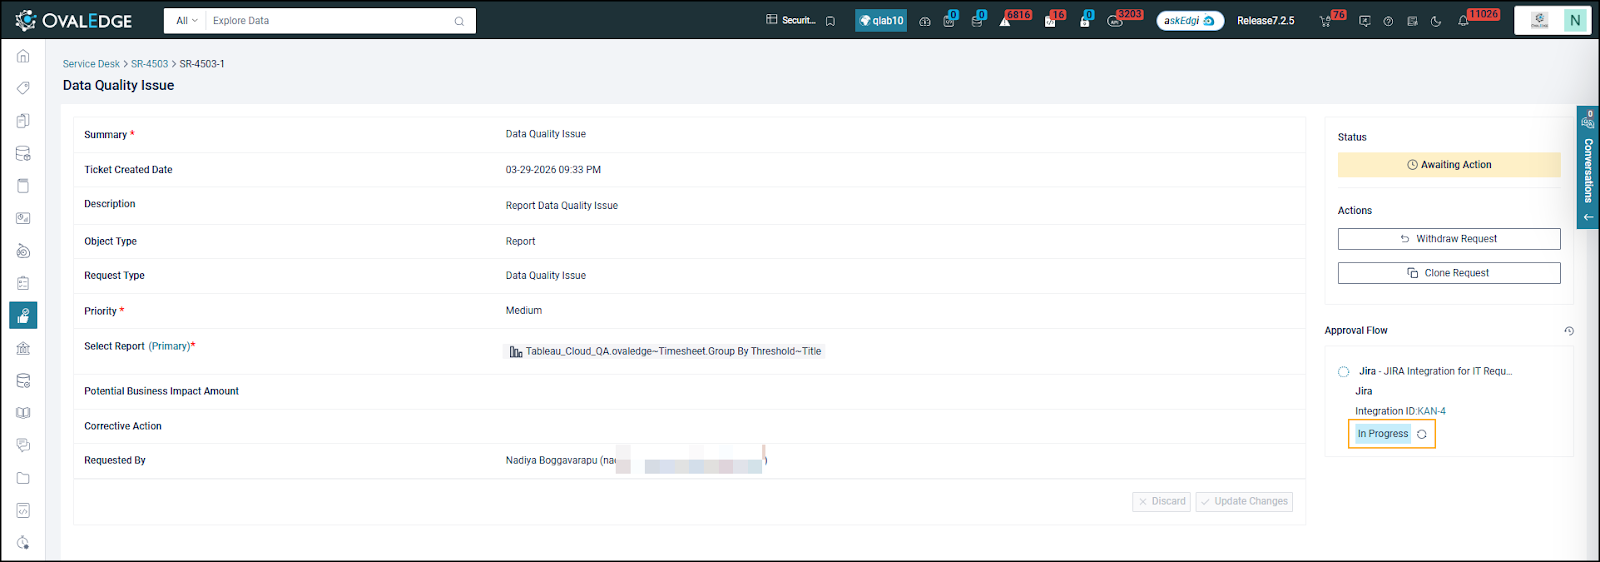
 3. Navigate back to **OvalEdge** and check the service request status.
4. Confirm that the status change in **JIRA** is reflected in the **OvalEdge Service Desk** for the corresponding service request.
3. Navigate back to **OvalEdge** and check the service request status.
4. Confirm that the status change in **JIRA** is reflected in the **OvalEdge Service Desk** for the corresponding service request.
 ### Outcome
* A JIRA ticket is automatically created when a service request is raised in OvalEdge.
* Status changes in JIRA are synchronized with the corresponding service request in OvalEdge.
***
Copyright © 2025, OvalEdge LLC, Peachtree Corners, GA, USA.
---
# Agent Instructions
This documentation is published with GitBook. GitBook is the documentation platform designed so that both humans and AI agents can read, navigate, and reason over technical content effectively. Learn more at gitbook.com.
## Querying This Documentation
If you need additional information that is not directly available in this page, you can query the documentation dynamically by asking a question.
Perform an HTTP GET request on the current page URL with the `ask` query parameter, and the optional `goal` query parameter:
```
GET https://docs.ovaledge.com/release8.1/installation-and-settings/integrations-with-enterpirse-apps/jira-integration.md?ask=&goal=
```
`ask` is the immediate question: it should be specific, self-contained, and written in natural language.
`goal` is optional and describes the broader end goal you are ultimately trying to accomplish on behalf of the user. GitBook uses it to tailor the answer towards what is most useful for that goal.
The response will contain a direct answer to the question and relevant excerpts and sources from the documentation.
Use this mechanism when the answer is not explicitly present in the current page, you need clarification or additional context, or you want to retrieve related documentation sections.
### Outcome
* A JIRA ticket is automatically created when a service request is raised in OvalEdge.
* Status changes in JIRA are synchronized with the corresponding service request in OvalEdge.
***
Copyright © 2025, OvalEdge LLC, Peachtree Corners, GA, USA.
---
# Agent Instructions
This documentation is published with GitBook. GitBook is the documentation platform designed so that both humans and AI agents can read, navigate, and reason over technical content effectively. Learn more at gitbook.com.
## Querying This Documentation
If you need additional information that is not directly available in this page, you can query the documentation dynamically by asking a question.
Perform an HTTP GET request on the current page URL with the `ask` query parameter, and the optional `goal` query parameter:
```
GET https://docs.ovaledge.com/release8.1/installation-and-settings/integrations-with-enterpirse-apps/jira-integration.md?ask=&goal=
```
`ask` is the immediate question: it should be specific, self-contained, and written in natural language.
`goal` is optional and describes the broader end goal you are ultimately trying to accomplish on behalf of the user. GitBook uses it to tailor the answer towards what is most useful for that goal.
The response will contain a direct answer to the question and relevant excerpts and sources from the documentation.
Use this mechanism when the answer is not explicitly present in the current page, you need clarification or additional context, or you want to retrieve related documentation sections.