# PingFederate

This document describes the procedure for integrating PingFederate Single Sign-On (SSO) with the OvalEdge application. The integration leverages Active Directory (AD) for authentication, ensuring centralized identity management and secure access to OvalEdge.

The process covers:

* Active Directory data store configuration in PingFederate
* Password Credential Validator (PCV) setup
* Identity Provider (IdP) adaptor configuration
* SAML Entity ID setup
* Service Provider (SP) connection configuration for OvalEdge
* Metadata exchange and application-level configuration

This guide is intended for System Administrators, DevOps Engineers, and Identity Management specialists who manage enterprise SSO integrations.

## Prerequisites

Before starting the integration, ensure the following:

* Infrastructure
  * Access to PingFederate server with administrative credentials
  * Access to the OvalEdge application server (Linux or Windows)
  * Active Directory (AD) environment with valid user accounts
* System Requirements
  * PingFederate configured and accessible
  * Tomcat running OvalEdge application
  * Network connectivity between PingFederate, OvalEdge, and AD servers
* Files and Configurations
  * Ability to update oasis.properties and setenv.sh (Linux) or tomcat9w\.exe (Windows)
  * Export/import permissions for SAML metadata on PingFederate and OvalEdge

## Integration Procedure

### Active Directory Data Store Creation

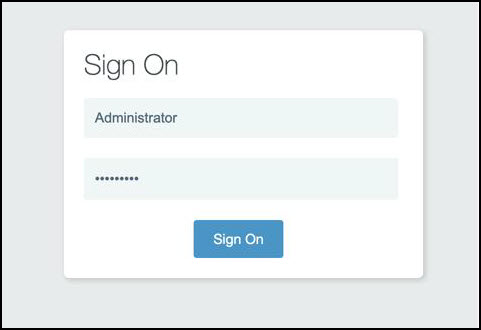
* Log in to **PingFederate** with administrator credentials.

  <div align="left"><figure><img src="/files/Srhp110f1PbjdUEPfj9t" alt=""><figcaption></figcaption></figure></div>
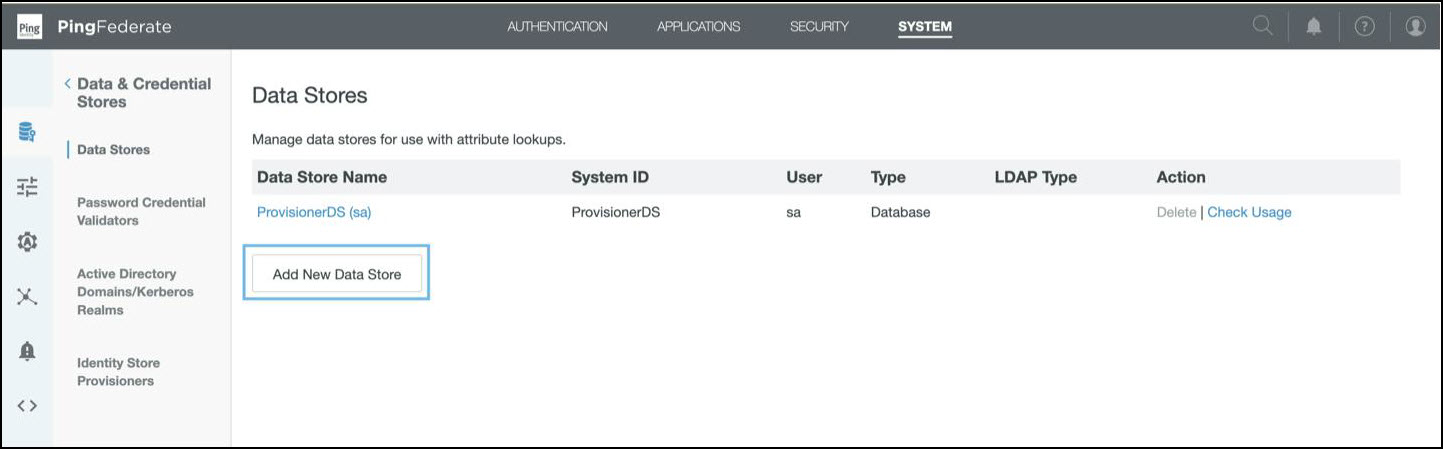
* Navigate to:

  ```
  System > Data Stores > Add New Data Store
  ```

  <figure><img src="/files/4wHwNO9Qv97sPu2OEPOV" alt=""><figcaption></figcaption></figure>
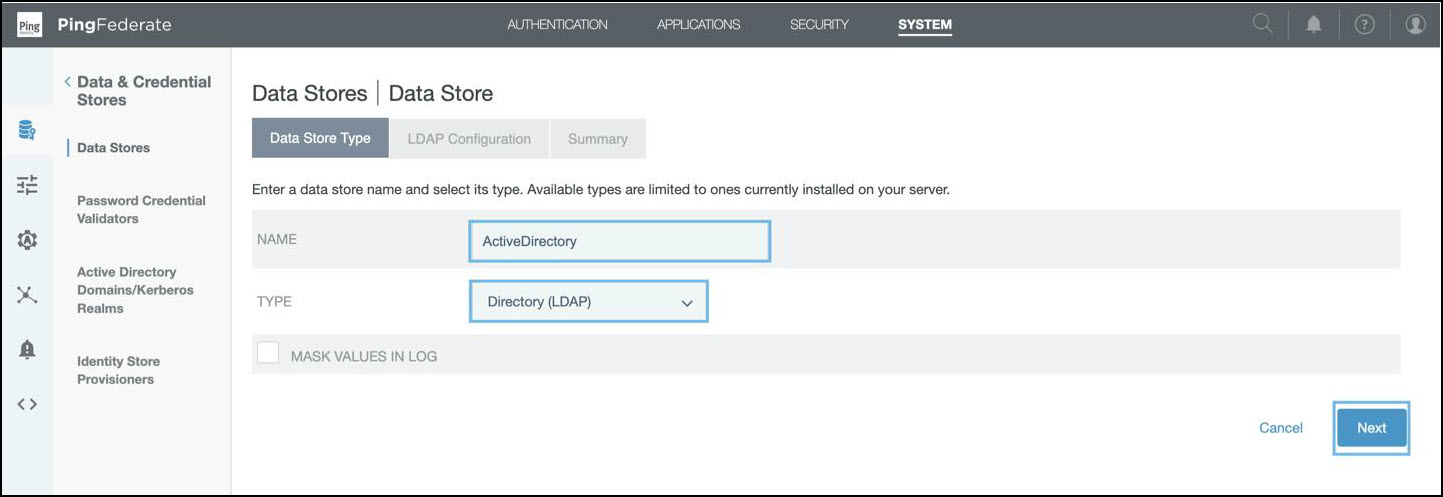
* Provide the following:
  * **Name:** Any descriptive name
  * **Type:** Directory (LDAP)

    <figure><img src="/files/kFcCh0uj8622h6rDVPkW" alt=""><figcaption></figcaption></figure>
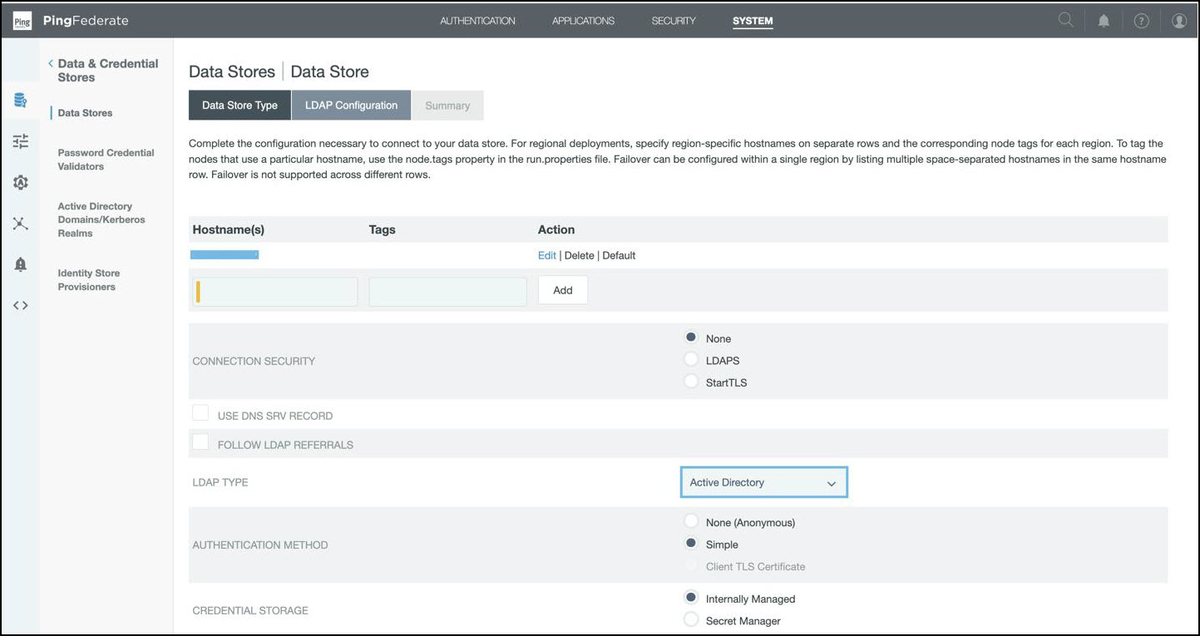
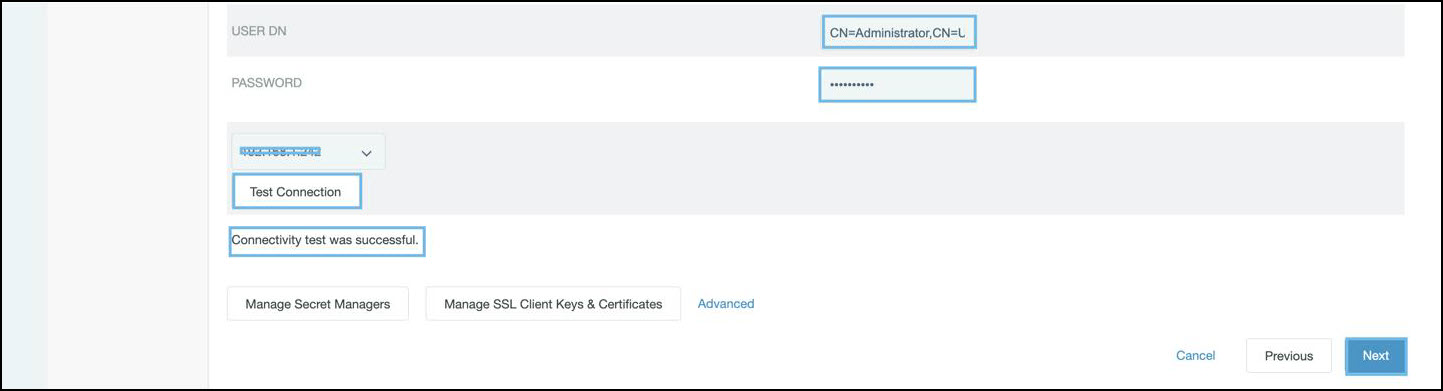
* Enter the Active Directory details:
  * **Hostname:** `<AD Server hostname or IP>`

    <figure><img src="/files/2pozRLMgNc7c6RPGwfAX" alt=""><figcaption></figcaption></figure>
  * **User DN:** `CN=Administrator,CN=Users,DC=<domain>,DC=<tld>`

    <figure><img src="/files/LtJZcaspEJYSOc20jB1c" alt=""><figcaption></figcaption></figure>
  * **Password:** AD administrator password
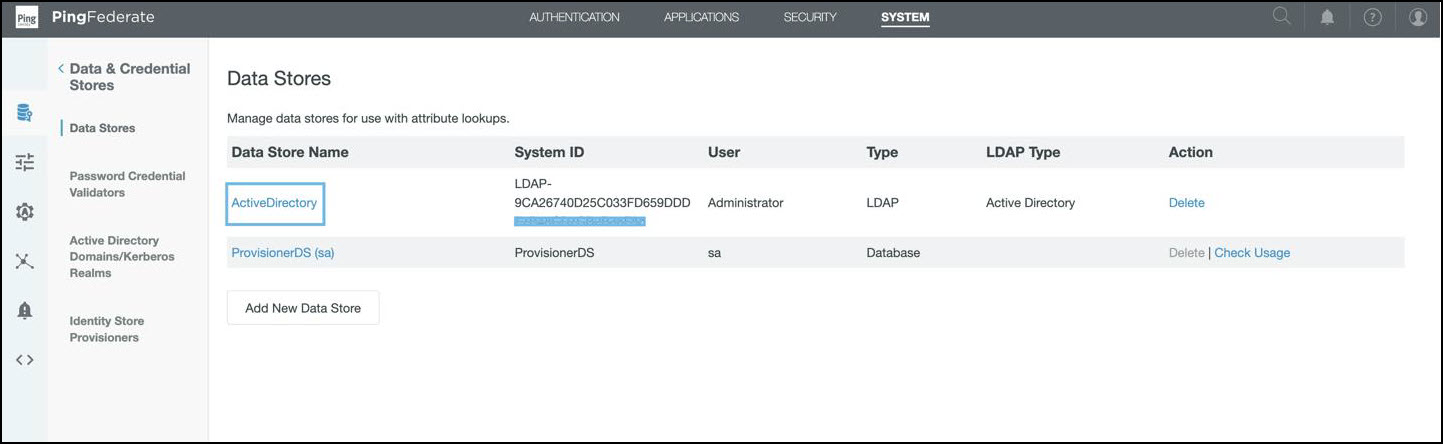
* Click **Next**, review details, and **save**.

  <figure><img src="/files/9633FEhQwRZGEuo1yfpX" alt=""><figcaption></figcaption></figure>

### Password Credential Validator (PCV) Creation

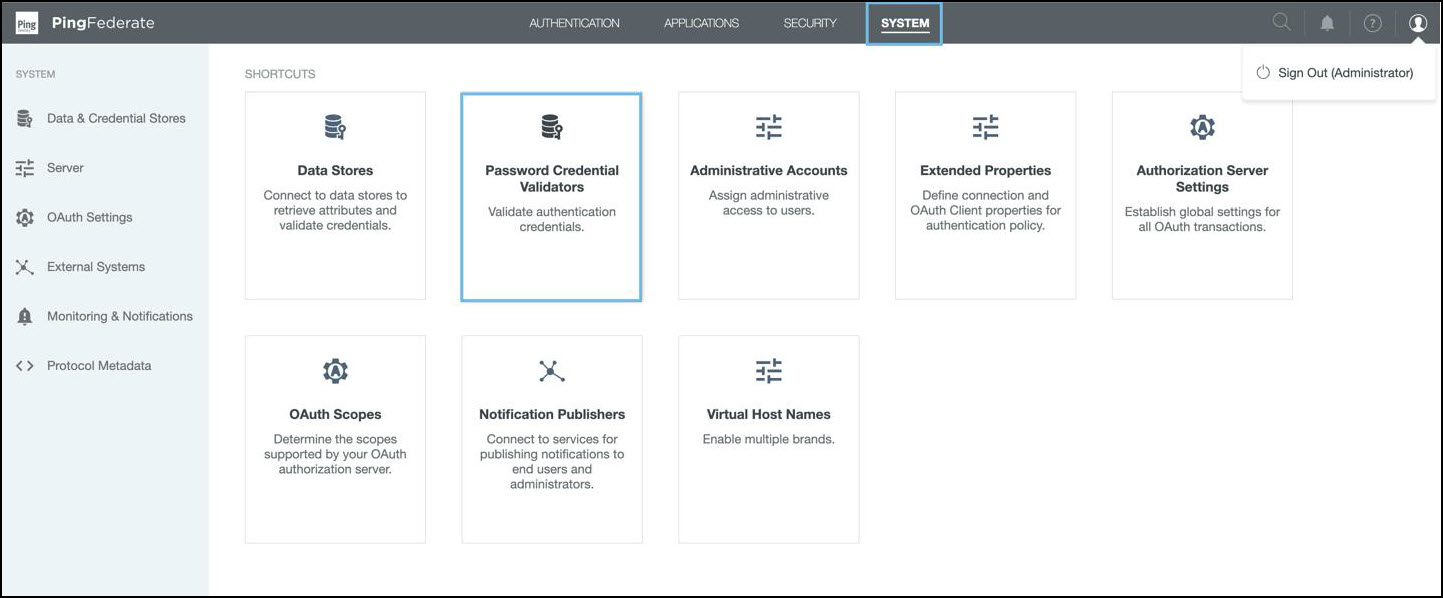
* Navigate to:

  ```
  System > Password Credential Validators
  ```

  <figure><img src="/files/vBD2g5WiFZhHhFLpPakm" alt=""><figcaption></figcaption></figure>
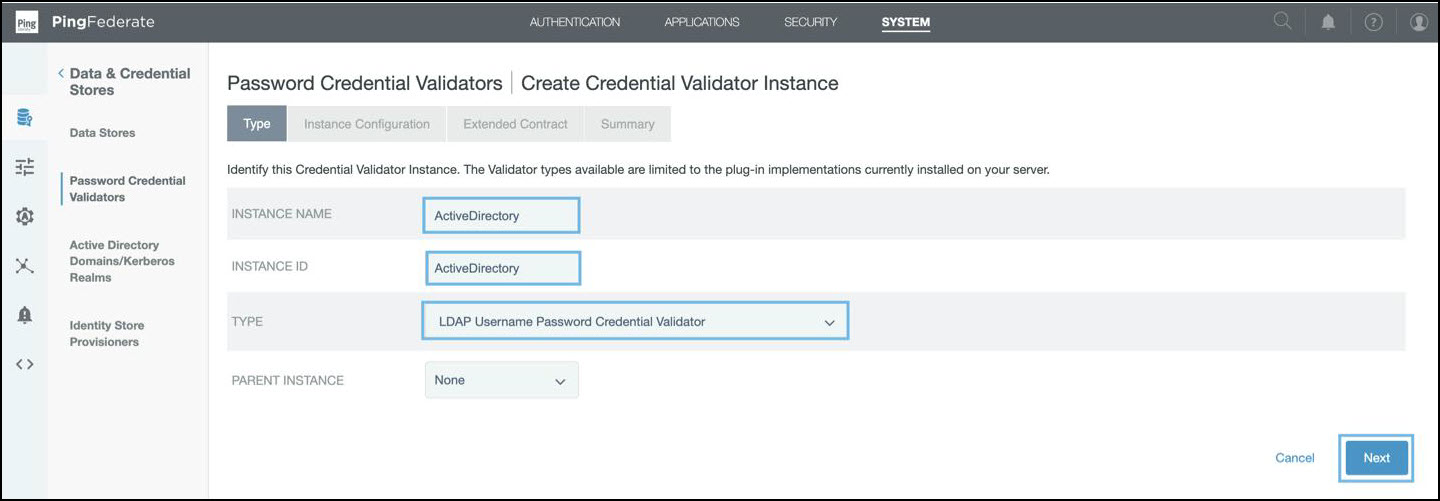
* Click **Create New Instance**.
* Provide:

  * **Instance Name / ID:** Any name
  * **Type:** LDAP Username Password Credential Validator

  <figure><img src="/files/VCeYLzqYvU1pjFQiA7UU" alt=""><figcaption></figcaption></figure>
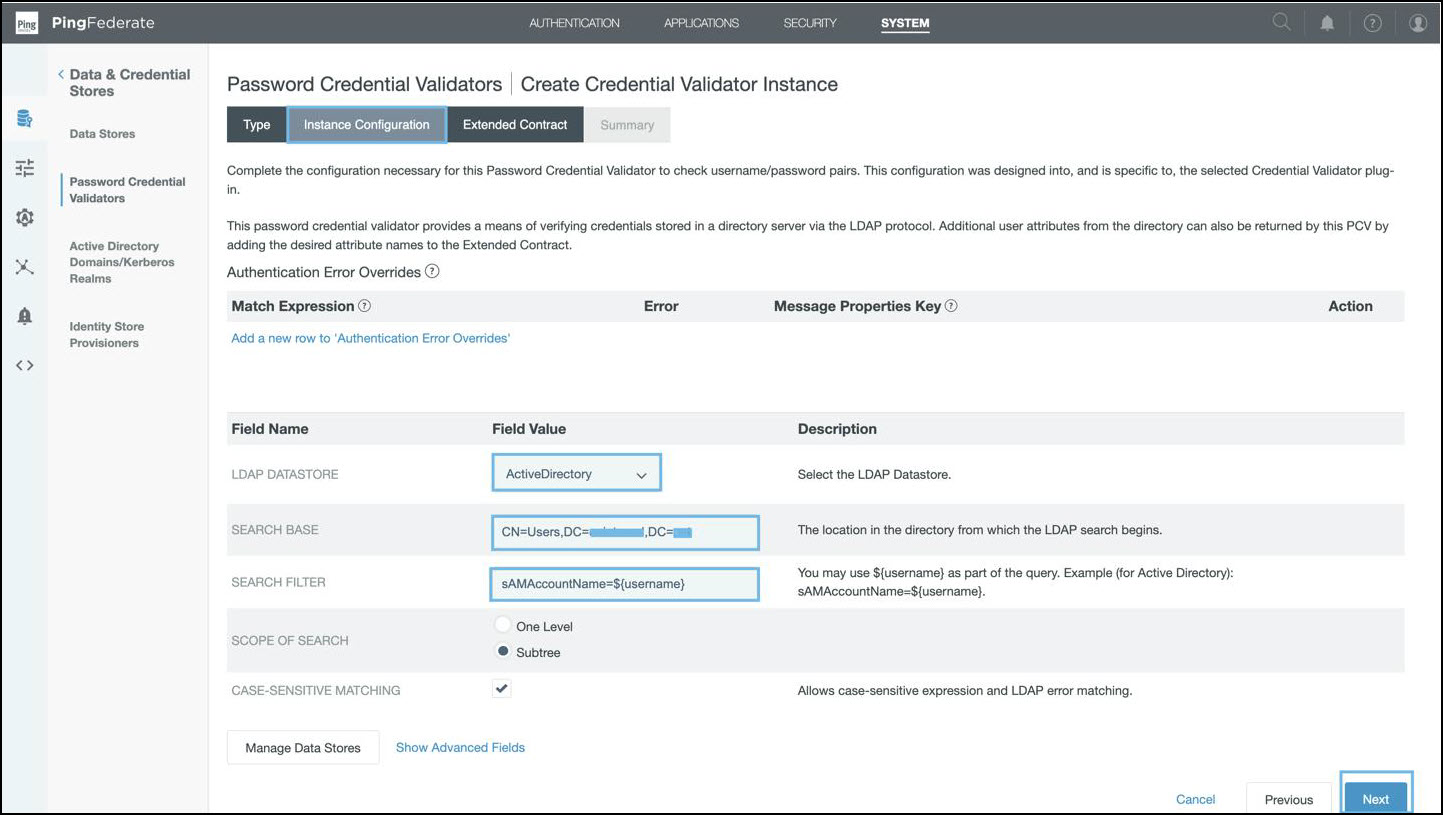
* In **Instance Configuration**, enter:

  * **LDAP Datastore:** Select the datastore created in Step 1
  * **Search Base:** Distinguished Name (DN) of the AD root
  * **Search Filter:**

    ```
    sAMAccountName=${username}
    ```

  <figure><img src="/files/BLqWB5fbLhRpOI5SLhsV" alt=""><figcaption></figcaption></figure>
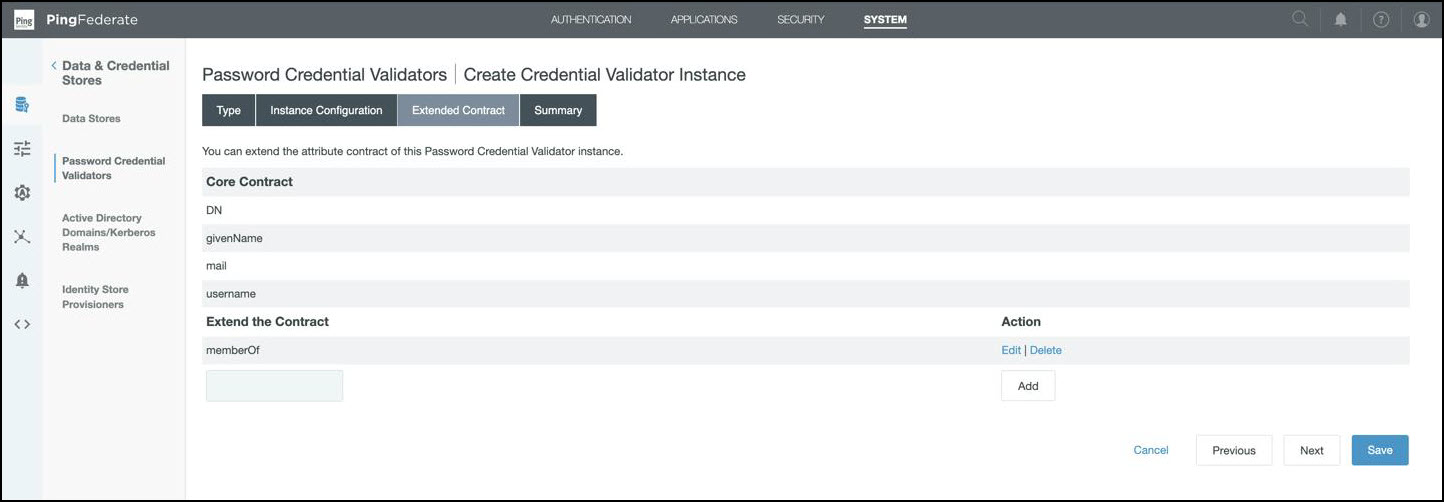
* In the **Extended Contract**, add `memberOf`.

  <figure><img src="/files/YTpzOnkYGA0j13SXomKl" alt=""><figcaption></figcaption></figure>
* Review and save the validator.

  <figure><img src="/files/oXRgTrsVlP00HTAx8Scp" alt=""><figcaption></figcaption></figure>

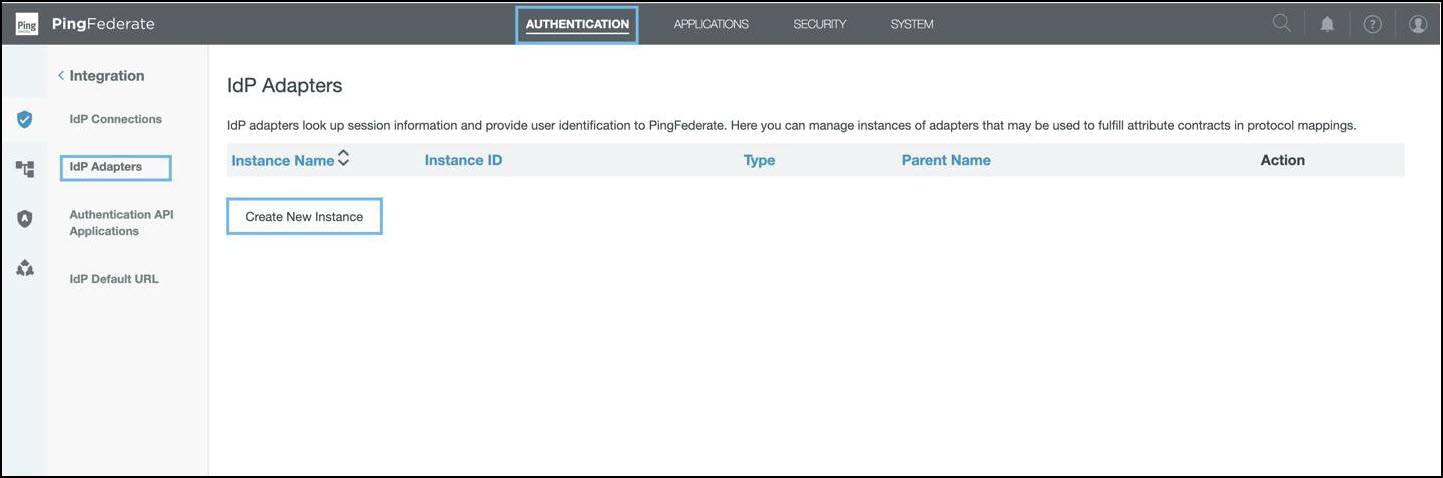
### IdP Adaptor Creation

* Navigate to:

  ```
  Authentication > IdP Adaptors
  ```
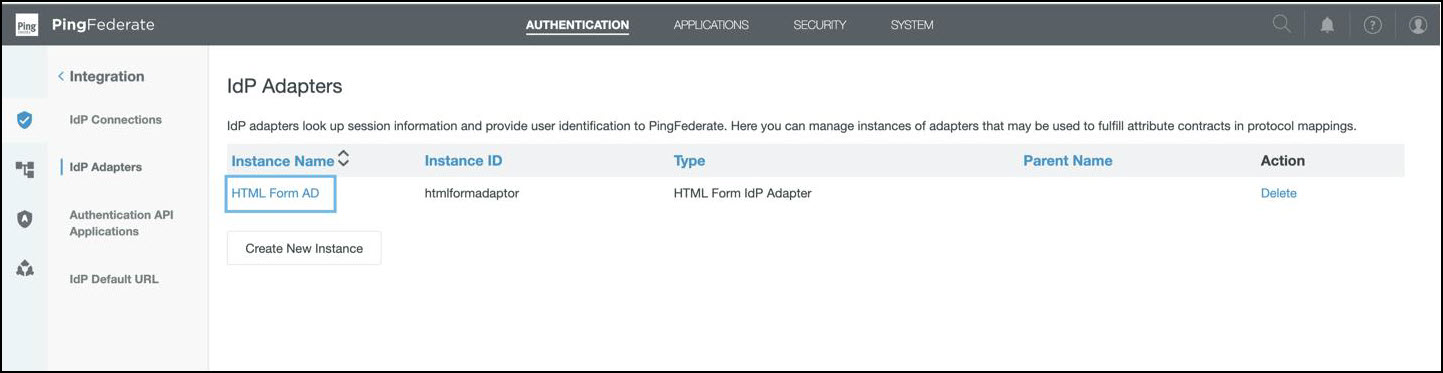
* Click **Create New Instance**.

  <figure><img src="/files/HwRxh7eFroZmPvVIMFe9" alt=""><figcaption></figcaption></figure>
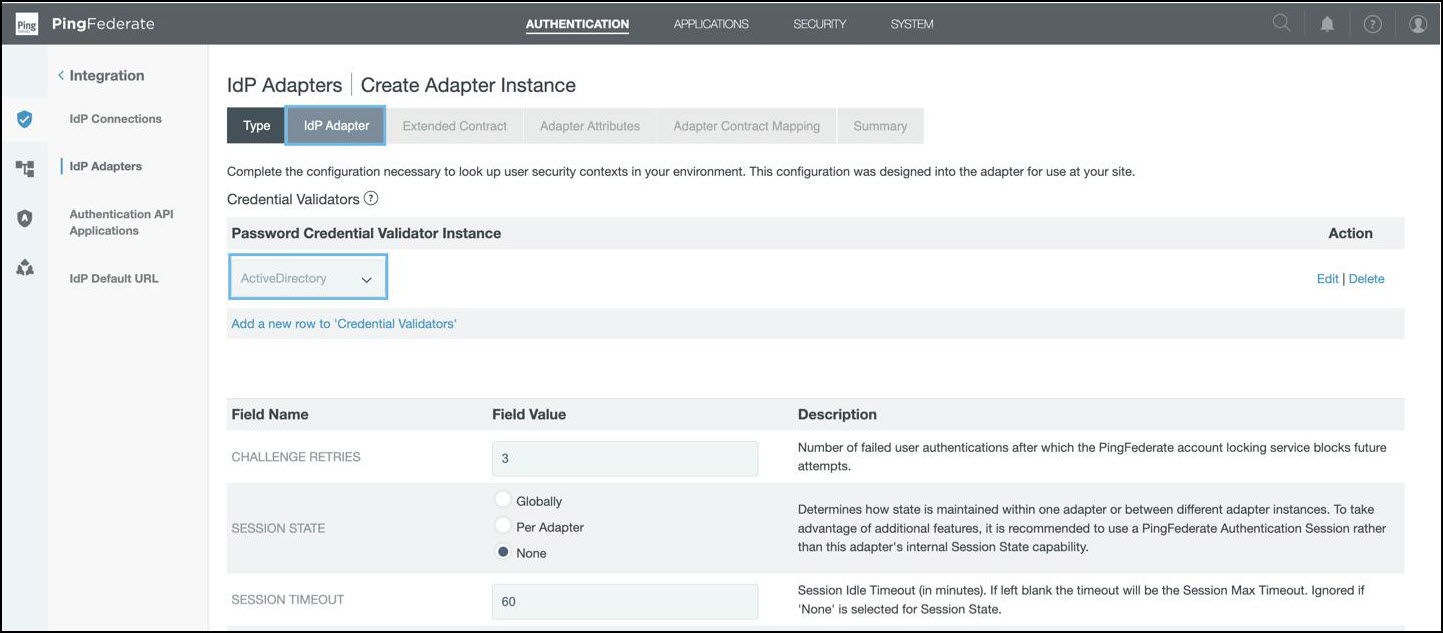
* Enter:
  * **Instance Name / ID:** Any name
  * **Type:** HTML Form IdP Adaptor
* Under **Adaptor Settings**, link the AD datastore created earlier.

  <figure><img src="/files/cEXdPTst8FgskTBZy6fE" alt=""><figcaption></figcaption></figure>
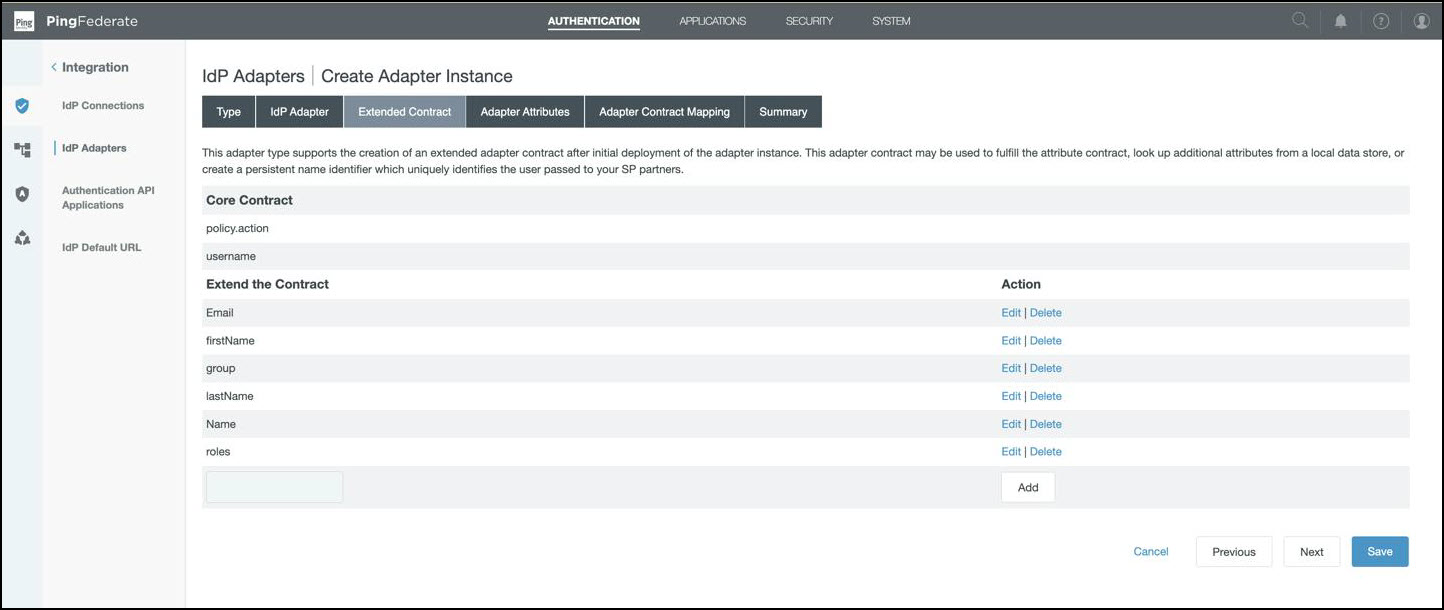
* In the **Extended Contract**, add attributes:

  * Name
  * Email
  * firstName
  * lastName

  <figure><img src="/files/gpOq822UMmjqPdigNoWy" alt=""><figcaption></figcaption></figure>
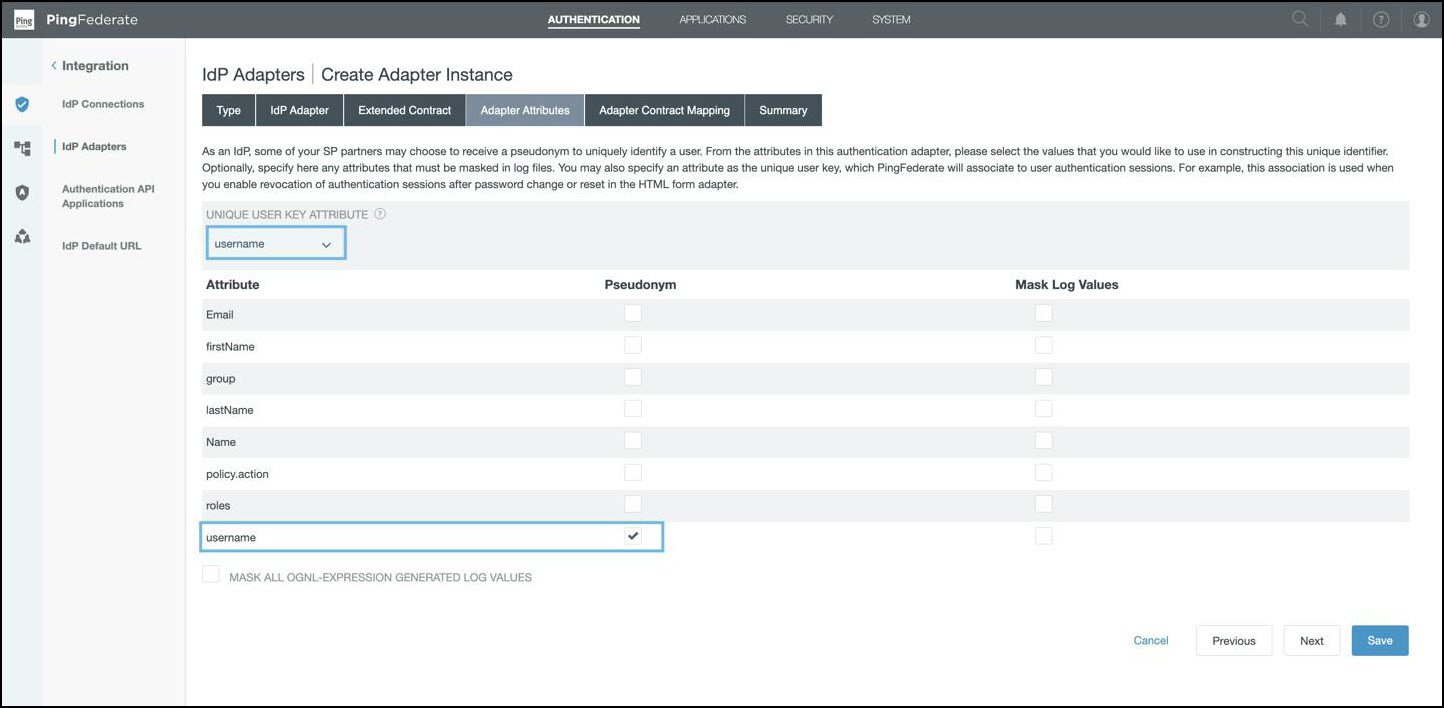
* In the **Adaptor Attribute section**, enter the highlighted details and then click **Next**.

  <figure><img src="/files/cG7wsCDuF7pyHxr9UzV6" alt=""><figcaption></figcaption></figure>
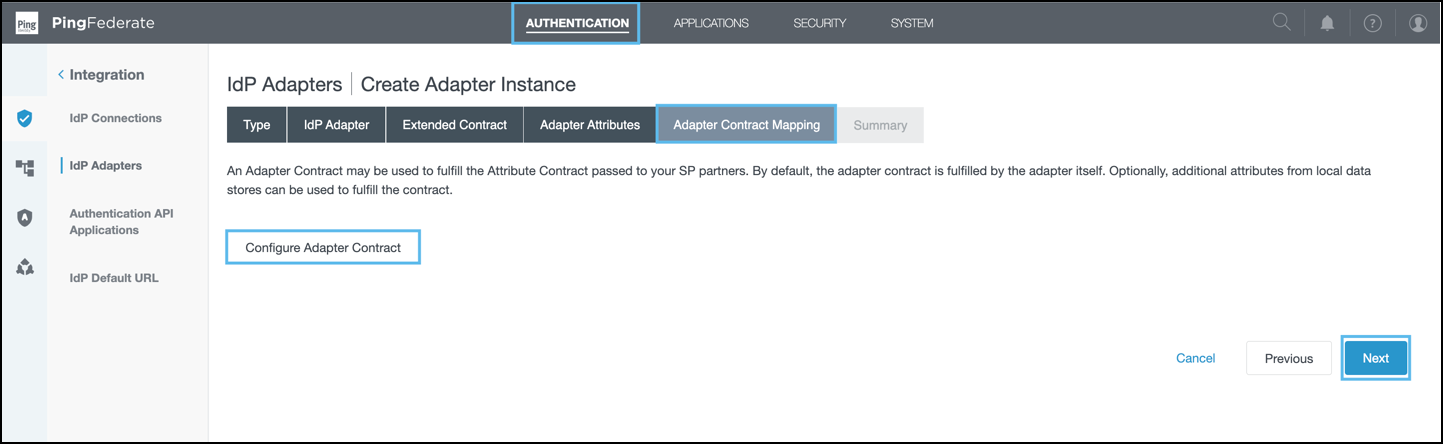
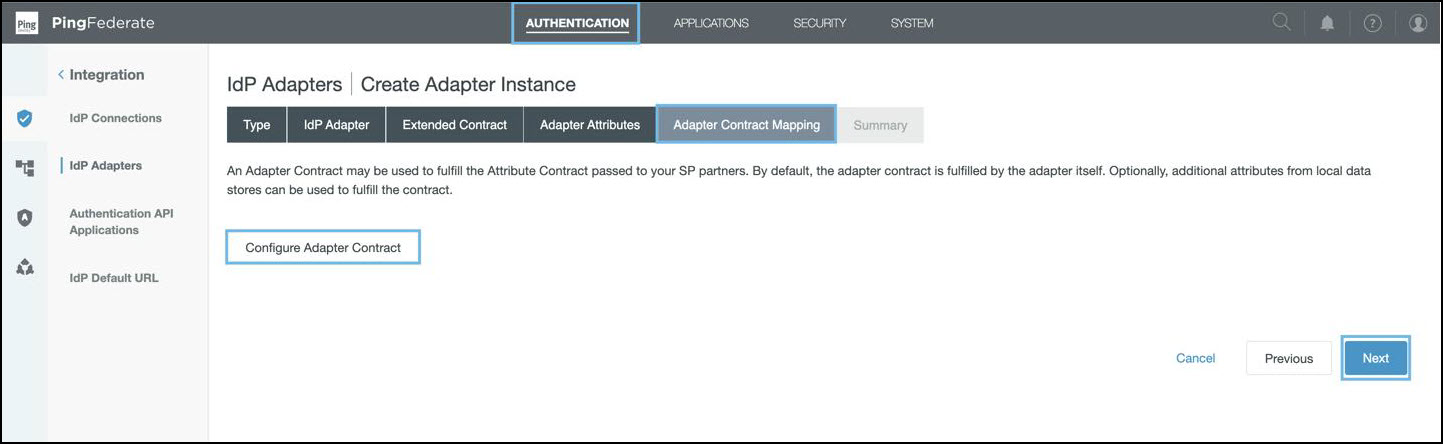
* In the **Adaptor Contract Mapping tab**, click **Configure Adaptor Contract**.

  <figure><img src="/files/bZW0uw9vfLqoRFBTw6BZ" alt=""><figcaption></figcaption></figure>
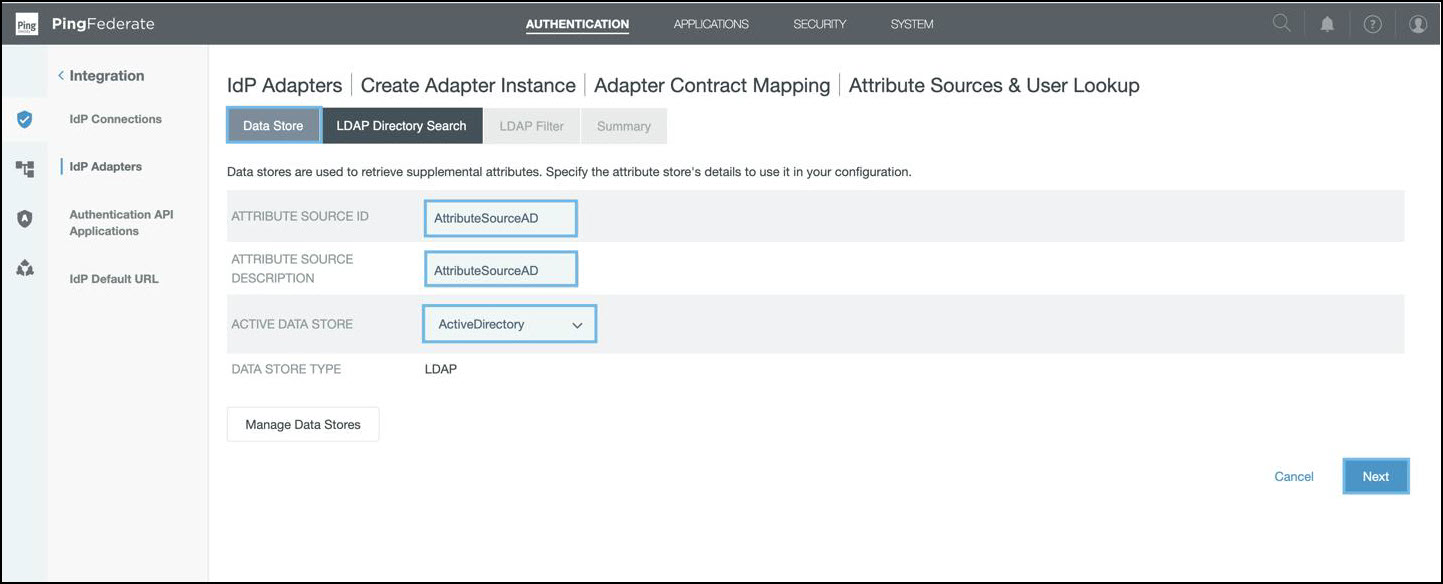
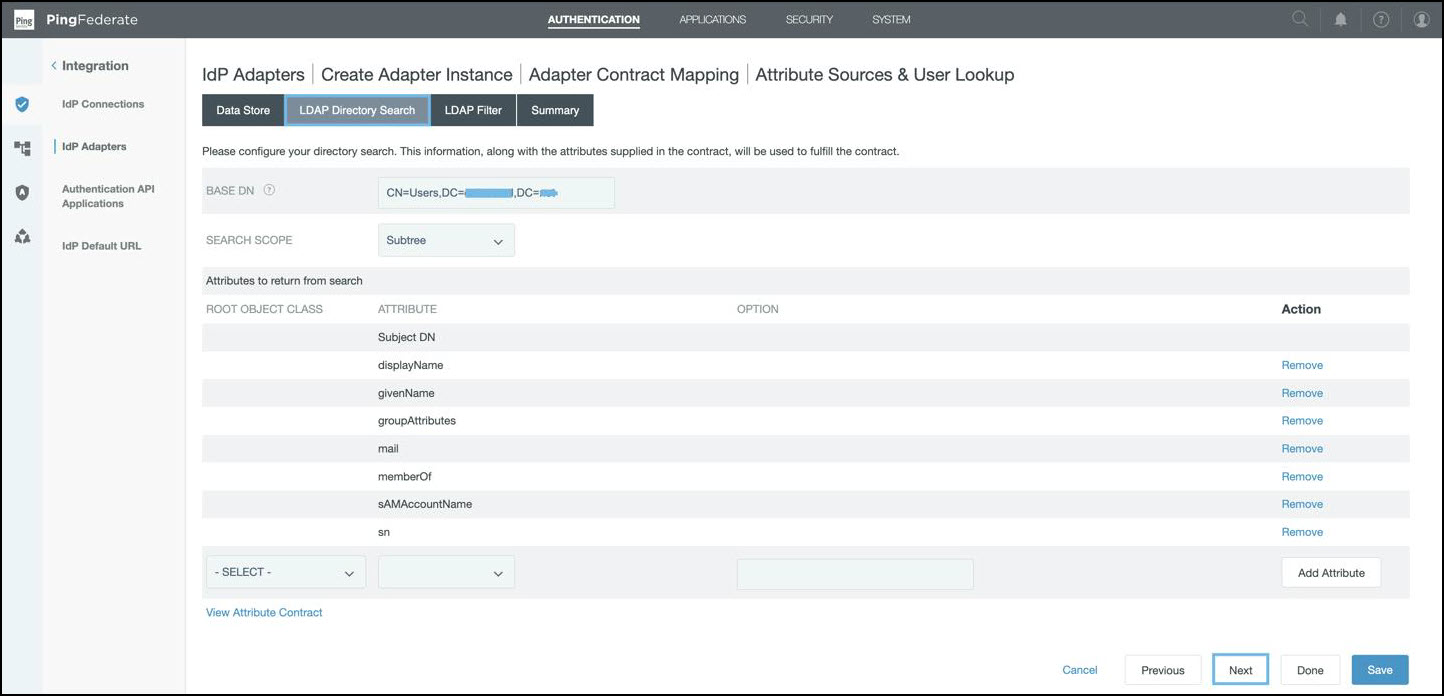
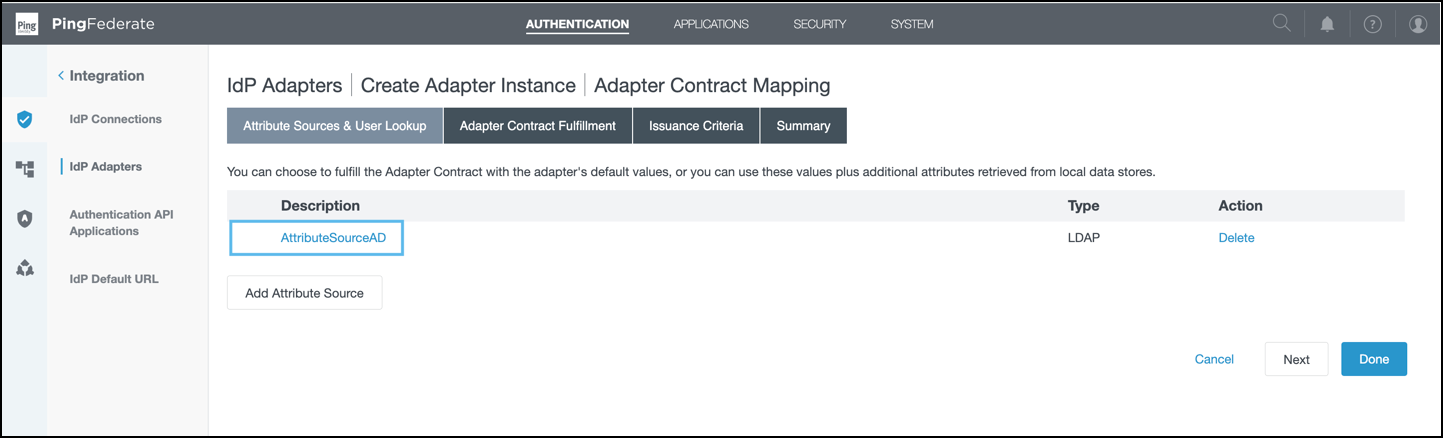
* Click **Add Attribute Sources**. Fill in the details:

  <figure><img src="/files/7cOHhG0OH0fF0x9Al3Ab" alt=""><figcaption></figcaption></figure>

  * **Attribute Source ID:** Any name of your choice
  * **Attribute Source Description:** Any description
  * **Active Data Store:** Select the Active Directory created in the datastore section

    <figure><img src="/files/YPfBRX8BGR9rlnpOwCSn" alt=""><figcaption></figcaption></figure>
* Enter the filter details as shown, then click **Next**.

  <figure><img src="/files/52hPPGY1nhBg6OMo90sg" alt=""><figcaption></figcaption></figure>
* Review the changes and click **Done**.<br>

  <figure><img src="/files/x1PLd70e6pWezJxf38Hl" alt=""><figcaption></figcaption></figure>
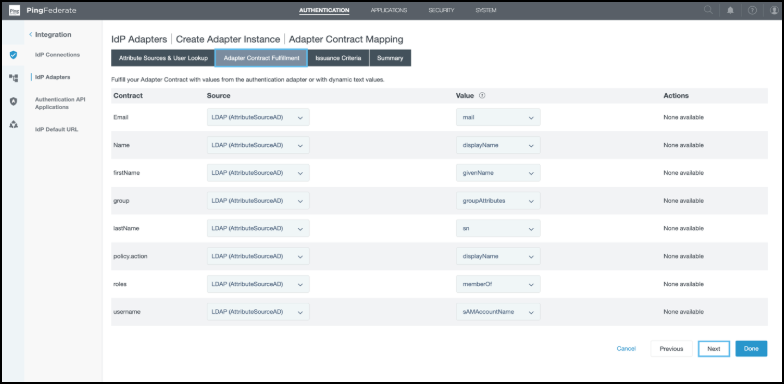
* Click **Adaptor Contract Fulfillment** → enter details → **Next**.

  <figure><img src="/files/ozBdby5Tro0D6rLhZlrC" alt=""><figcaption></figcaption></figure>
* Continue clicking **Next** and then **Save**.

  <figure><img src="/files/jIvsjILTfaUHQXFBqoQq" alt=""><figcaption></figcaption></figure>

### Entity ID Configuration

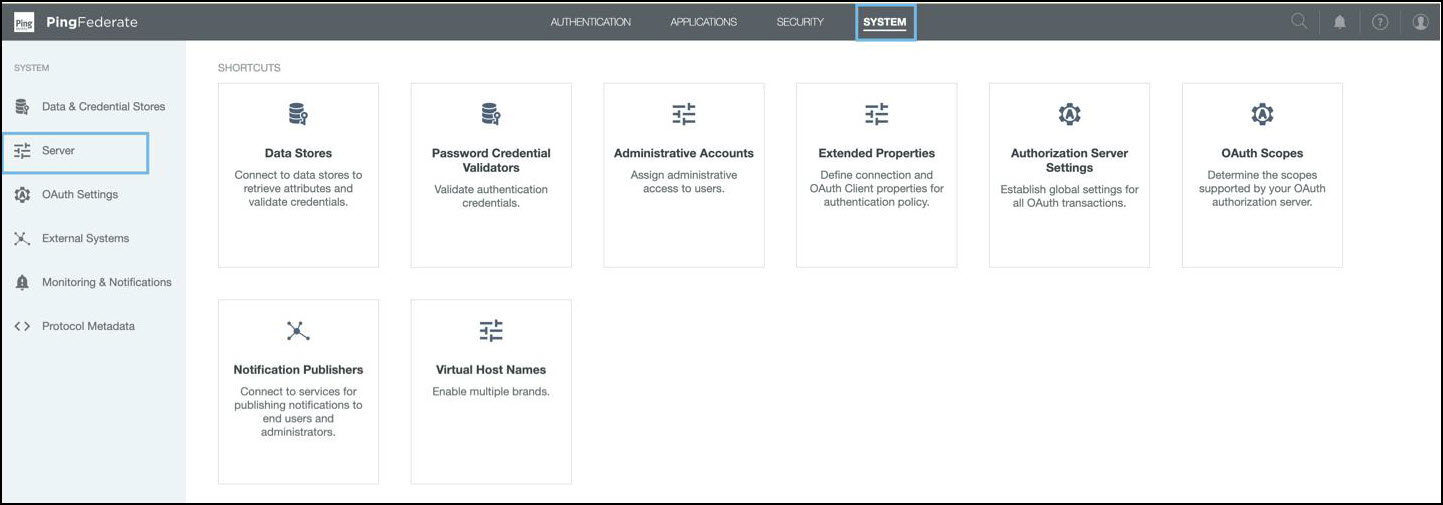
* Navigate to **System > Server.**

  <figure><img src="/files/YvlPTtZVSVMYrpV99KQb" alt=""><figcaption></figcaption></figure>
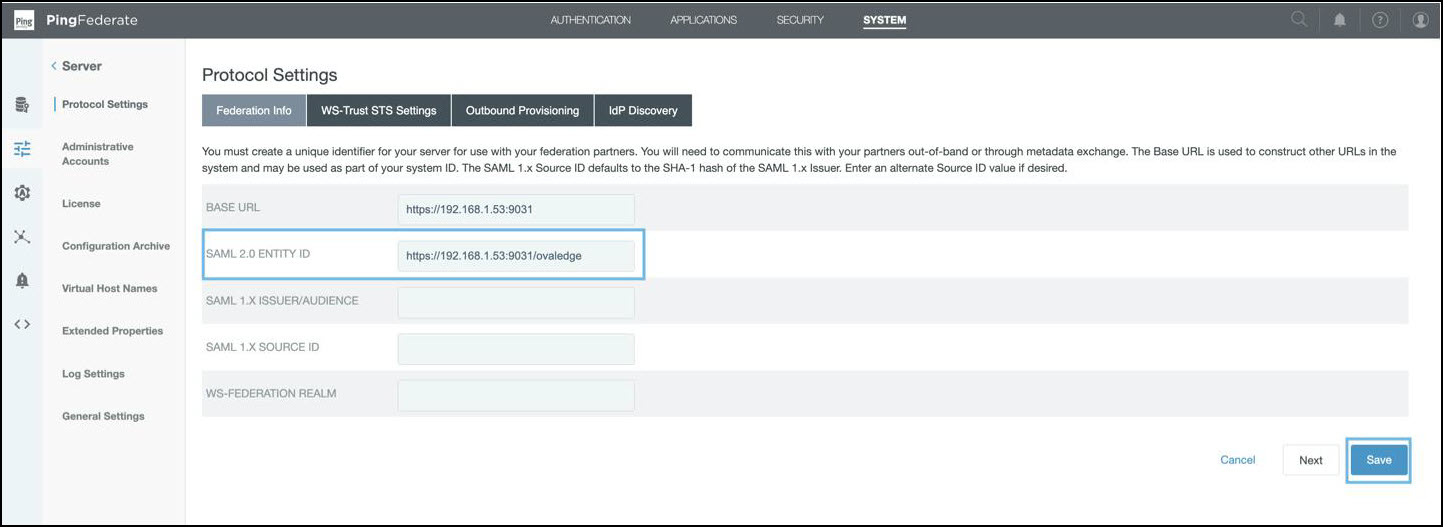
* Enter a **SAML 2.0 Entity ID** (any valid URL).

  <figure><img src="/files/4vcjczWYerJ2W6fiRMWc" alt=""><figcaption></figcaption></figure>
* Proceed through the wizard and save the configuration.

### Service Provider (SP) Connection (OvalEdge Application)

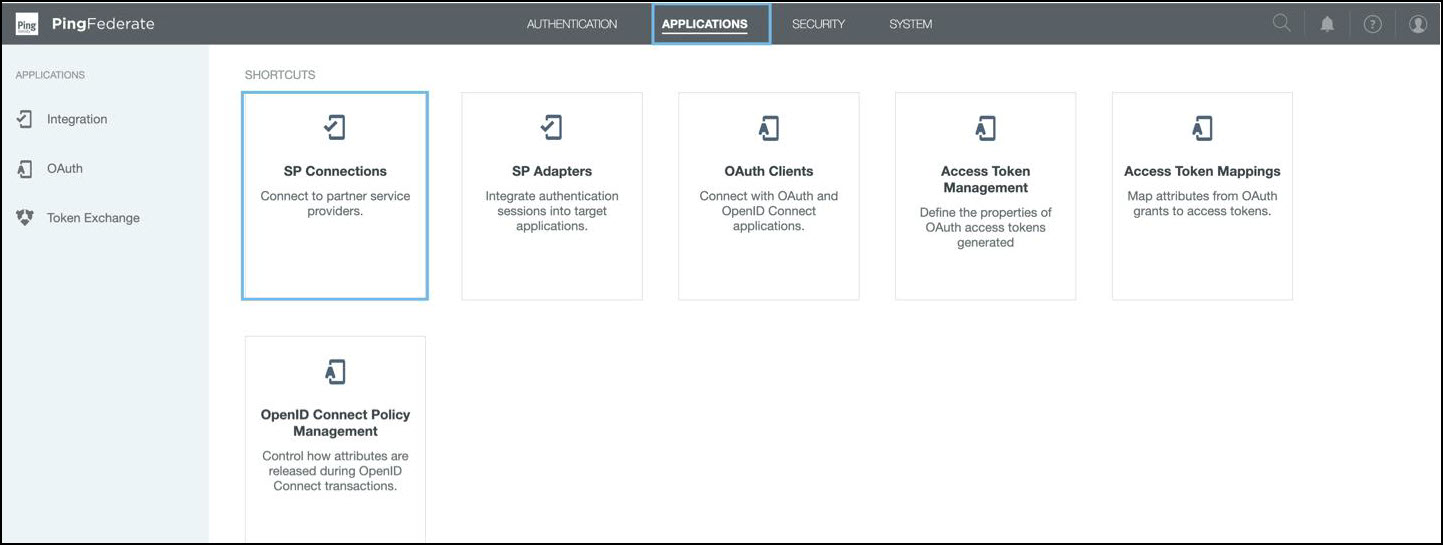
* Navigate to **Applications > SP Connections** in PingFederate.

  <figure><img src="/files/8sg37iuKj2bDHlRSEGGh" alt=""><figcaption></figcaption></figure>
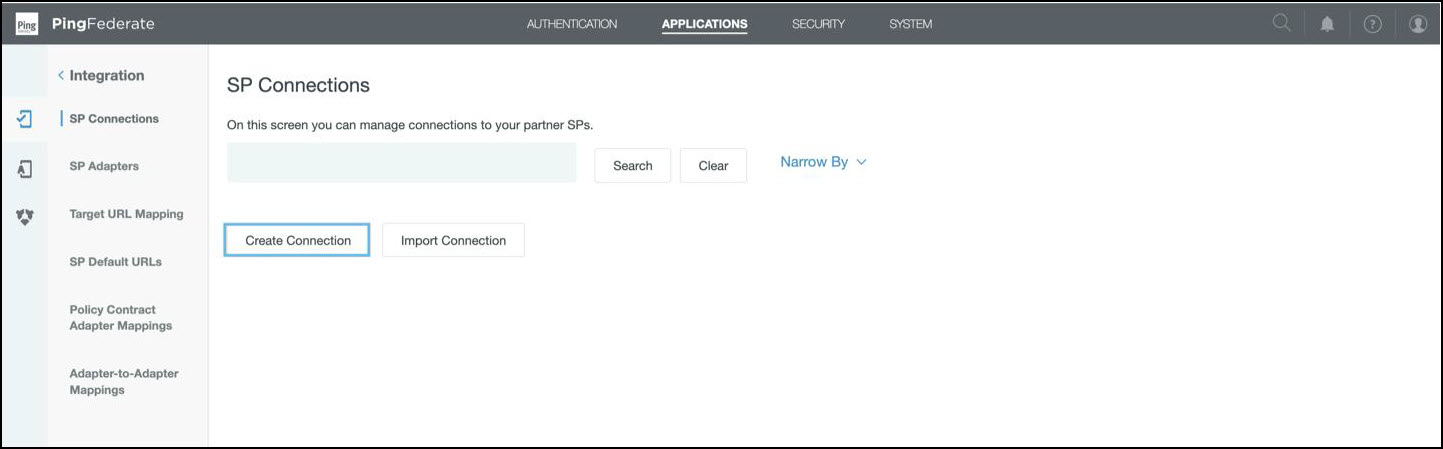
* Click **Create Connection**.

  <figure><img src="/files/g5AvKB5BZWbhq2sa4b3S" alt=""><figcaption></figcaption></figure>
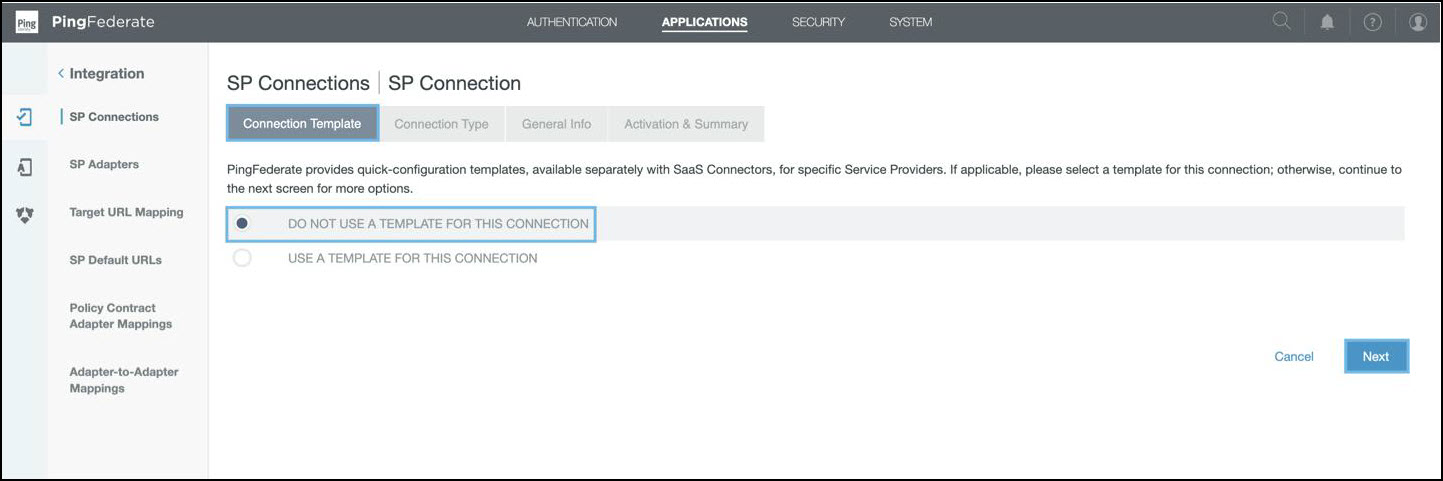
* Select **Do not use a template** and click **Next**.

  <figure><img src="/files/uVD8CiZ0DpXkOGpRUmwr" alt=""><figcaption></figcaption></figure>
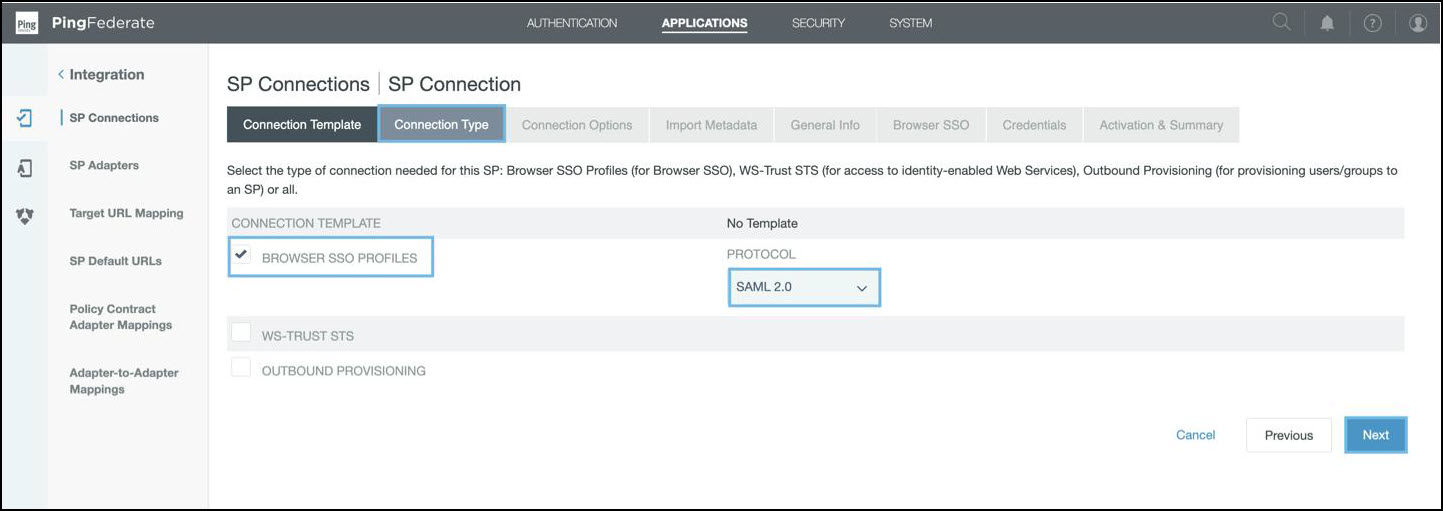
* Choose **Browser SSO** as the connection type.

  <figure><img src="/files/lZmyAkD5uNv3RuLFmGFo" alt=""><figcaption></figcaption></figure>
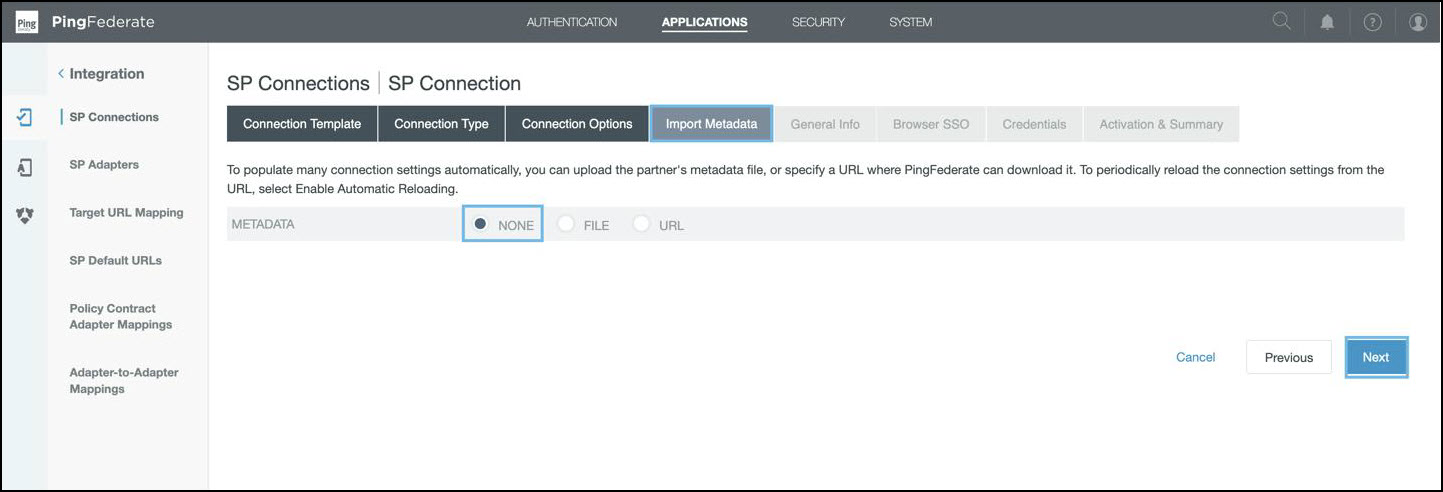
* In the Import Metadata URL, select **None** and click **Next**.

  <figure><img src="/files/ZvMAn95kr9n5aMIe7VCK" alt=""><figcaption></figcaption></figure>
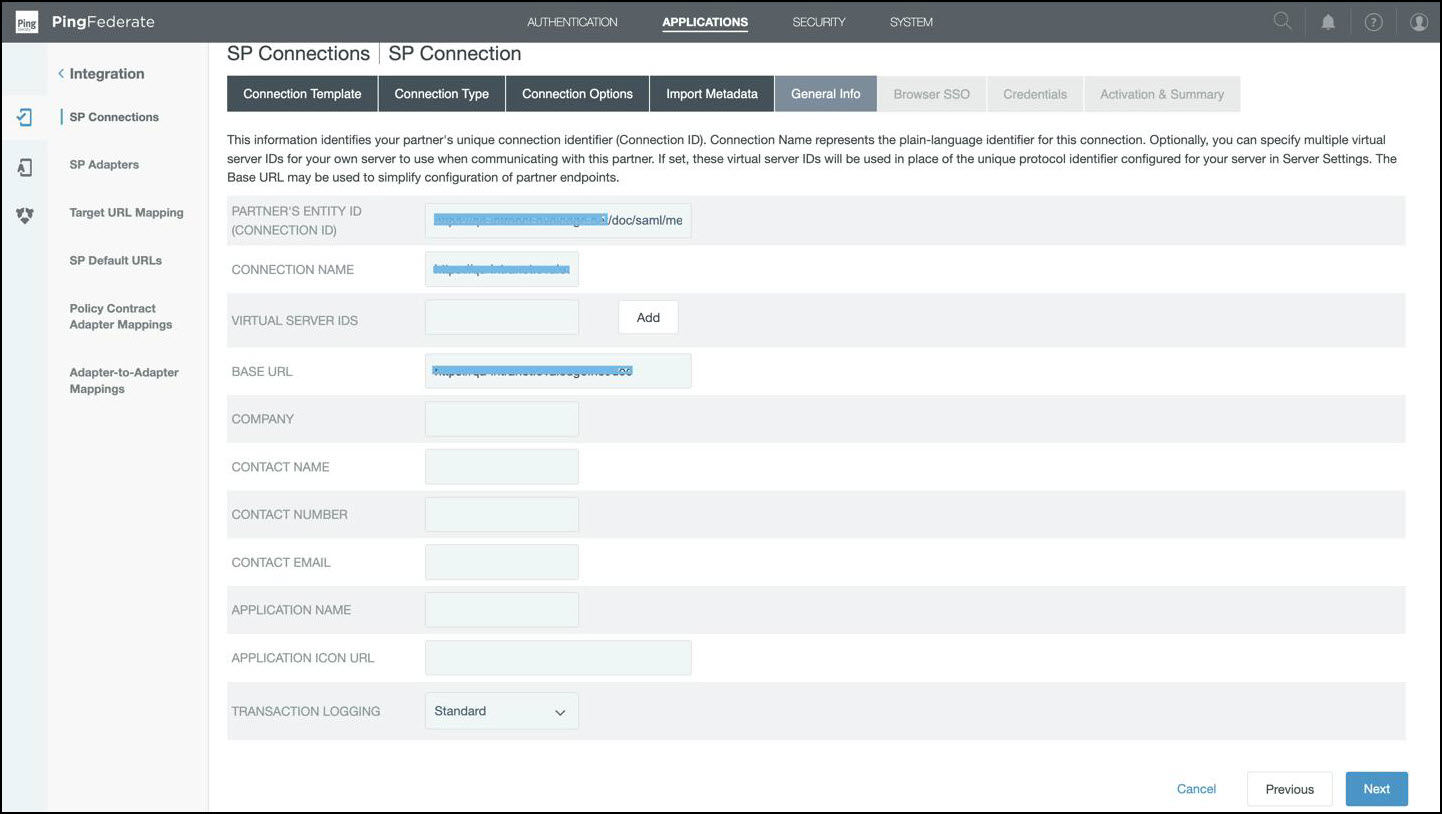
* In **General Info**, enter:

  * **Partner’s Entity ID**: `https://<IP-or-DNS>/saml/metadata`
  * **Connection Name**: `https://<IP-or-DNS>/saml/metadata`
  * **Base URL**: `https://<IP-or-DNS>` (OvalEdge application URL)

  <figure><img src="/files/oRczfkh1zn8EH1S7VU01" alt=""><figcaption></figcaption></figure>

  <div data-gb-custom-block data-tag="hint" data-style="info" class="hint hint-info"><p>Here, <code>https://&#x3C;IP-or-DNS></code> is an OvalEdge application URL.</p></div>
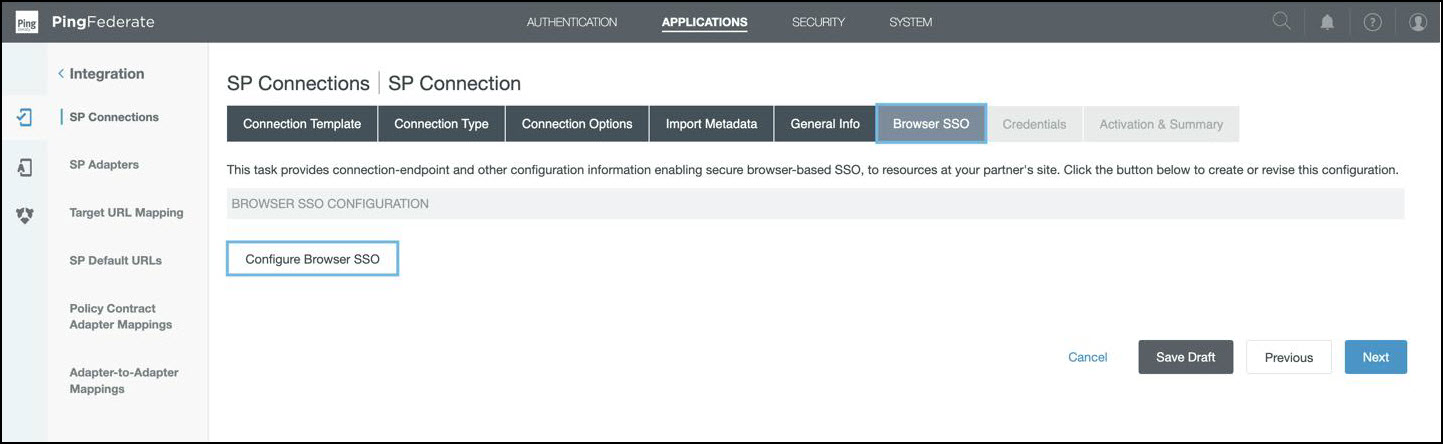
* Click **Browser SSO**.

  <figure><img src="/files/4I9AaZWFjfQ6BHIPHTMb" alt=""><figcaption></figcaption></figure>
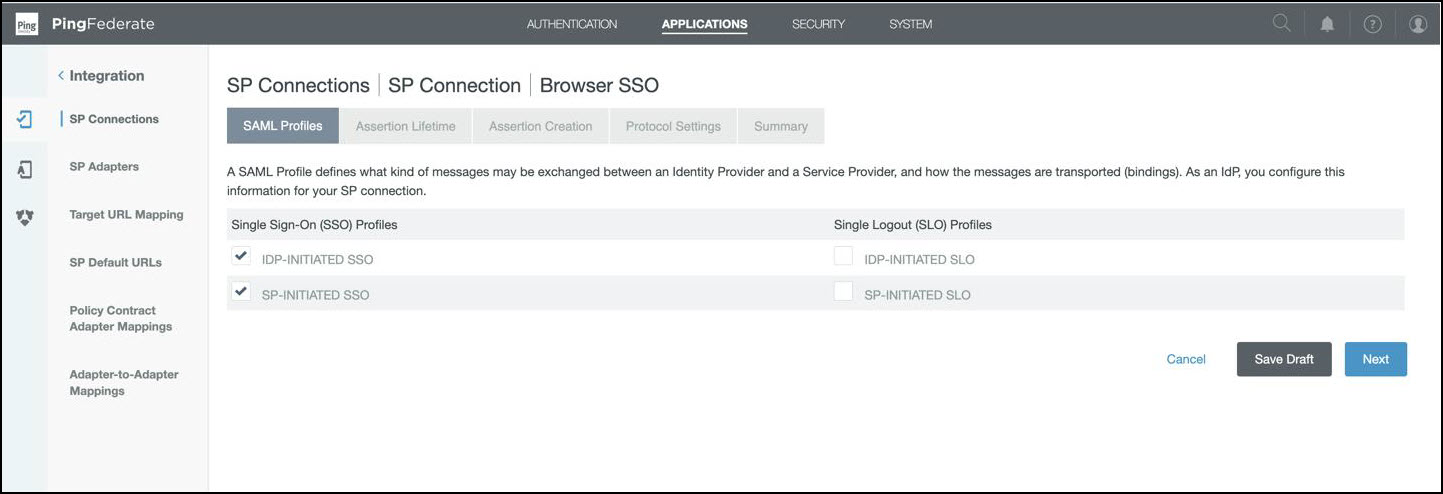
* Enable both **IdP-Initiated** and **SP-Initiated SSO.**

  <figure><img src="/files/j9Z985V7cBHhHPtikXMV" alt=""><figcaption></figcaption></figure>
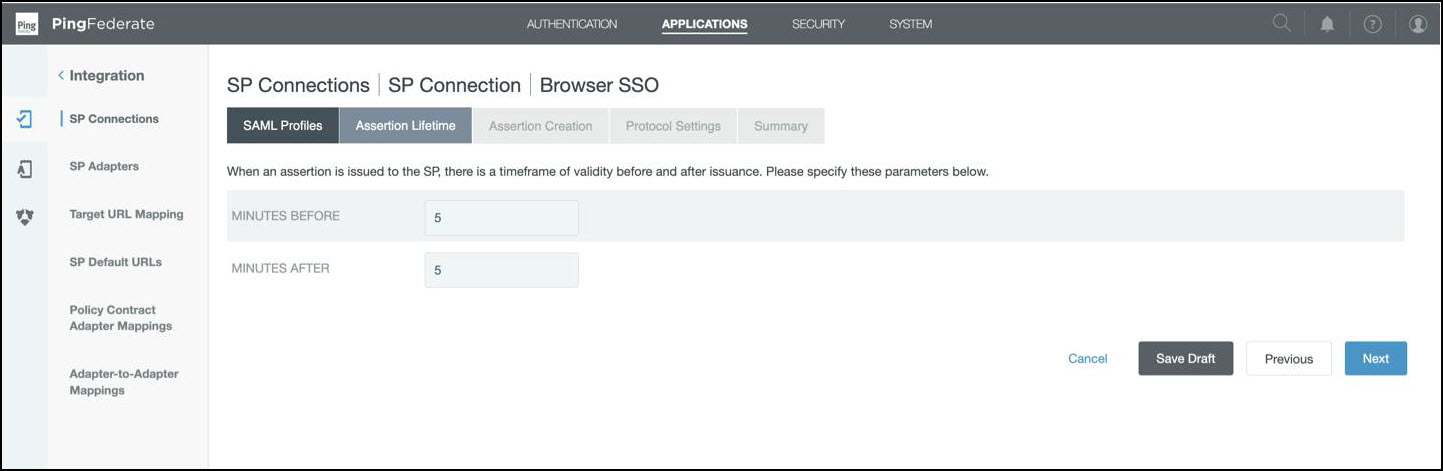
* In Assertion-Lifetime, click **Next**.

  <figure><img src="/files/h68jqBF9mWwXgzjfctV3" alt=""><figcaption></figcaption></figure>
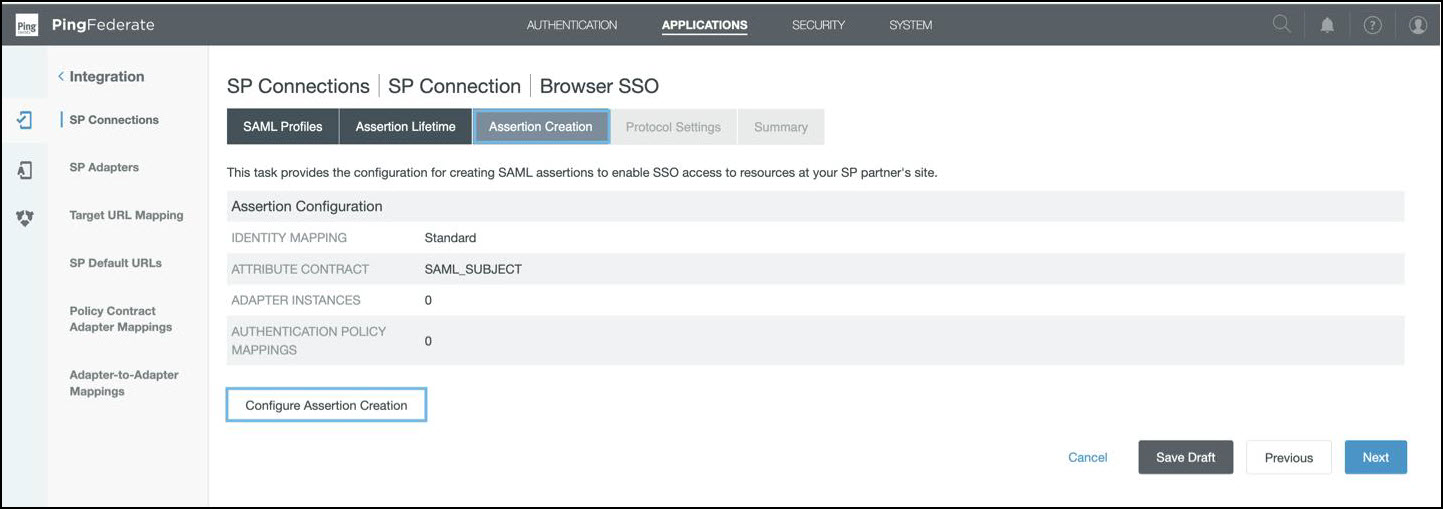
* Click **Configure Assertions Creation** and then click **Next**.

  <figure><img src="/files/M6Ka9rZTXyCnahrkfEkA" alt=""><figcaption></figcaption></figure>
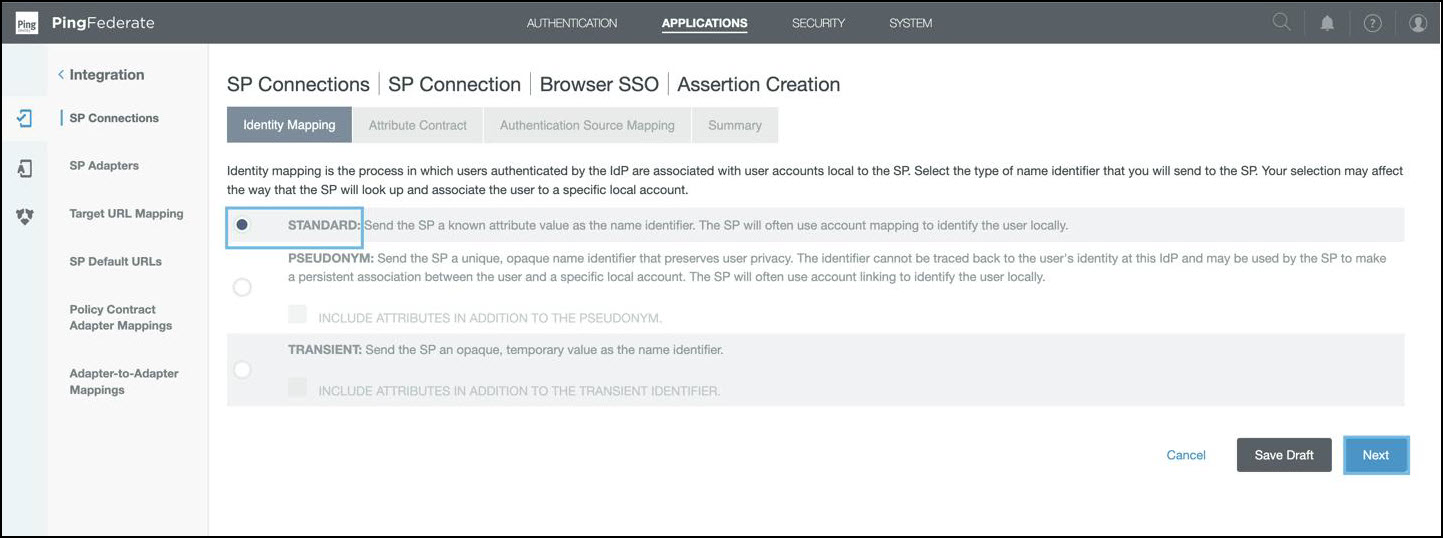
* Select the **STANDARD** checkbox and click **Next**.

  <figure><img src="/files/dd5MHqZZRRVOHZoc0rPW" alt=""><figcaption></figcaption></figure>
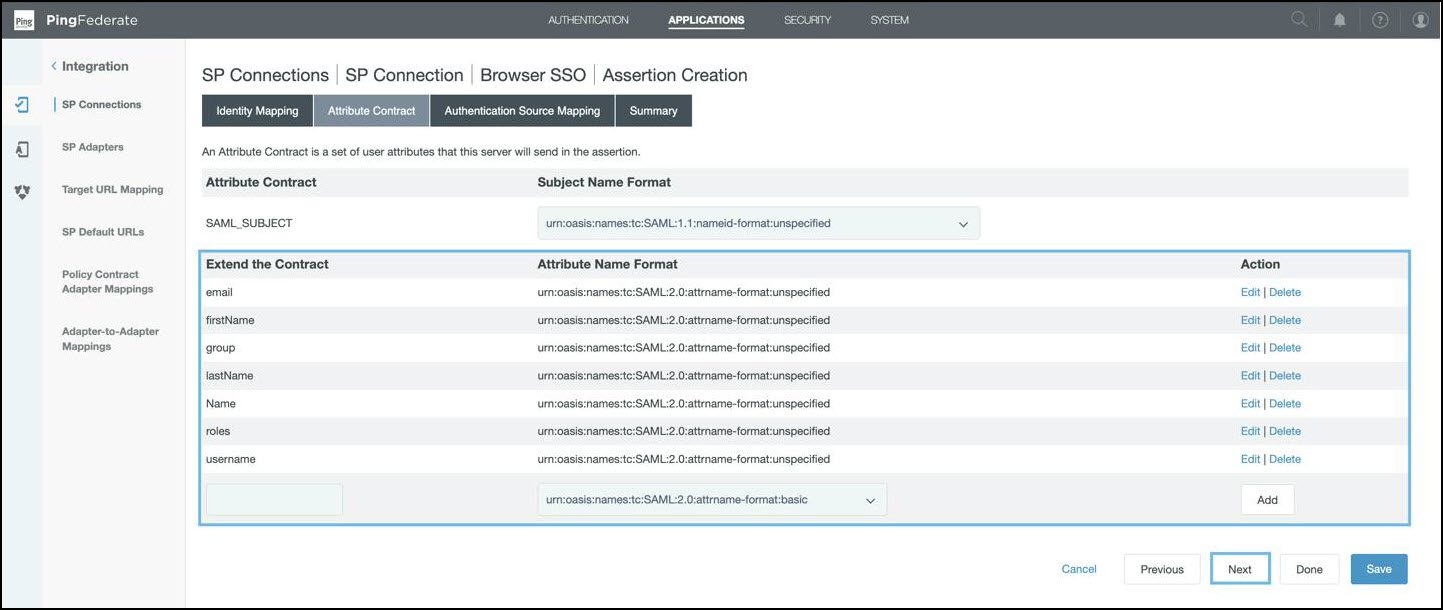
* Add/Edit the attributes and click **Next**.

  <figure><img src="/files/rVeUFHrBhSbjAJLxmpmA" alt=""><figcaption></figcaption></figure>
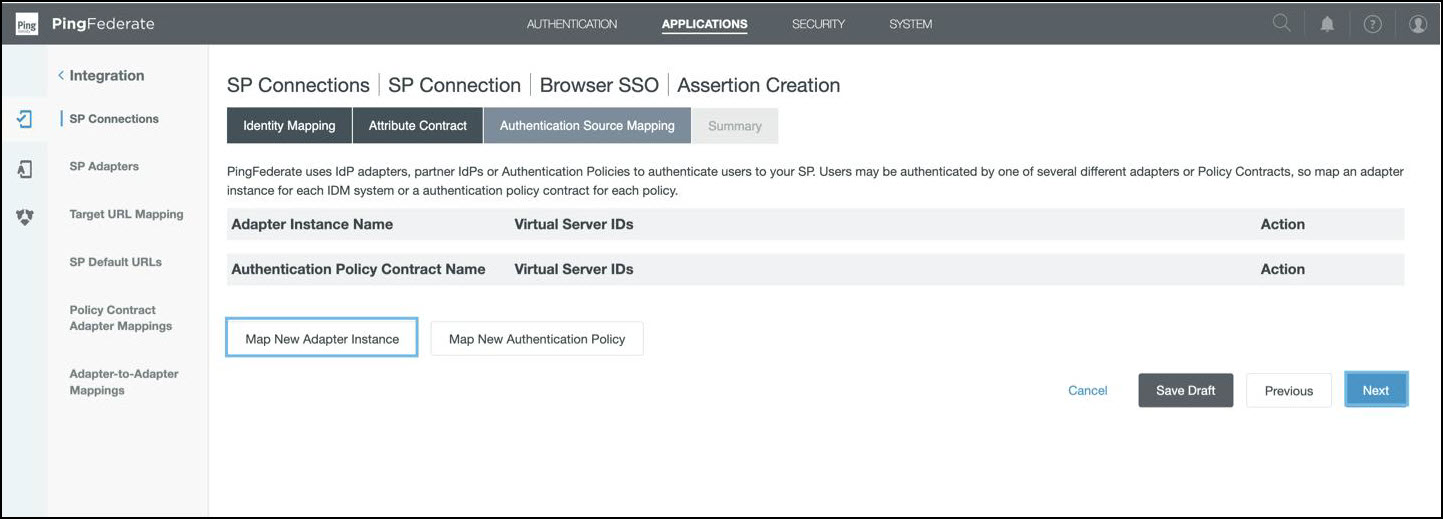
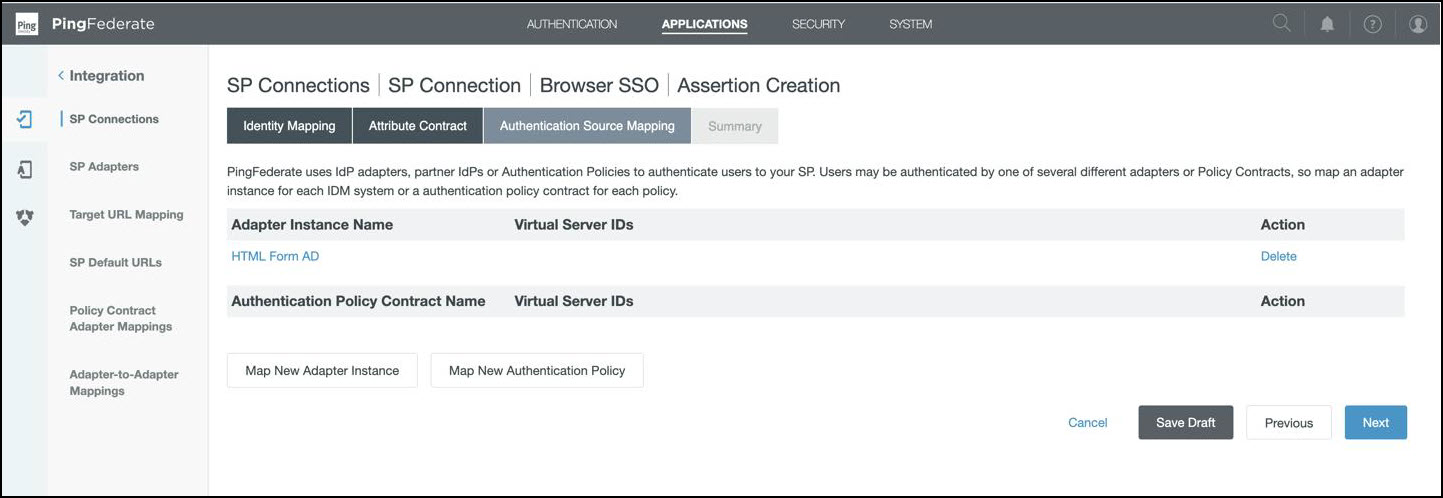
* Click **Map New adaptor Instance**.

  <figure><img src="/files/NhMqP1wG8UQJ6rDvGi6L" alt=""><figcaption></figcaption></figure>
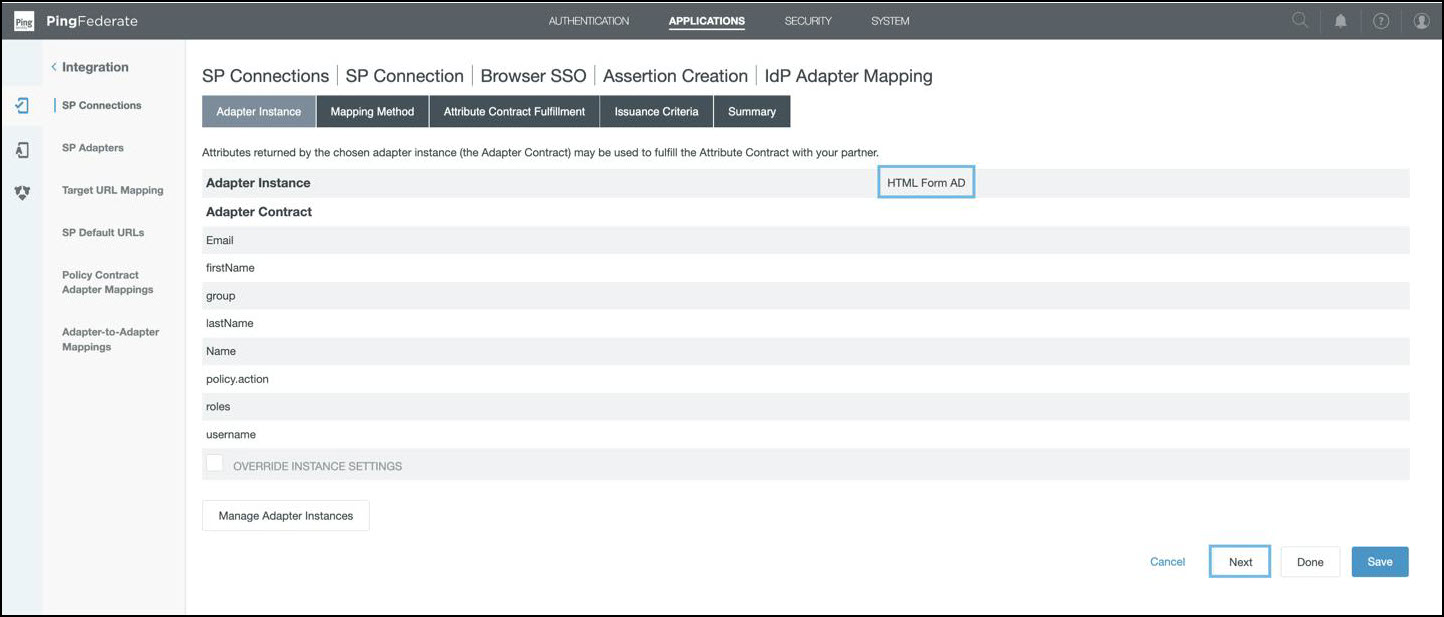
* Select the **Adaptor Name** that we created in the Adaptor instance creation section and click **Next**.

  <figure><img src="/files/FWXpF23Ng7GhQiPKLdz7" alt=""><figcaption></figcaption></figure>
* Select the checkbox and click **Next**.

  <figure><img src="/files/PsuzafU57h25cAvjKIGe" alt=""><figcaption></figcaption></figure>
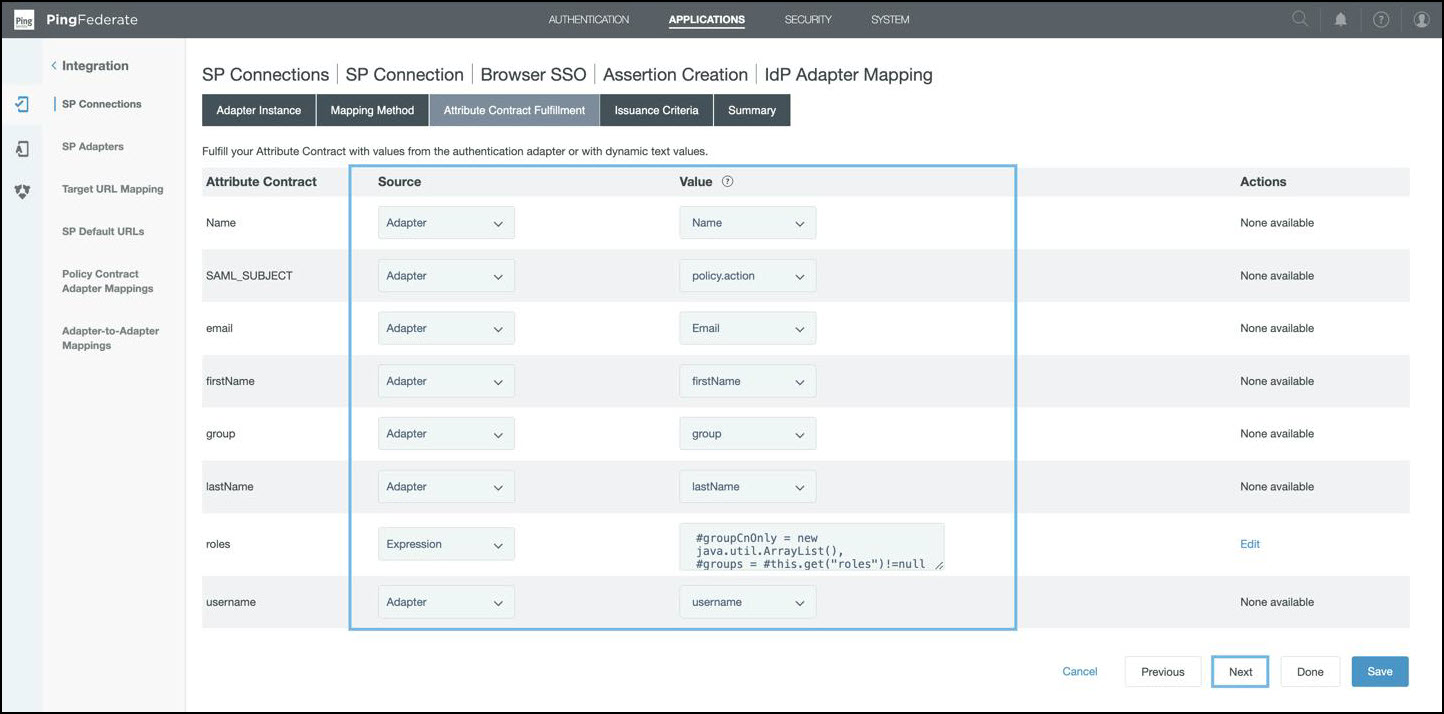
* In **Attribute Contract Fulfillment**, enter the details below and click **Next**.

  <figure><img src="/files/C1XIhf55HmHLerPxMWuj" alt=""><figcaption></figcaption></figure>

  <br>

  **Configure role expressions (example):**

  ```java
  #groupCnOnly = new java.util.ArrayList(),
  #groups = #this.get("roles")!=null ? #this.get("roles").getValues() : {},
  #groups.{
    #group = #this,
    #group = new javax.naming.ldap.LdapName(#group),
    #cn = #group.getRdn(#group.size() - 1).getValue().toString(),
    #groupCnOnly.add(#cn)
  },
  #this.get("roles")!=null ? new org.sourceid.saml20.adapter.attribute.AttributeValue(#groupCnOnly) : null
  ```
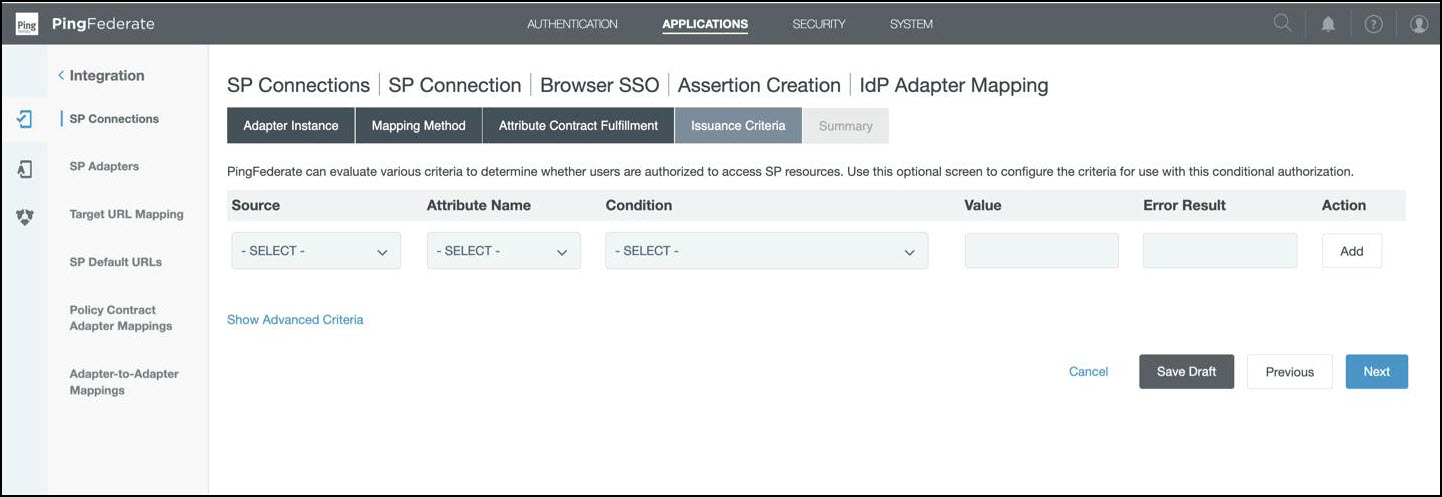
* In the **Issuance Criteria**, click **Next**.

  <figure><img src="/files/BC8IawcVkFTZwybIfhEz" alt=""><figcaption></figcaption></figure>
* Review the Summary and click **Next**.

  <figure><img src="/files/A3StEuR0ywPjnTG0Aav5" alt=""><figcaption></figcaption></figure>
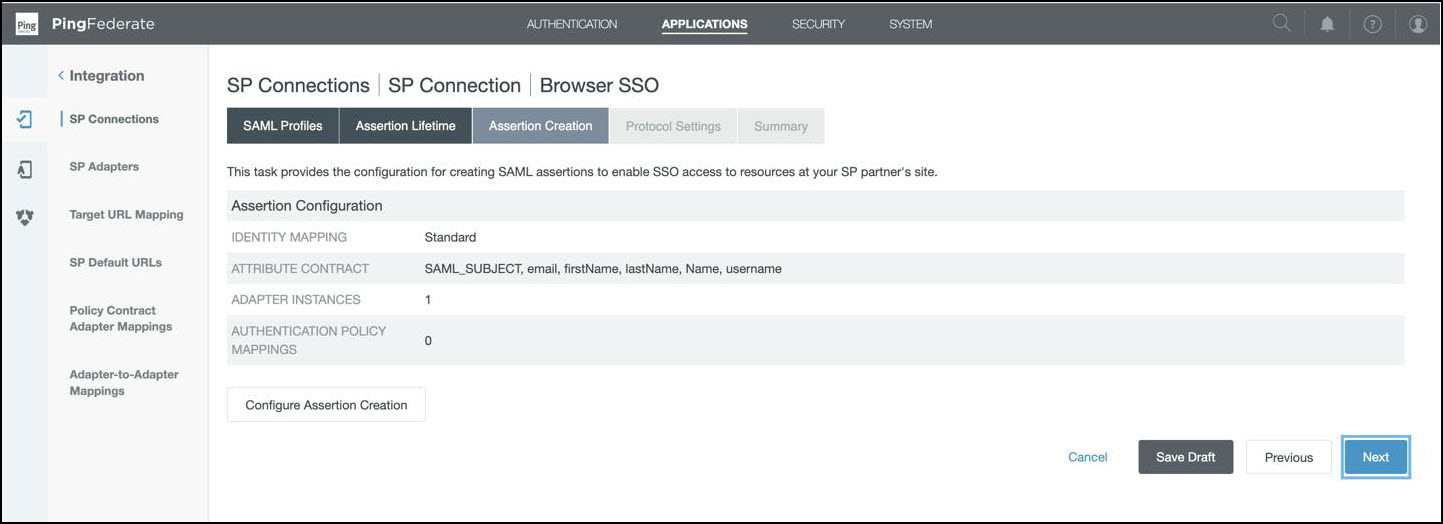
* Review the Assertion Configuration, and click on **Next**.

  <figure><img src="/files/hMnle77GIr5cTkxzthTv" alt=""><figcaption></figcaption></figure>
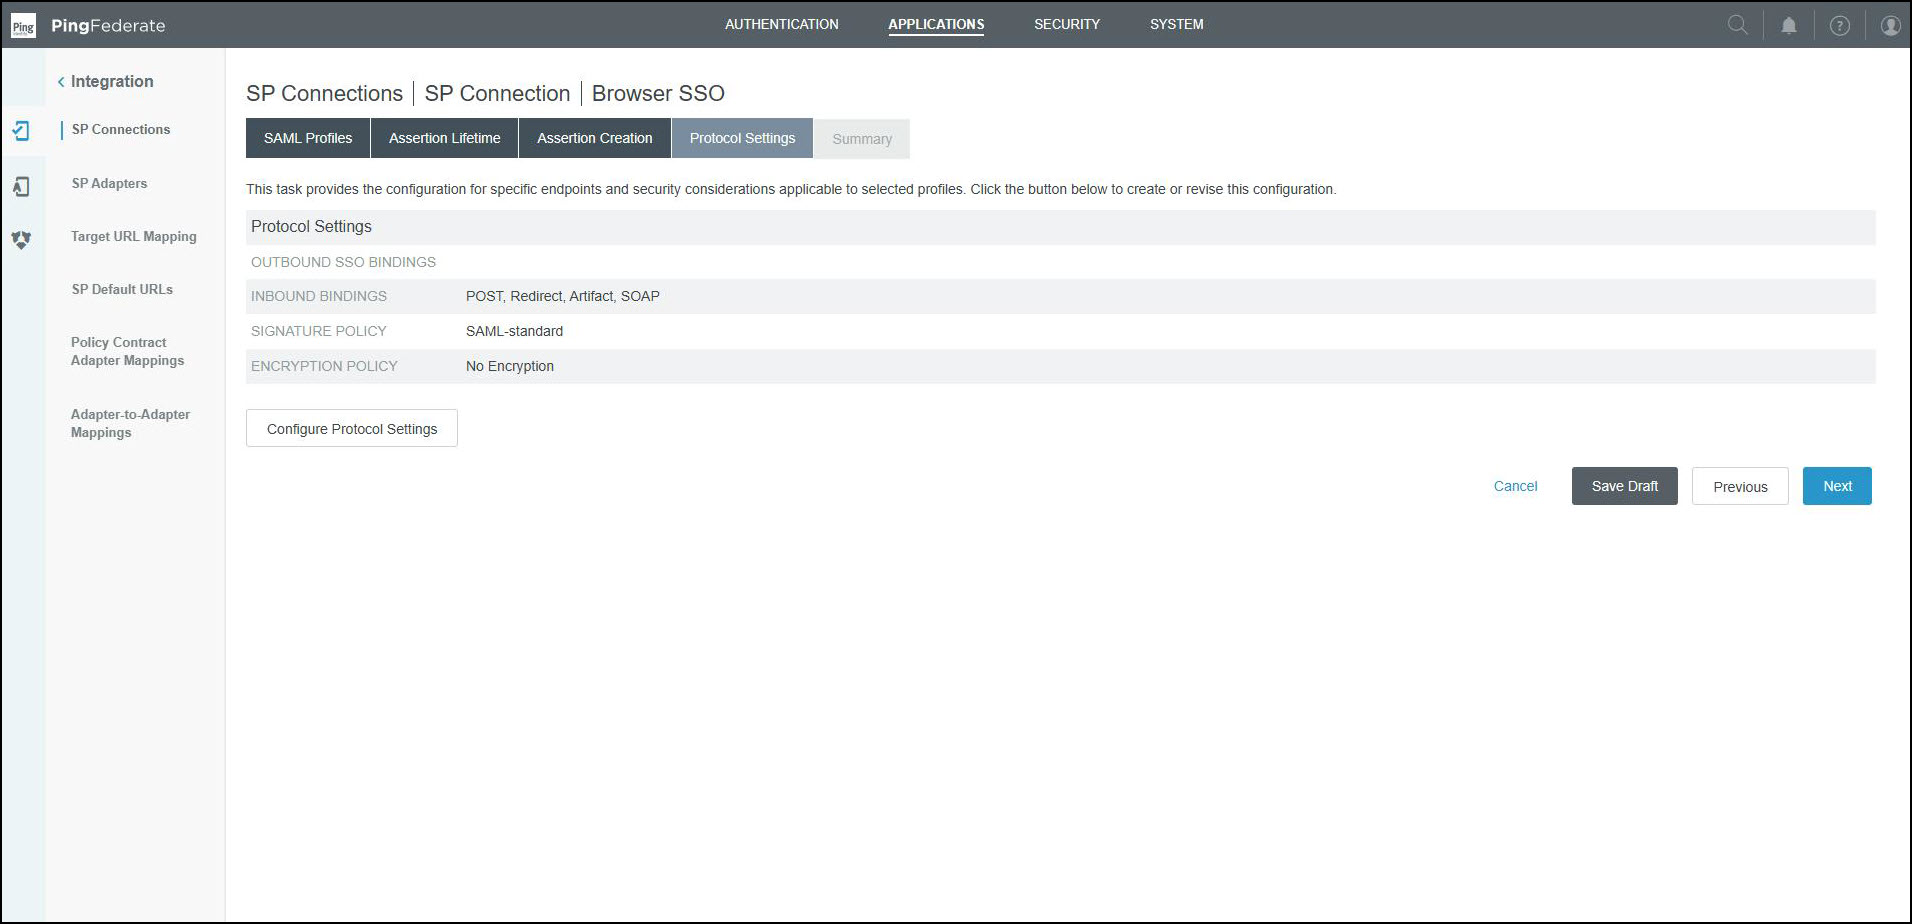
* **Configure Protocol Settings:**

  * **Endpoint URL**: `https://<IP-or-DNS>/saml/SSO`

  <figure><img src="/files/L3USGlbRBDgEvVRYgct3" alt=""><figcaption></figcaption></figure>
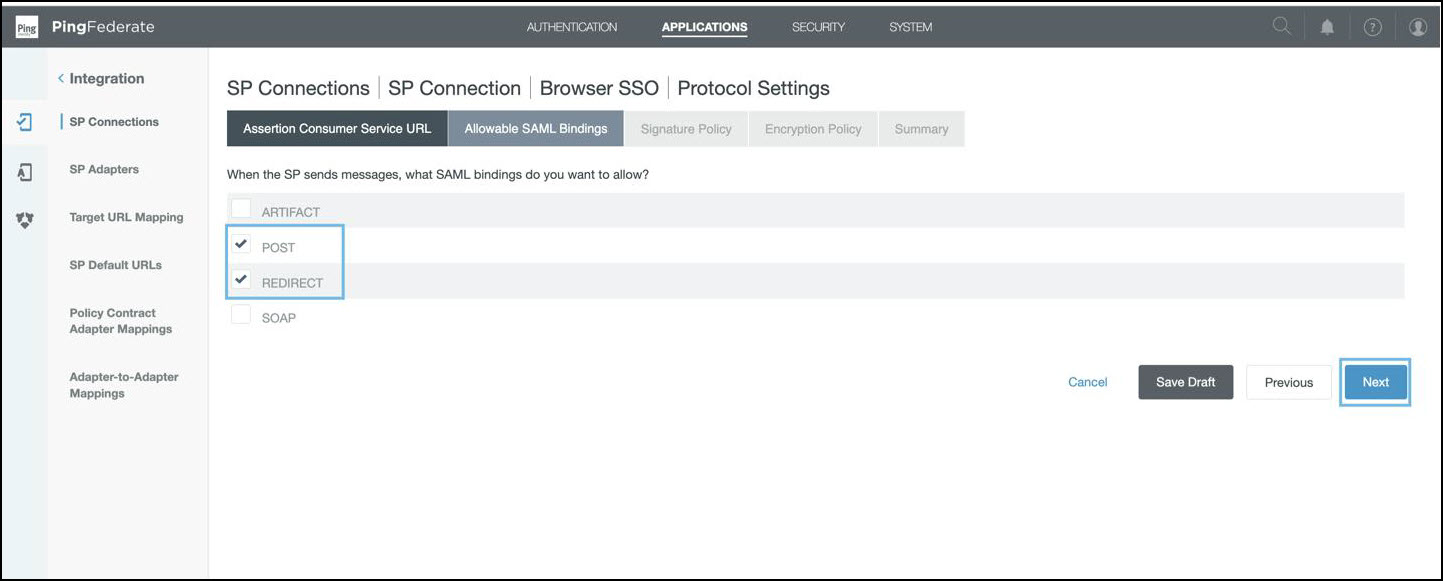
* Select the highlighted checkbox and click **Next**.

  <figure><img src="/files/7v809tVxHMSRHVFUt51J" alt=""><figcaption></figcaption></figure>
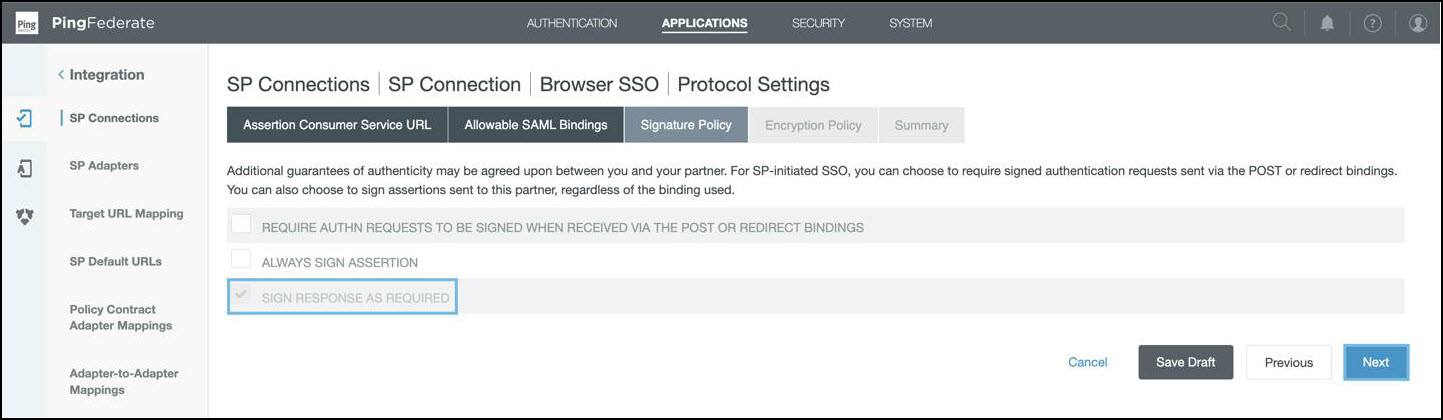
* In the **signature policy**, enable the **SIGN RESPONSE AS REQUIRED** checkbox and click on **Next**.

  <figure><img src="/files/LaJH9mowjJrc1WYy1m4O" alt=""><figcaption></figcaption></figure>
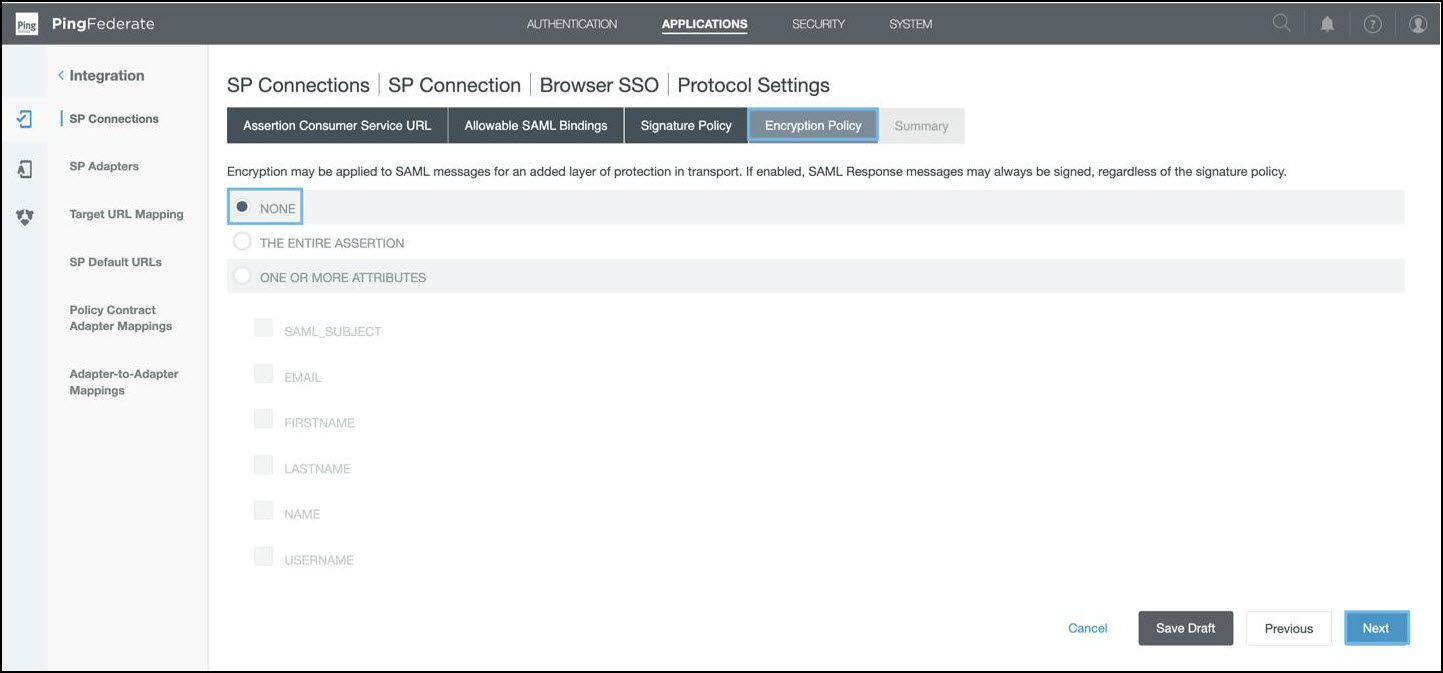
* In the **Encryption policy**, click **Next**.

  <figure><img src="/files/qyGkx2AUgxr1YQ6RA6Oa" alt=""><figcaption></figcaption></figure>
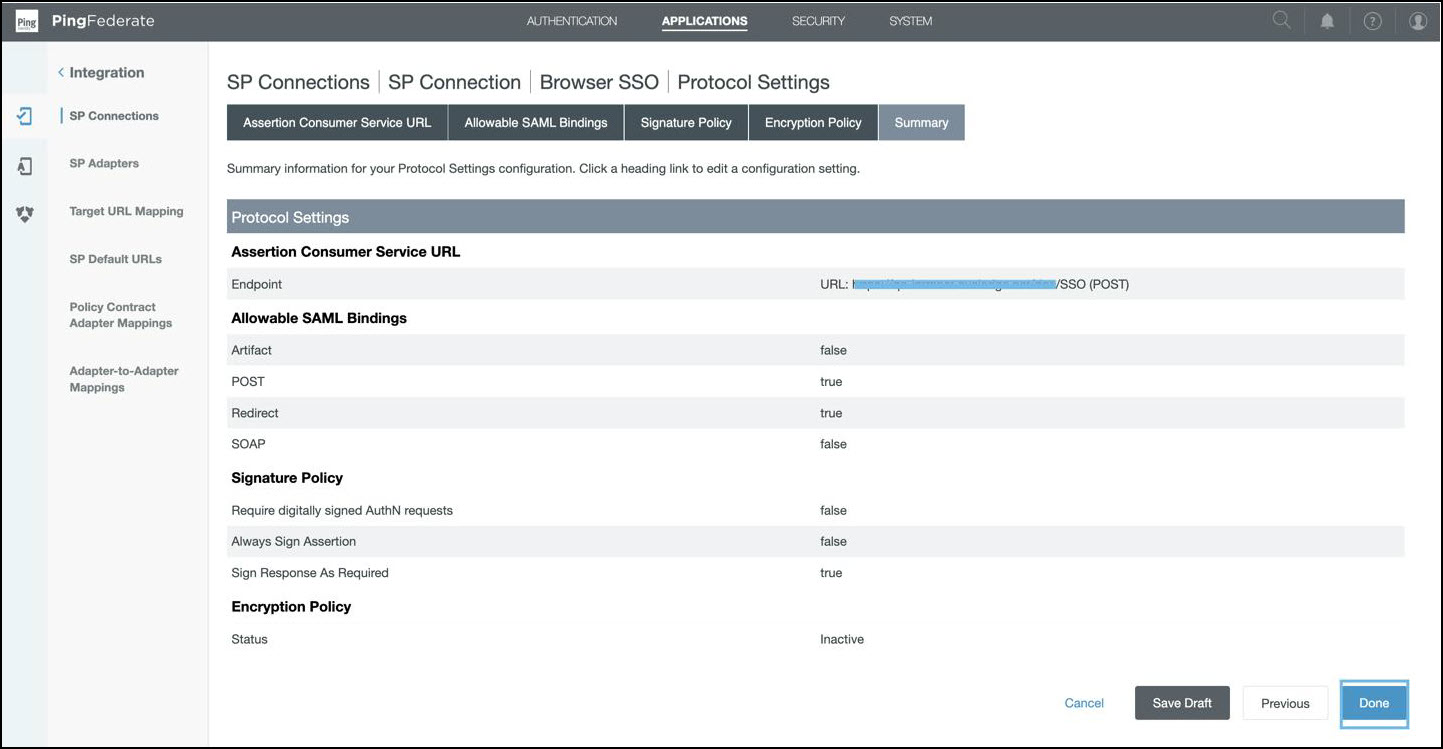
* In **summary**, review the changes and click **Done**.

  <figure><img src="/files/BvS9XywYI82Zb1iuyIii" alt=""><figcaption></figcaption></figure>
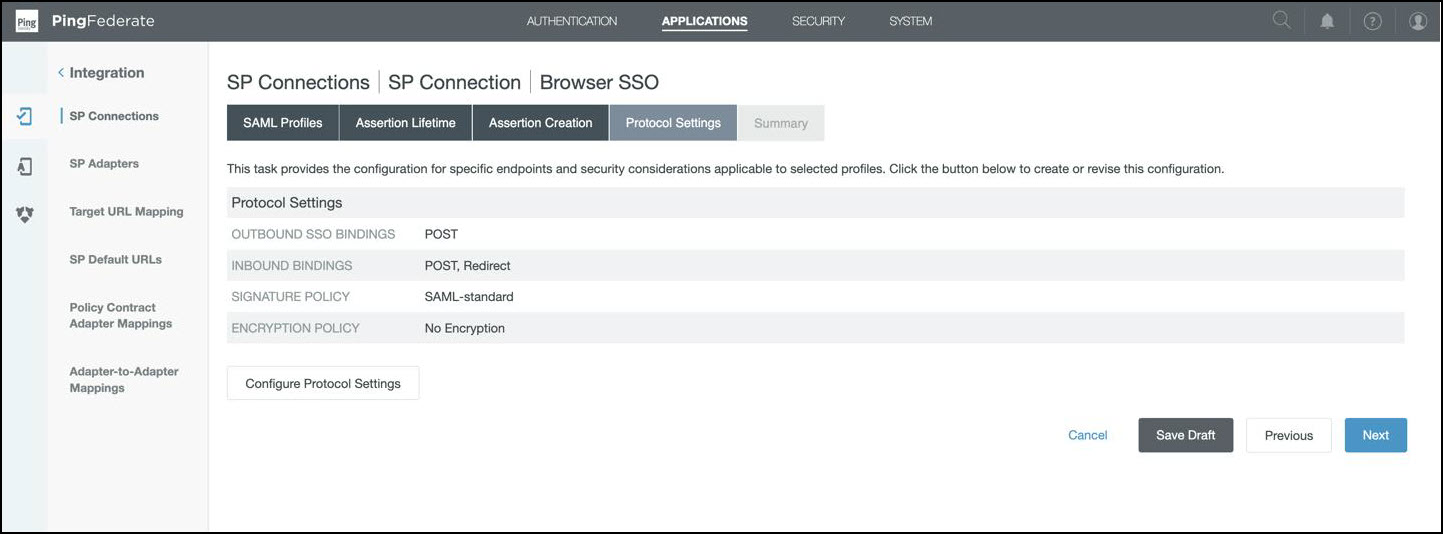
* In the **Protocol Settings,** click **Next,** and **Done**.

  <figure><img src="/files/MSG42qSPMGvxESGcBOdu" alt=""><figcaption></figcaption></figure>
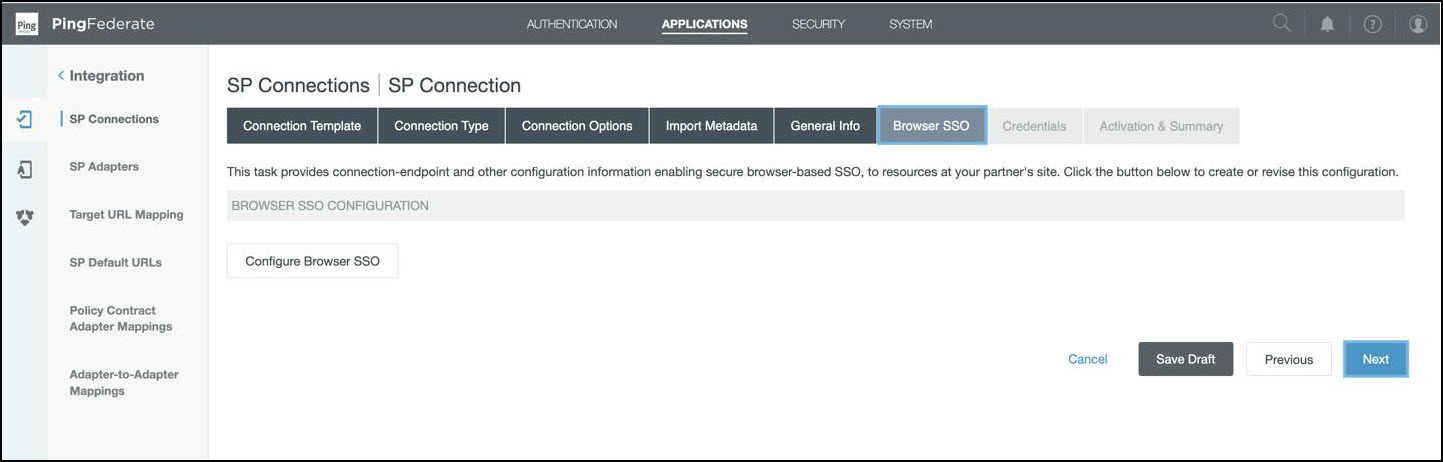
* In the **Browser SSO** tab, click **Next**.

  <figure><img src="/files/B7mbIGdnptOHxCdZQLgY" alt=""><figcaption></figcaption></figure>
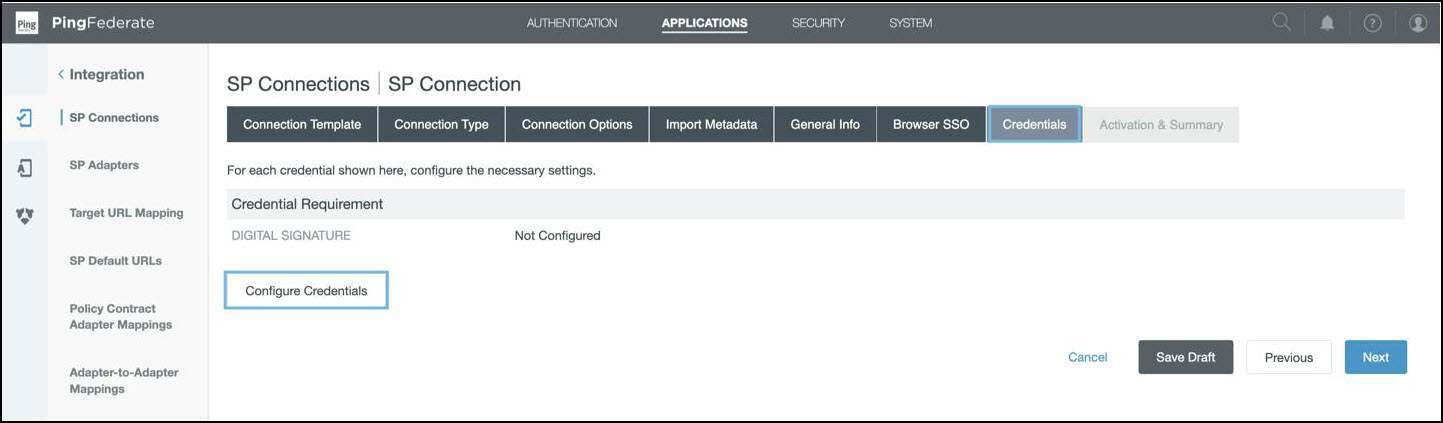
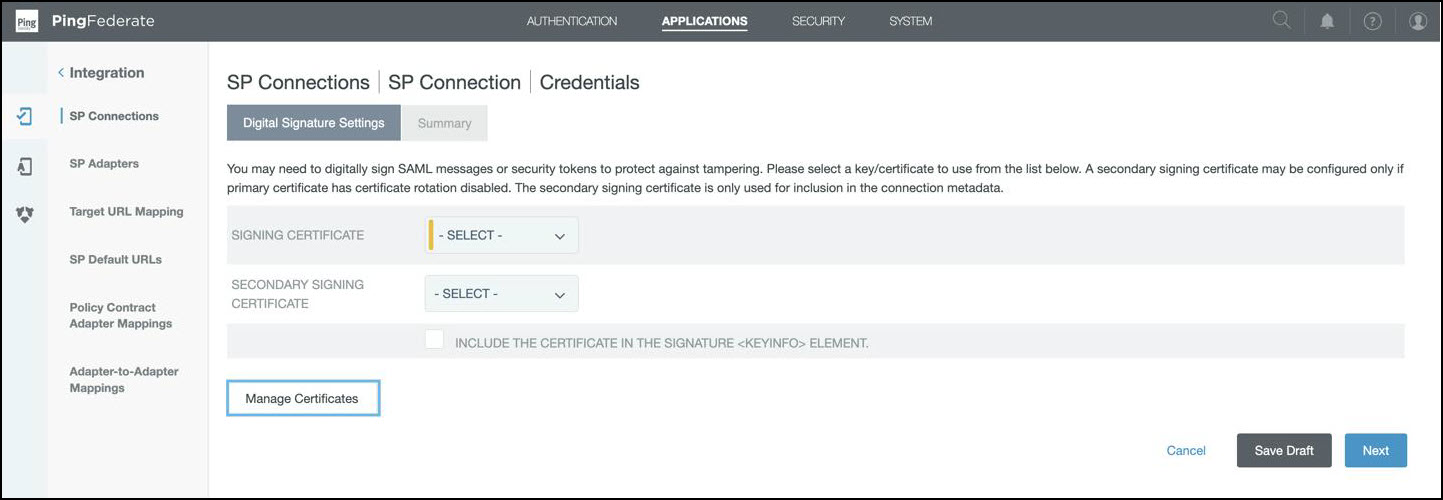
* In the **Credentials** tab, click **Configure Credentials**.

  <figure><img src="/files/zUEub7WabShBiFgZpHxy" alt=""><figcaption></figcaption></figure>
* Click **Manage Certificates**.

  <figure><img src="/files/vPHZf2LZaAgUU9OczMe6" alt=""><figcaption></figcaption></figure>
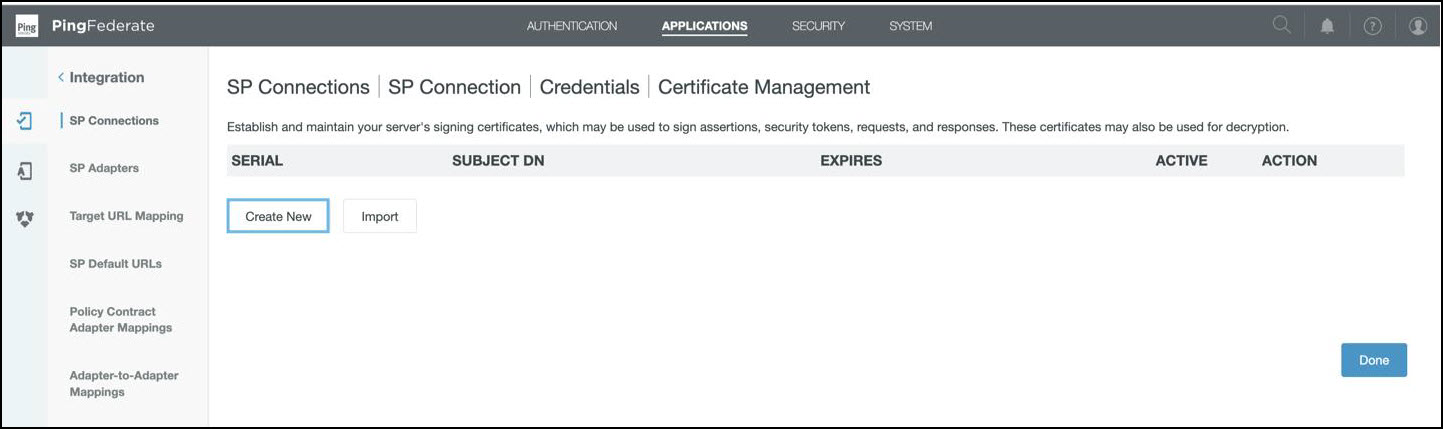
* Click **Create New**.

  <figure><img src="/files/UuYPc0J7PUuHdNveFJ3L" alt=""><figcaption></figcaption></figure>
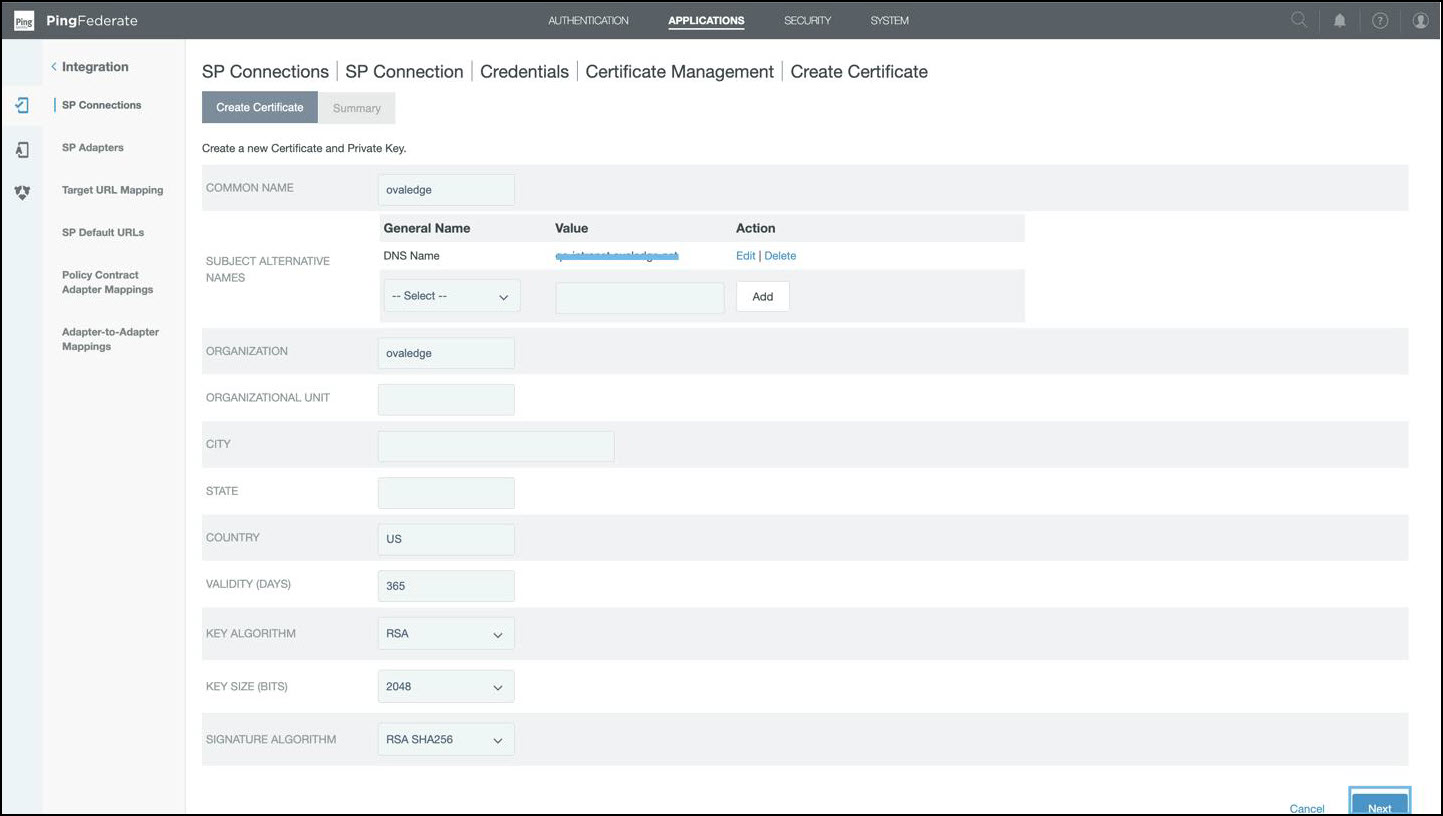
* Add the following details and click **Next**.

  <figure><img src="/files/gLBs8bHlDyWhlA5mn7B6" alt=""><figcaption></figcaption></figure>
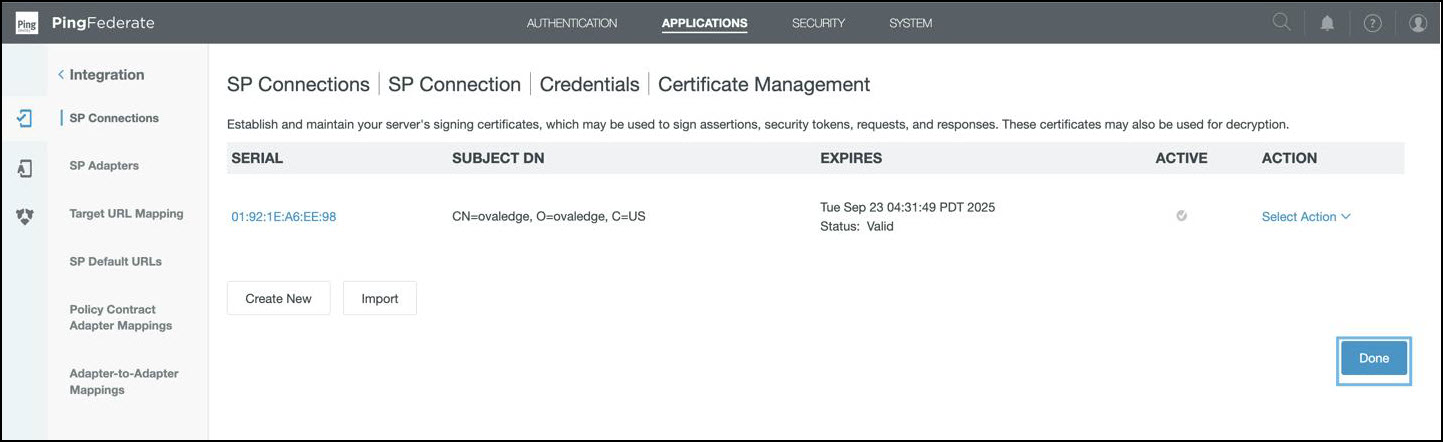
* Review the changes, and click **Done**.

  <figure><img src="/files/9mp72qBc5FgnwdhGnB7v" alt=""><figcaption></figcaption></figure>
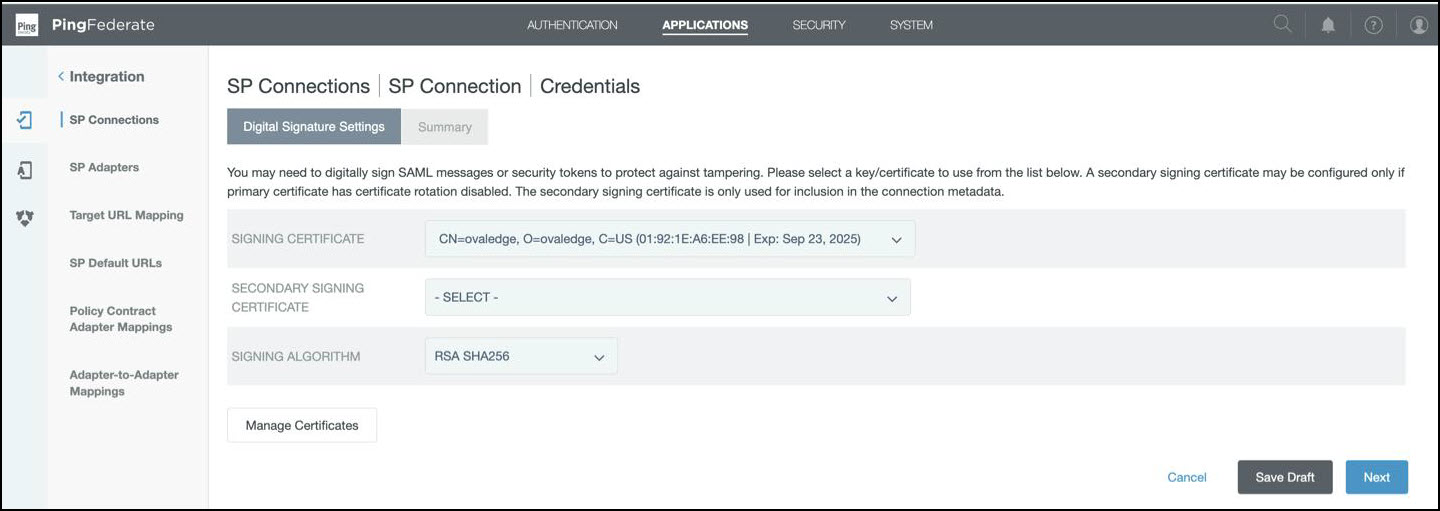
* In the **Digital Signature Settings**, click **Next,** and **Done**.

  <figure><img src="/files/TKP29MMSGMQnqH8aCVQI" alt=""><figcaption></figcaption></figure>
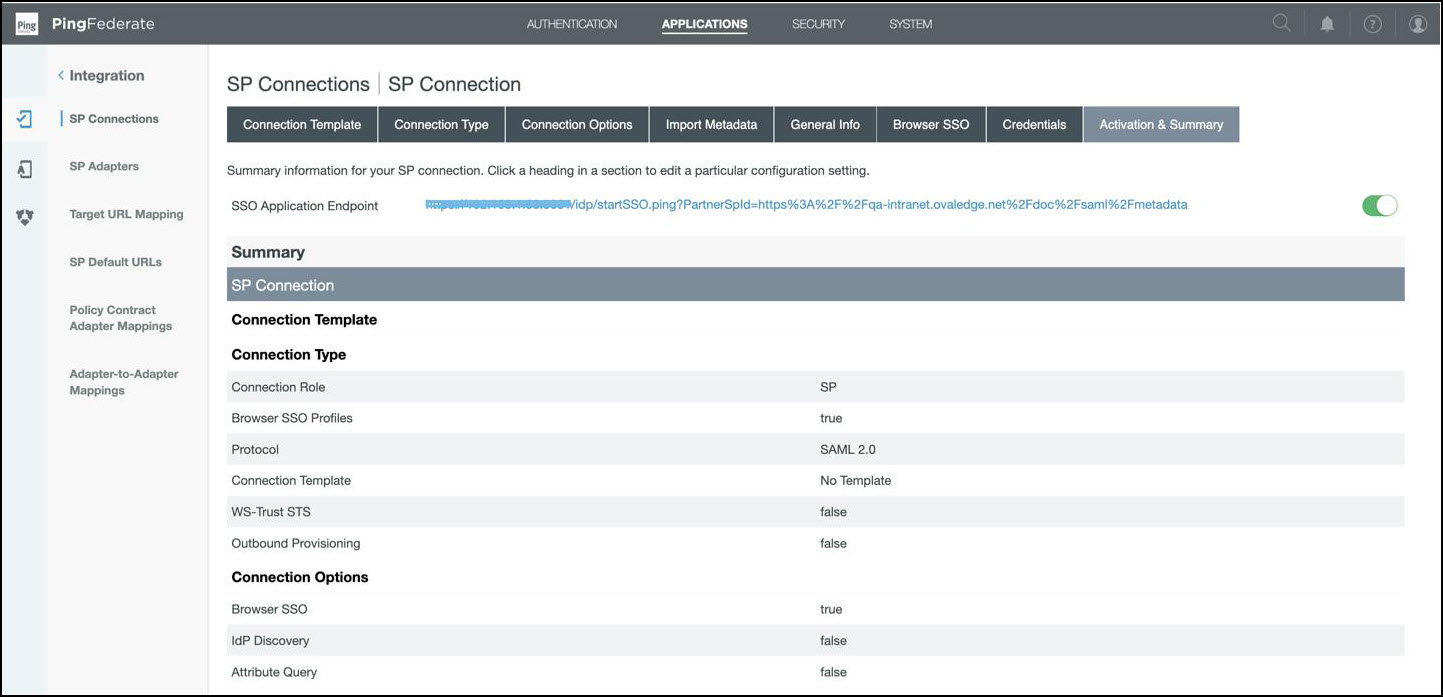
* Review the page and click **Done**.

  <figure><img src="/files/z9nzxNseF2ChM738Lwv7" alt=""><figcaption></figcaption></figure>
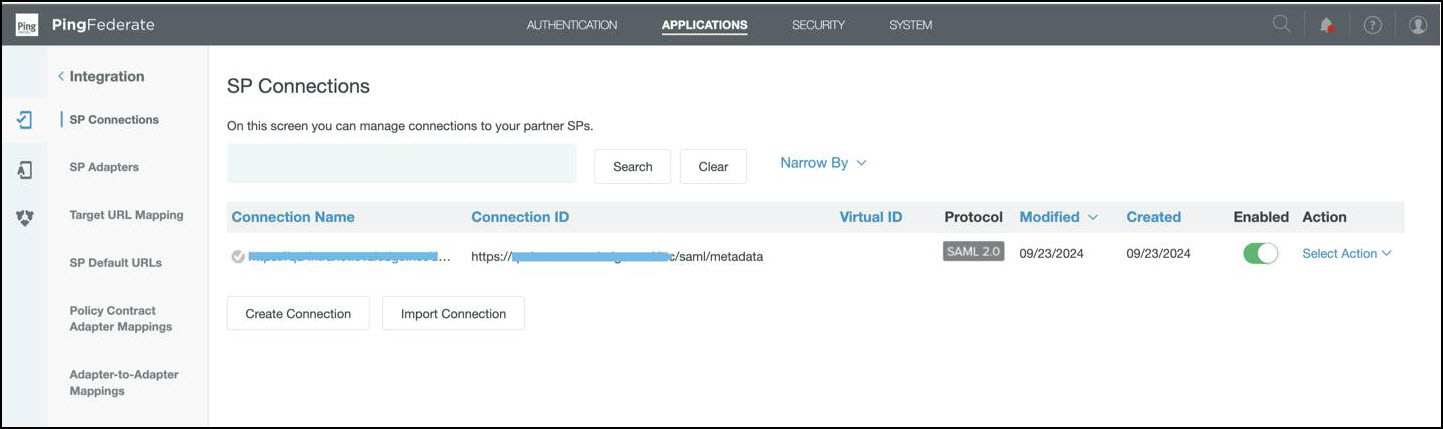
* The **Connection Name and Connection ID** are displayed.

  <figure><img src="/files/rYWmQkNScyZ2dTXKtnEc" alt=""><figcaption></figcaption></figure>
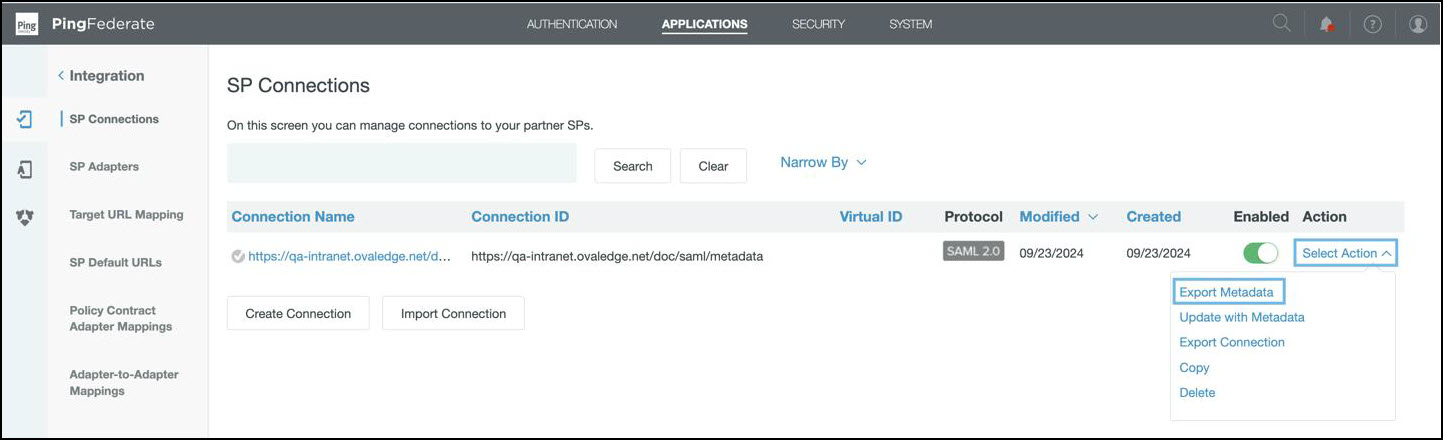
* Click **Select Action** and **Export Metadata,** as shown below.

  <figure><img src="/files/hwwpARh4B2HGswnjLQuX" alt=""><figcaption></figcaption></figure>

### OvalEdge Application Configuration

* Place the `metadata.xml` file (exported) in the OvalEdge application server directory.
* Update `oasis.properties` to reference the metadata file path.
* Configure Tomcat environment variable:
  * **Linux**: Edit `setenv.sh` and add:

    ```bash
    -DOVALEDGE_SECURITY_TYPE=saml
    ```
  * **Windows**: Run:

    ```bash
    tomcat9w.exe //ES/tomcat1
    ```

    and add:

    ```bash
    -DOVALEDGE_SECURITY_TYPE=saml
    ```
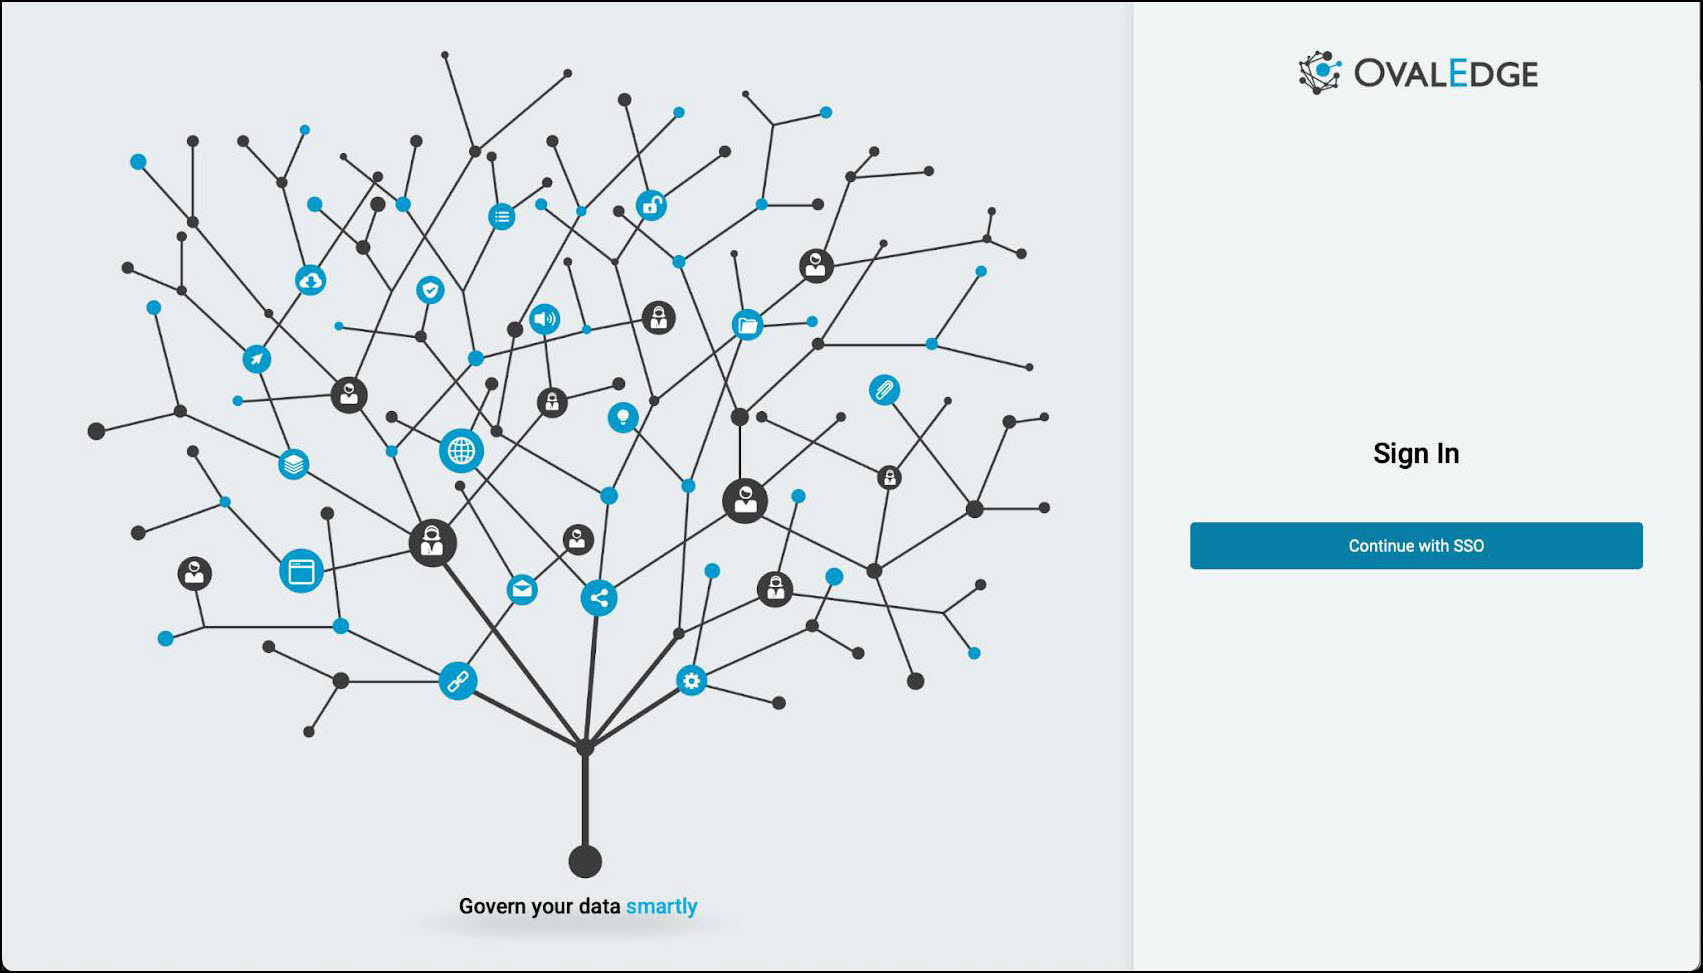
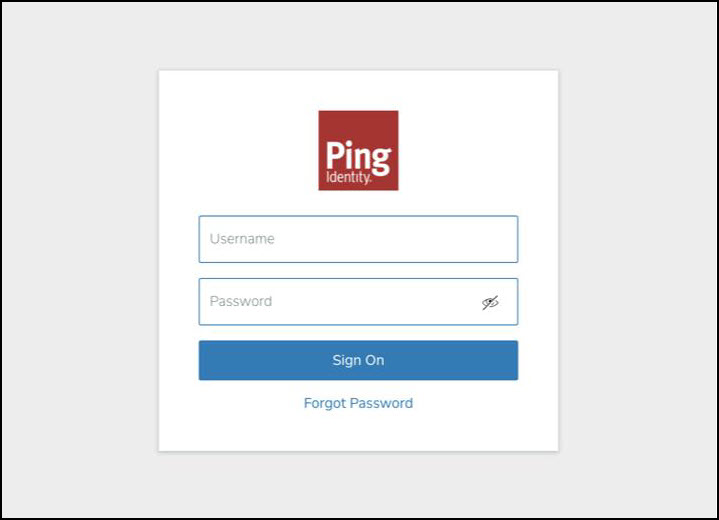
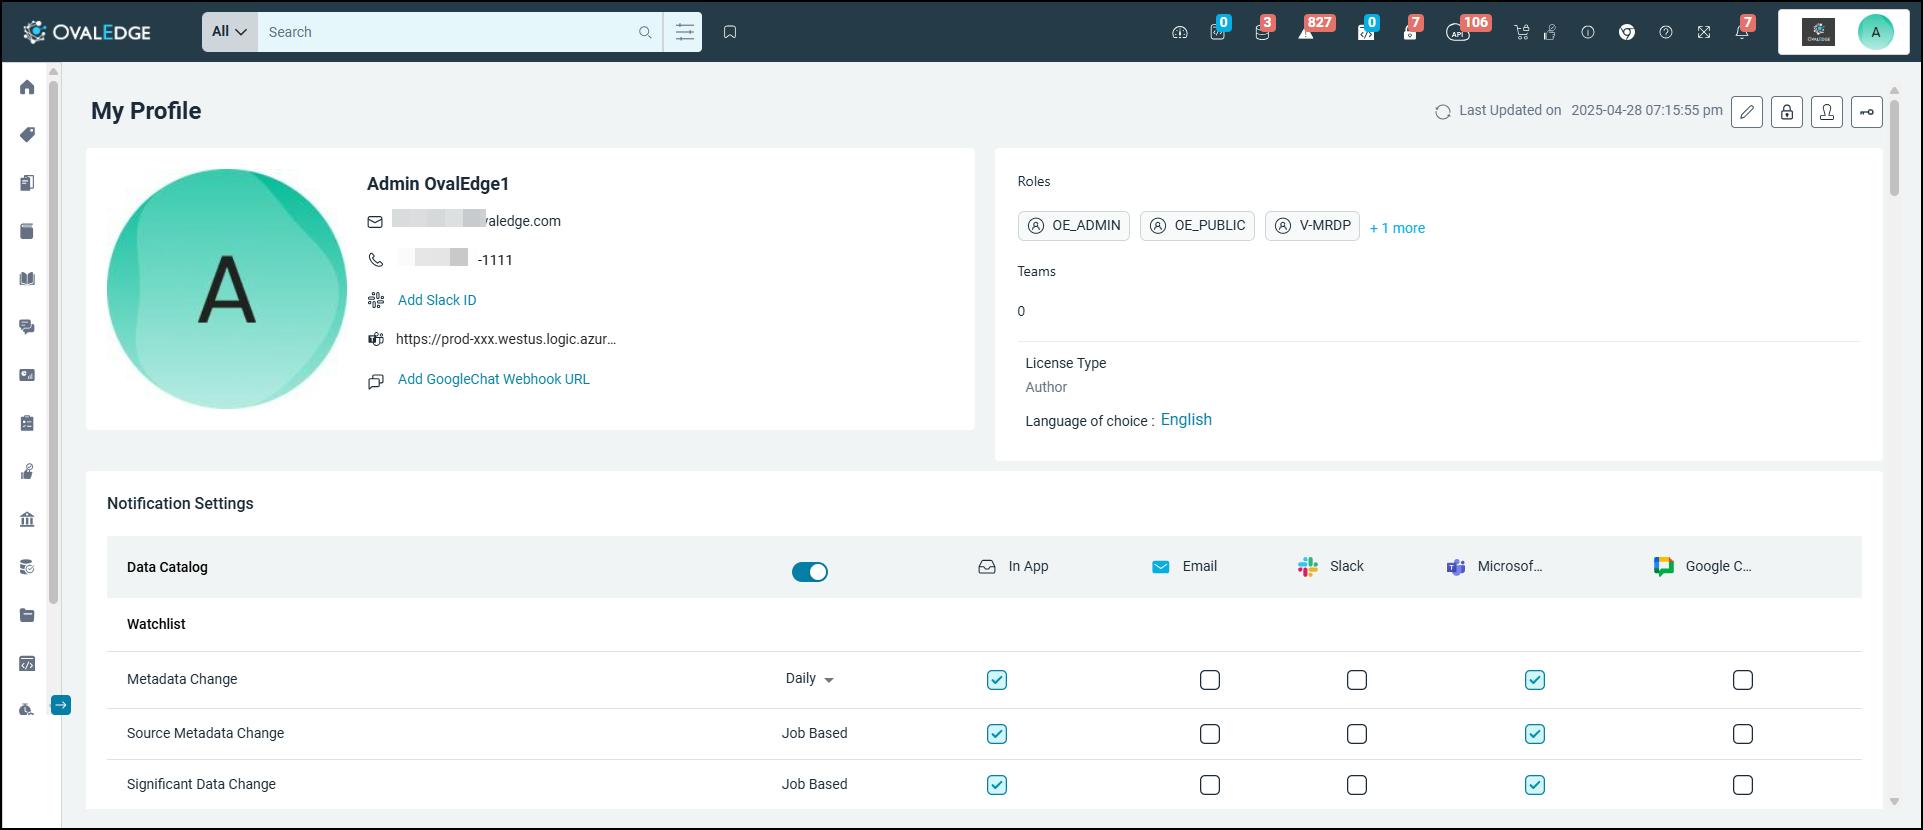
* Now log in to the OvalEdge application, click **Continue with SSO**, and log in with your Ping credentials.

  <figure><img src="/files/pIZ6L2GXgvAaSBu3jQcq" alt=""><figcaption></figcaption></figure>

  <figure><img src="/files/SewEausgskdBL7it6xzV" alt=""><figcaption></figcaption></figure>

### Update OvalEdge system settings

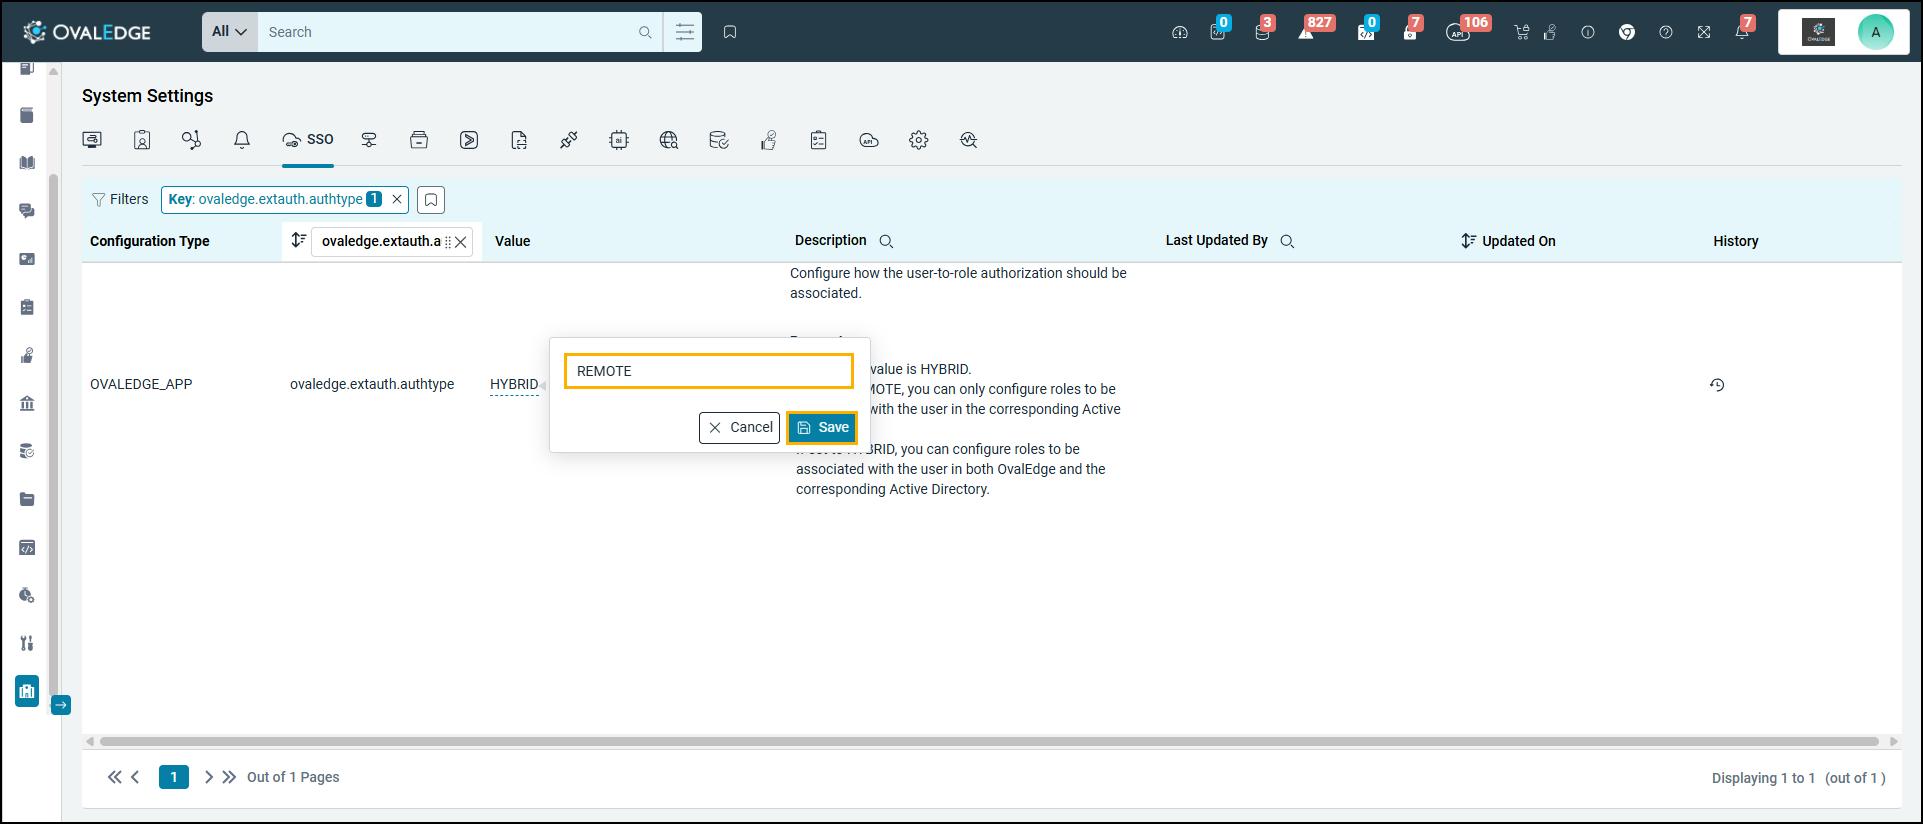
* Navigate to **System Settings > SSO**
* Set:

  ```properties
  ovaledge.extauth.authtype = REMOTE
  ```

  *(default is HYBRID)*

  <figure><img src="/files/6CZtVM85d4ltx7L6nyM3" alt=""><figcaption></figcaption></figure>
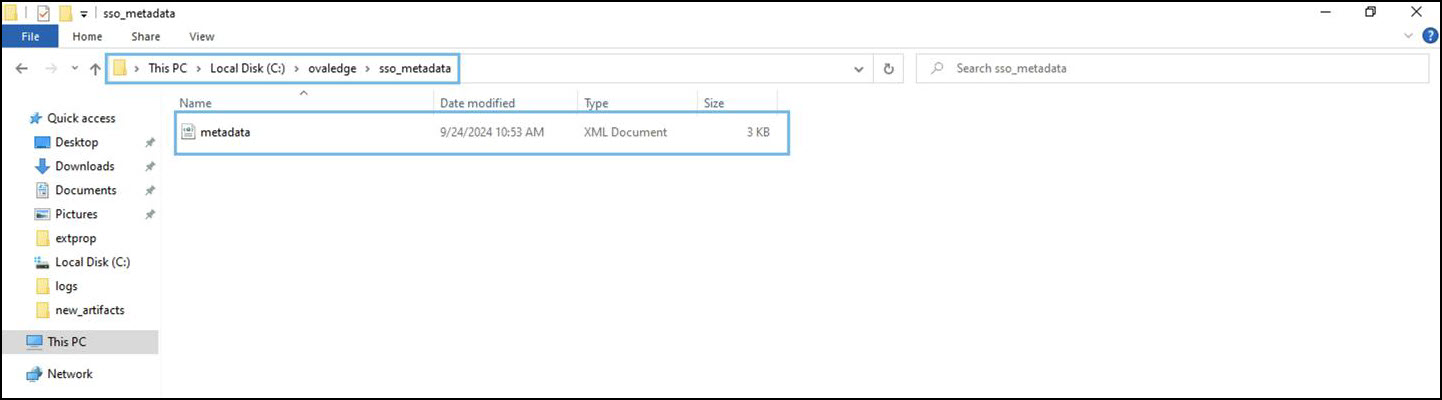
* Now connect to the application server (Windows or Linux), create a folder with any name, and paste the `metadata.xml` (step 34) file into that folder.

  <figure><img src="/files/yy9sBLq9uoIM0aPgcrrU" alt=""><figcaption></figcaption></figure>
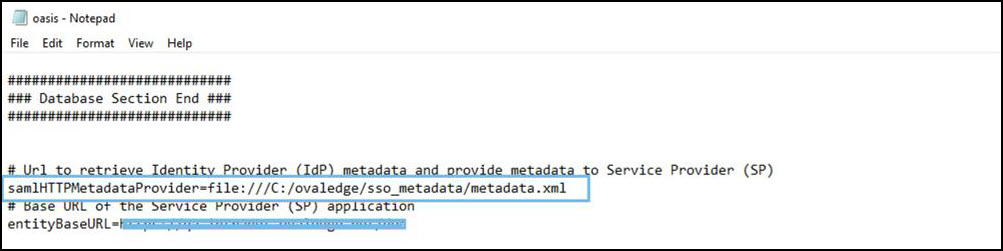
* Copy the `metadata.xml` file path, paste it into the `oasis.properties` file as shown below, and save the file.

  <figure><img src="/files/WZ0AgfnvLGEKoK3M7tdR" alt=""><figcaption></figcaption></figure>
* Now, navigate to the Tomcat bin directory and configure `setenv.sh` (for Windows use `tomcat9w.exe`) file with:

  ```bash
  -DOVALEDGE_SECURITY_TYPE=saml
  ```

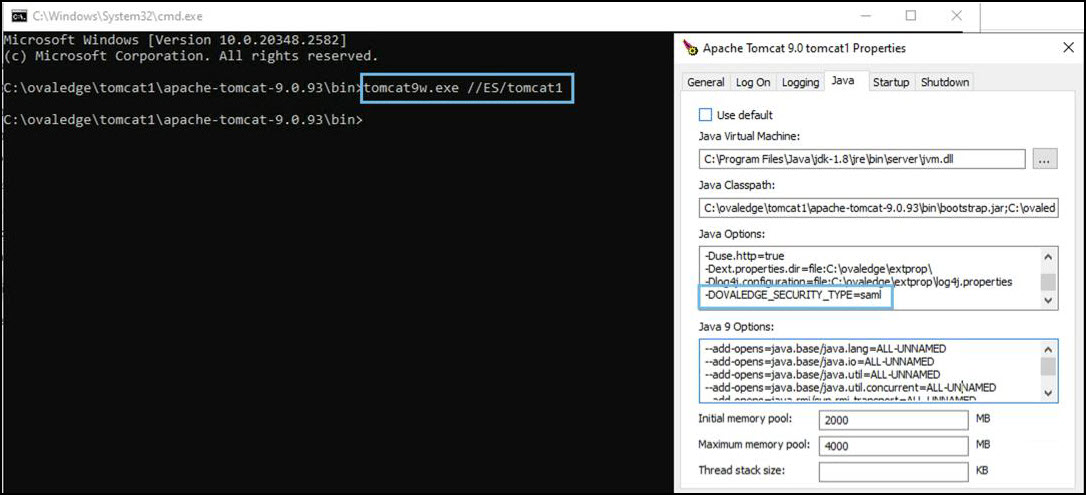
  * **Windows**:\
    Navigate to the Tomcat bin folder, open the command prompt here, execute the command below, and make changes:<br>

    ```bash
    tomcat9w.exe //ES/tomcat1
    ```

    \
    \&#xNAN;*Sample Reference Screenshot:*
    <figure><img src="/files/wT7K0fV0T5NKUBeTvHnS" alt=""><figcaption></figcaption></figure>

    <div data-gb-custom-block data-tag="hint" data-style="info" class="hint hint-info"><p>Here tomcat1 is the Tomcat service name.</p></div>
  * **Linux**:\
    Now navigate to the Tomcat bin path and edit `setenv.sh`.\
    In `-DOVALEDGE_SECURITY_TYPE=saml`, add `saml`, as shown below:

    ```bash
    -DOVALEDGE_SECURITY_TYPE=saml
    ```

    \
    \&#xNAN;*Sample Reference Screenshot:*
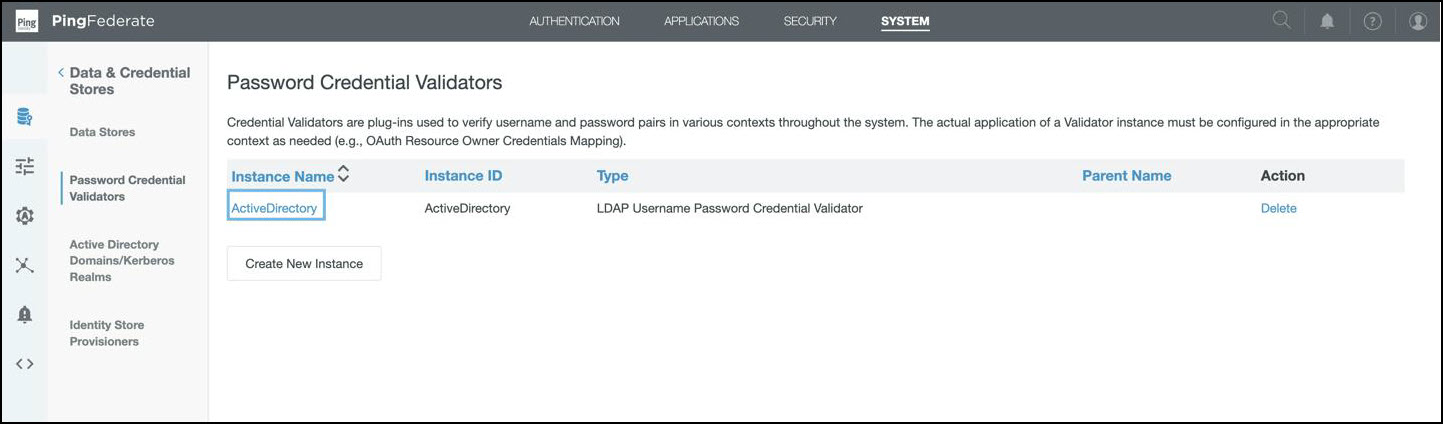
    <figure><img src="/files/yzZwlqknuM9GT3elCfTp" alt=""><figcaption></figcaption></figure>
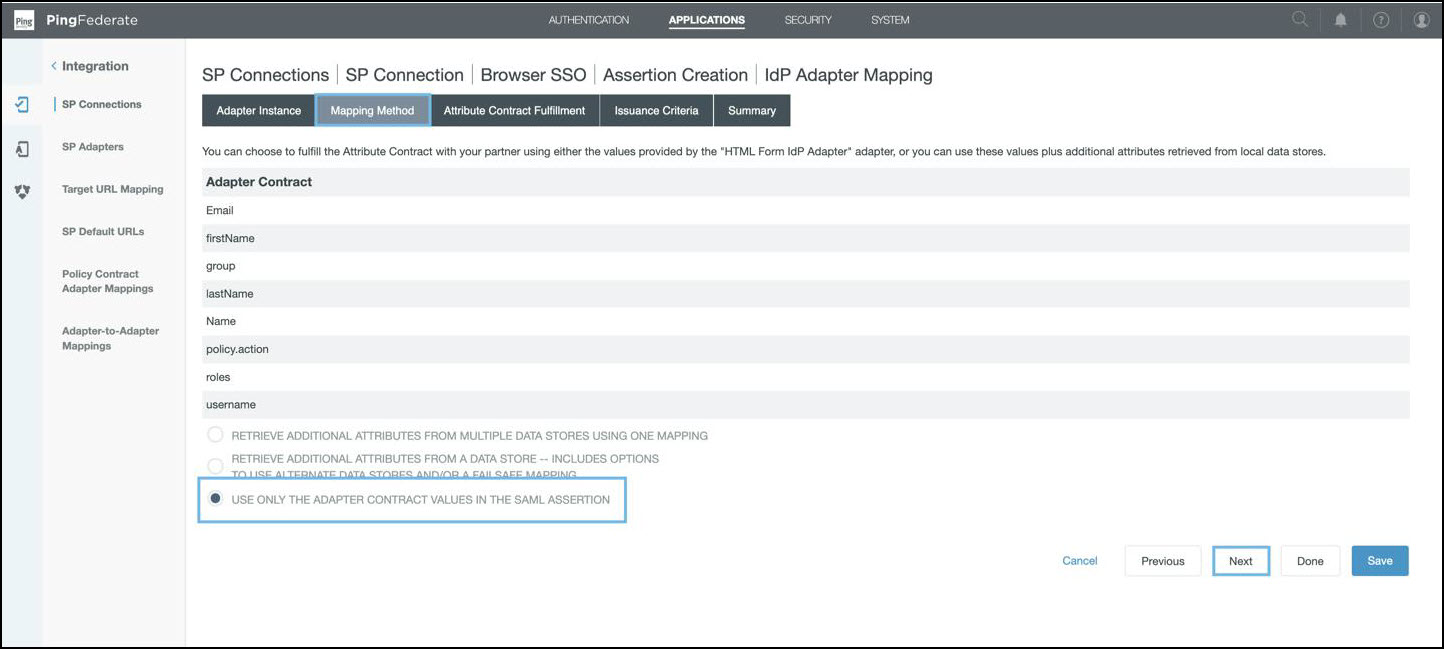
* Now restart Tomcat services and check the application after 5 minutes, as shown below. Now, you can log in to the application with AD users.
  <figure><img src="/files/I9vj0Znt4nXsiEldSdrP" alt=""><figcaption></figcaption></figure>

## Validation

* Verify that users from AD can log in to OvalEdge via SSO.
* Check that user attributes (**Name, Email, Groups**) are correctly mapped.
* Confirm that role-based access is applied according to AD group membership.

## Rollback Instructions

* If login fails after enabling SSO:
  * Revert:

    ```properties
    ovaledge.extauth.authtype = HYBRID
    ```
  * Remove or comment out the:

    ```bash
    -DOVALEDGE_SECURITY_TYPE=saml
    ```

    parameter in Tomcat.
  * Restart Tomcat services.

***

Copyright © 2025, OvalEdge LLC, Peachtree Corners, GA, USA.


---

# Agent Instructions: Querying This Documentation

If you need additional information that is not directly available in this page, you can query the documentation dynamically by asking a question.

Perform an HTTP GET request on the current page URL with the `ask` query parameter:

```
GET https://docs.ovaledge.com/release8.1/installation-and-settings/authentication-and-sso-setup/pingfederate.md?ask=<question>
```

The question should be specific, self-contained, and written in natural language.
The response will contain a direct answer to the question and relevant excerpts and sources from the documentation.

Use this mechanism when the answer is not explicitly present in the current page, you need clarification or additional context, or you want to retrieve related documentation sections.