# JumpCloud

This article provides step-by-step instructions for integrating **JumpCloud SSO (SAML 2.0)** with your custom application.

## **Prerequisites**

Before you begin, ensure the following:

* Admin access to the JumpCloud Admin Console
* A custom application that supports SAML 2.0 authentication
* A valid SSL certificate on your application
* Access to modify the SAML configuration in your application

## Steps Involved

1. **Create a New SSO Application in JumpCloud**
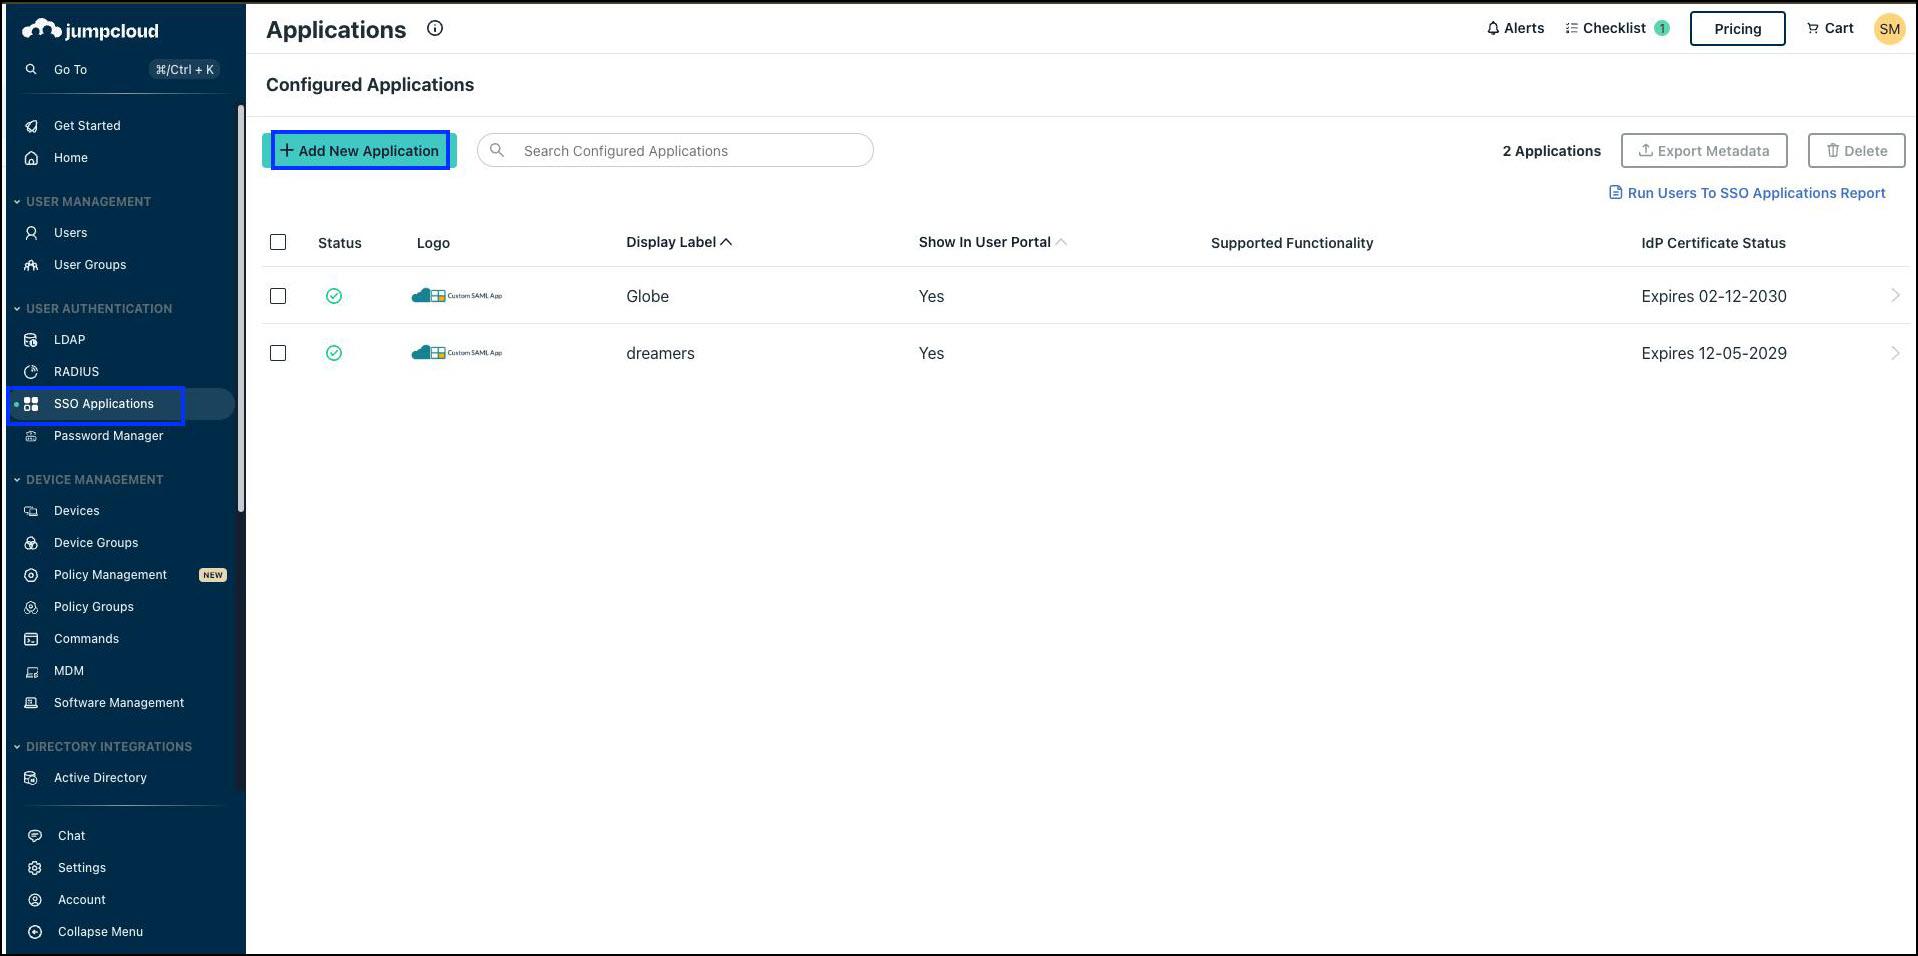
   * Log in to JumpCloud ([https://console.jumpcloud.com/login/](https://console.jumpcloud.com/login/?utm_source=chatgpt.com)) Admin Console and navigate to **SSO → Applications**.
   * Click on **Add New Application**.

     <figure><img src="/files/PdAjqZgYloPxuZTqQK6H" alt=""><figcaption></figcaption></figure>
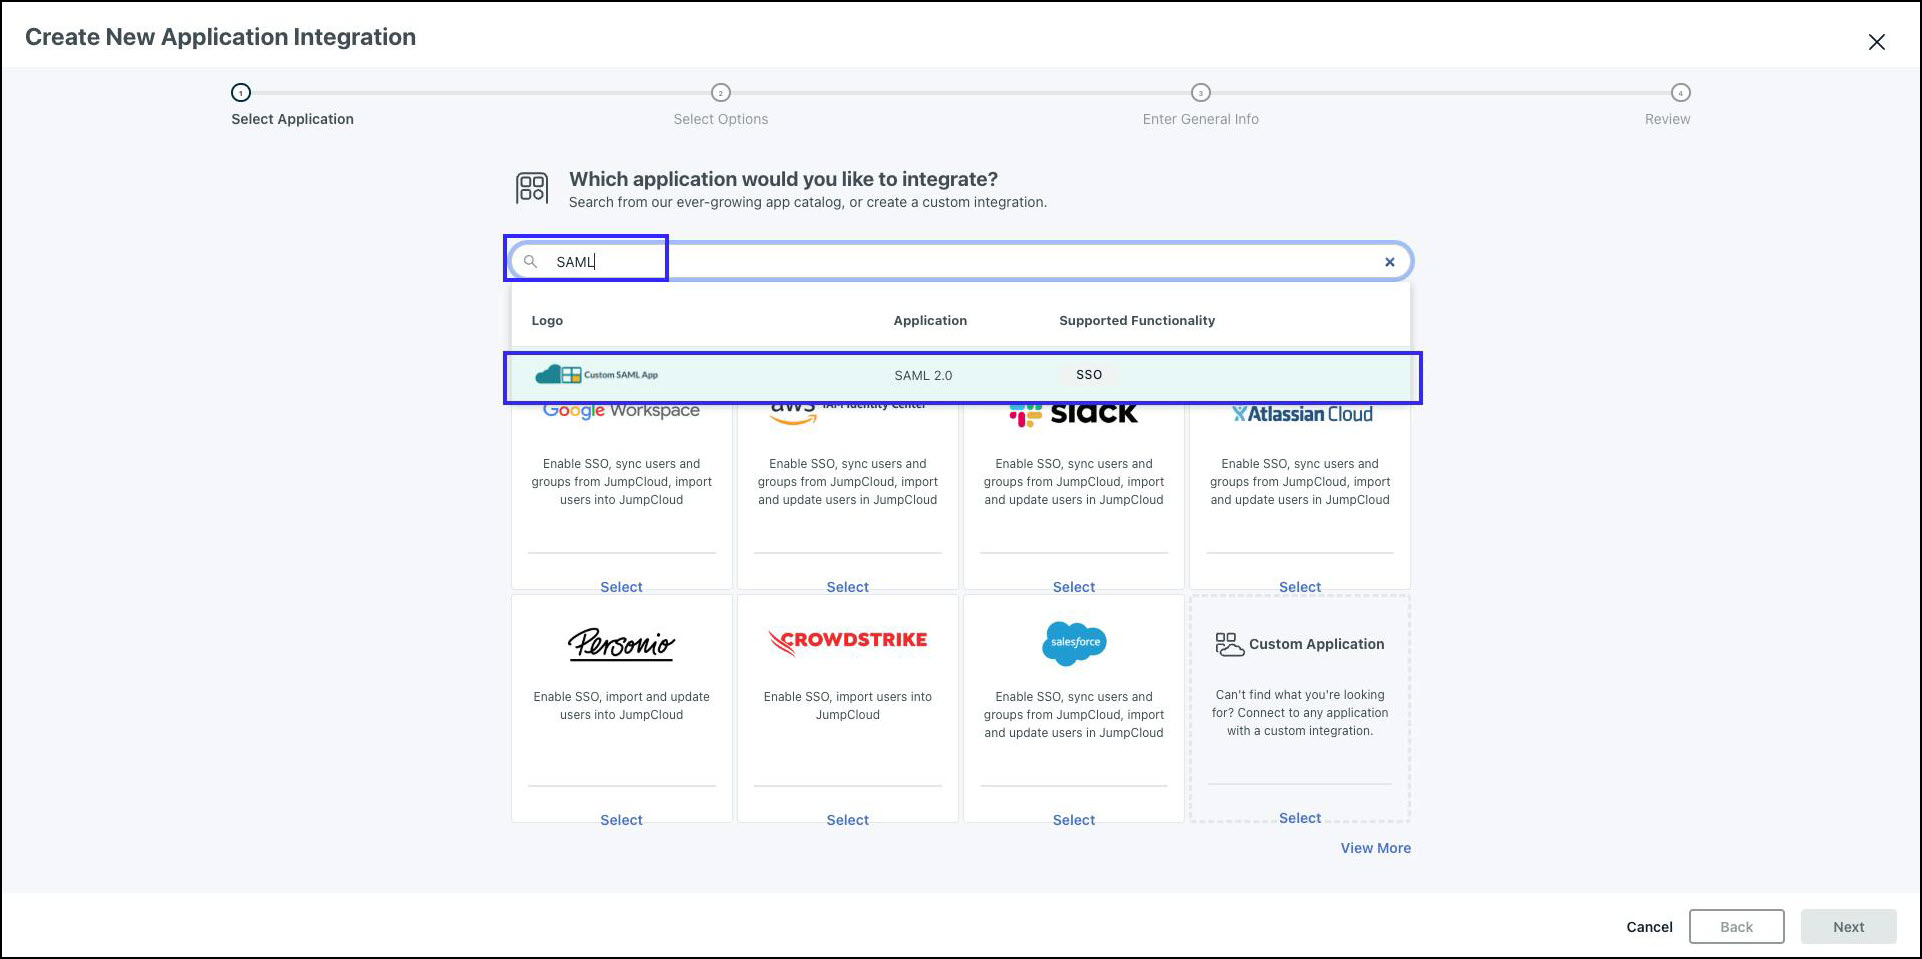
   * Search **SAML** and select the **SAML2.0 App**.

     <figure><img src="/files/HtVPVVumQjNg9jekjwWu" alt=""><figcaption></figcaption></figure>
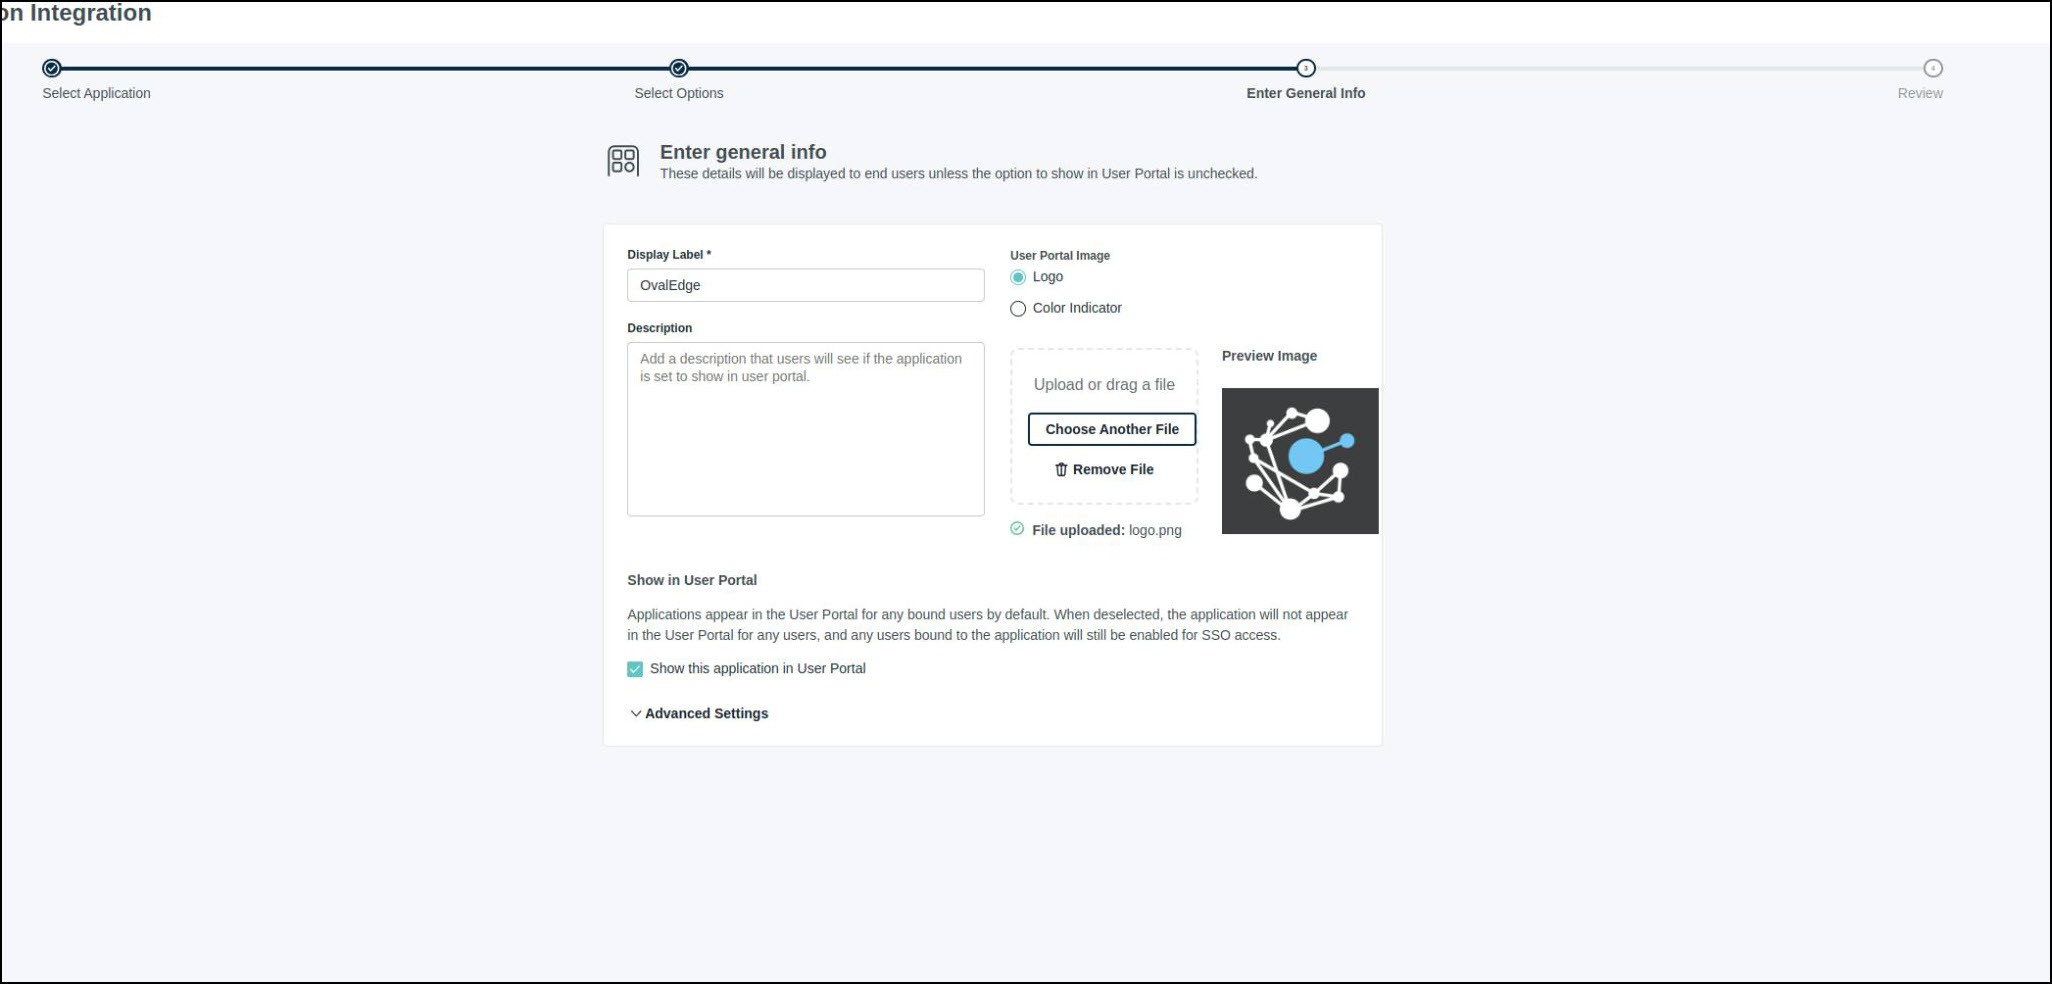
   * Provide a name for your application (e.g., `OvalEdge`).
   * Upload a logo (optional).

     <figure><img src="/files/DLhMNlFCQka016vrAhkS" alt=""><figcaption></figcaption></figure>
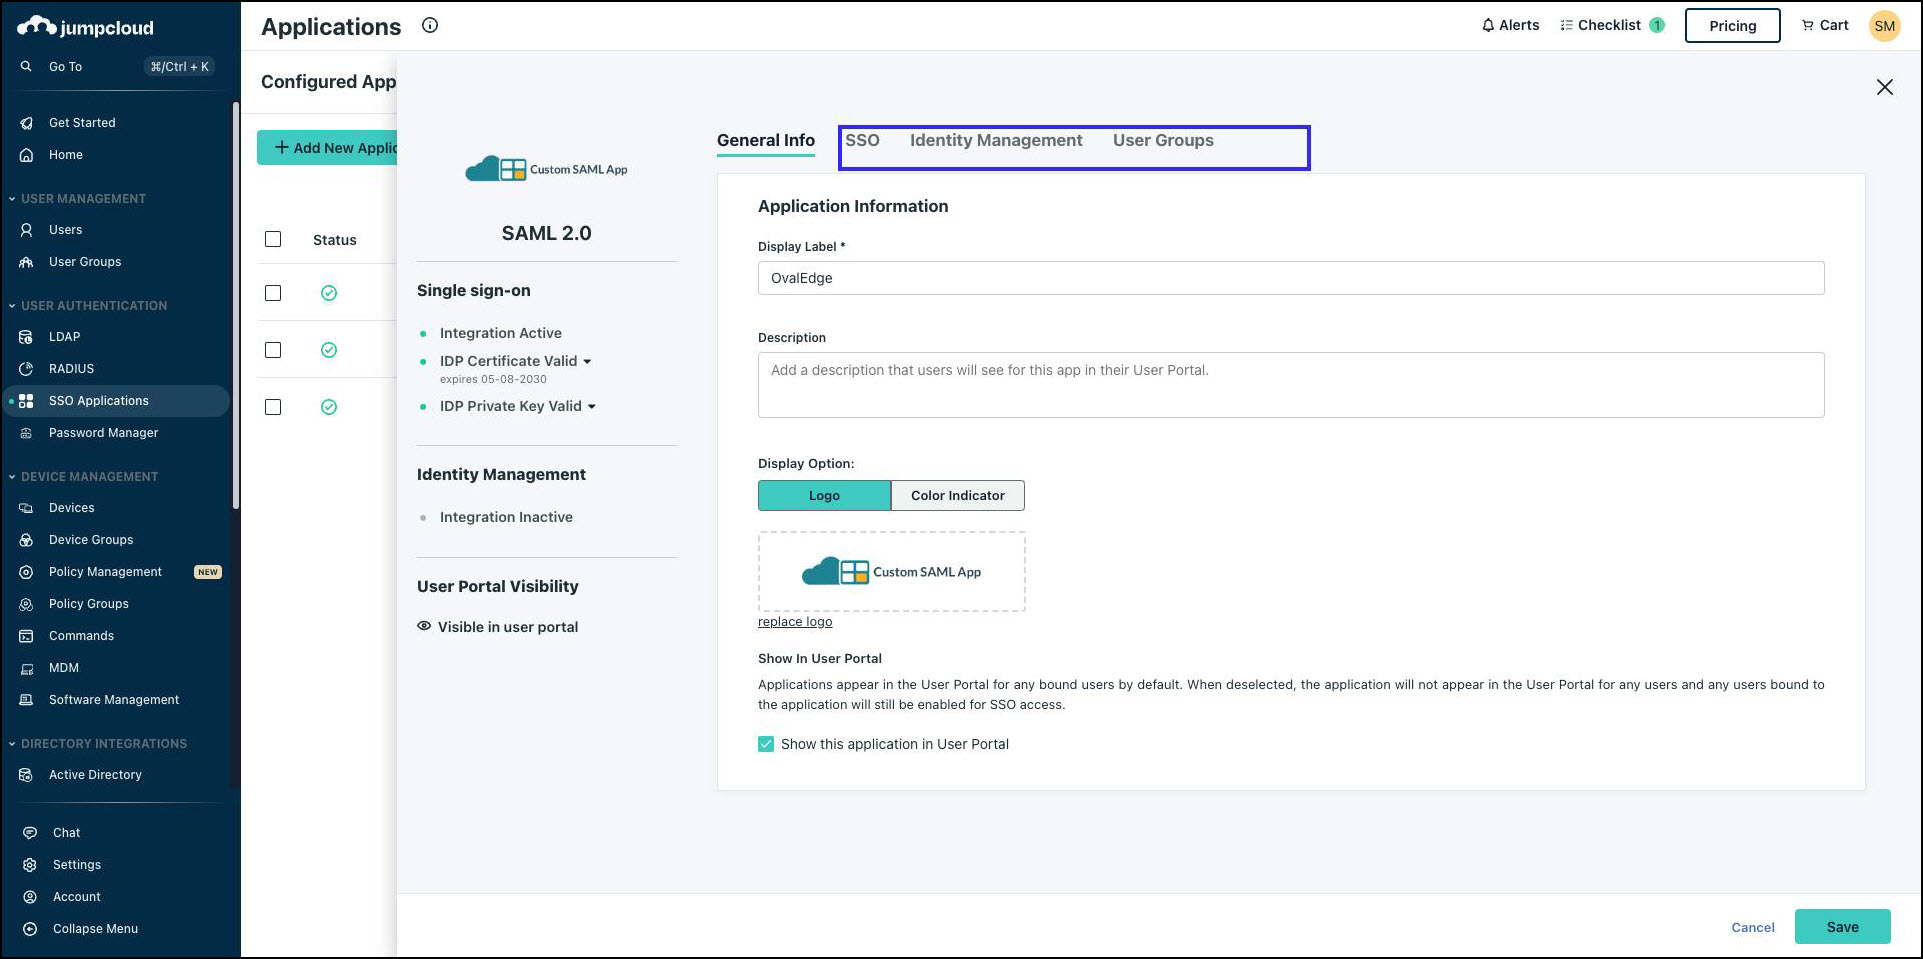
   * After submission, you'll be redirected to the **SSO → Identity Management → User Group** page.

     <figure><img src="/files/67U3dfr1ffKMVFZA00Vo" alt=""><figcaption></figcaption></figure>

2. **Configure SAML Settings**
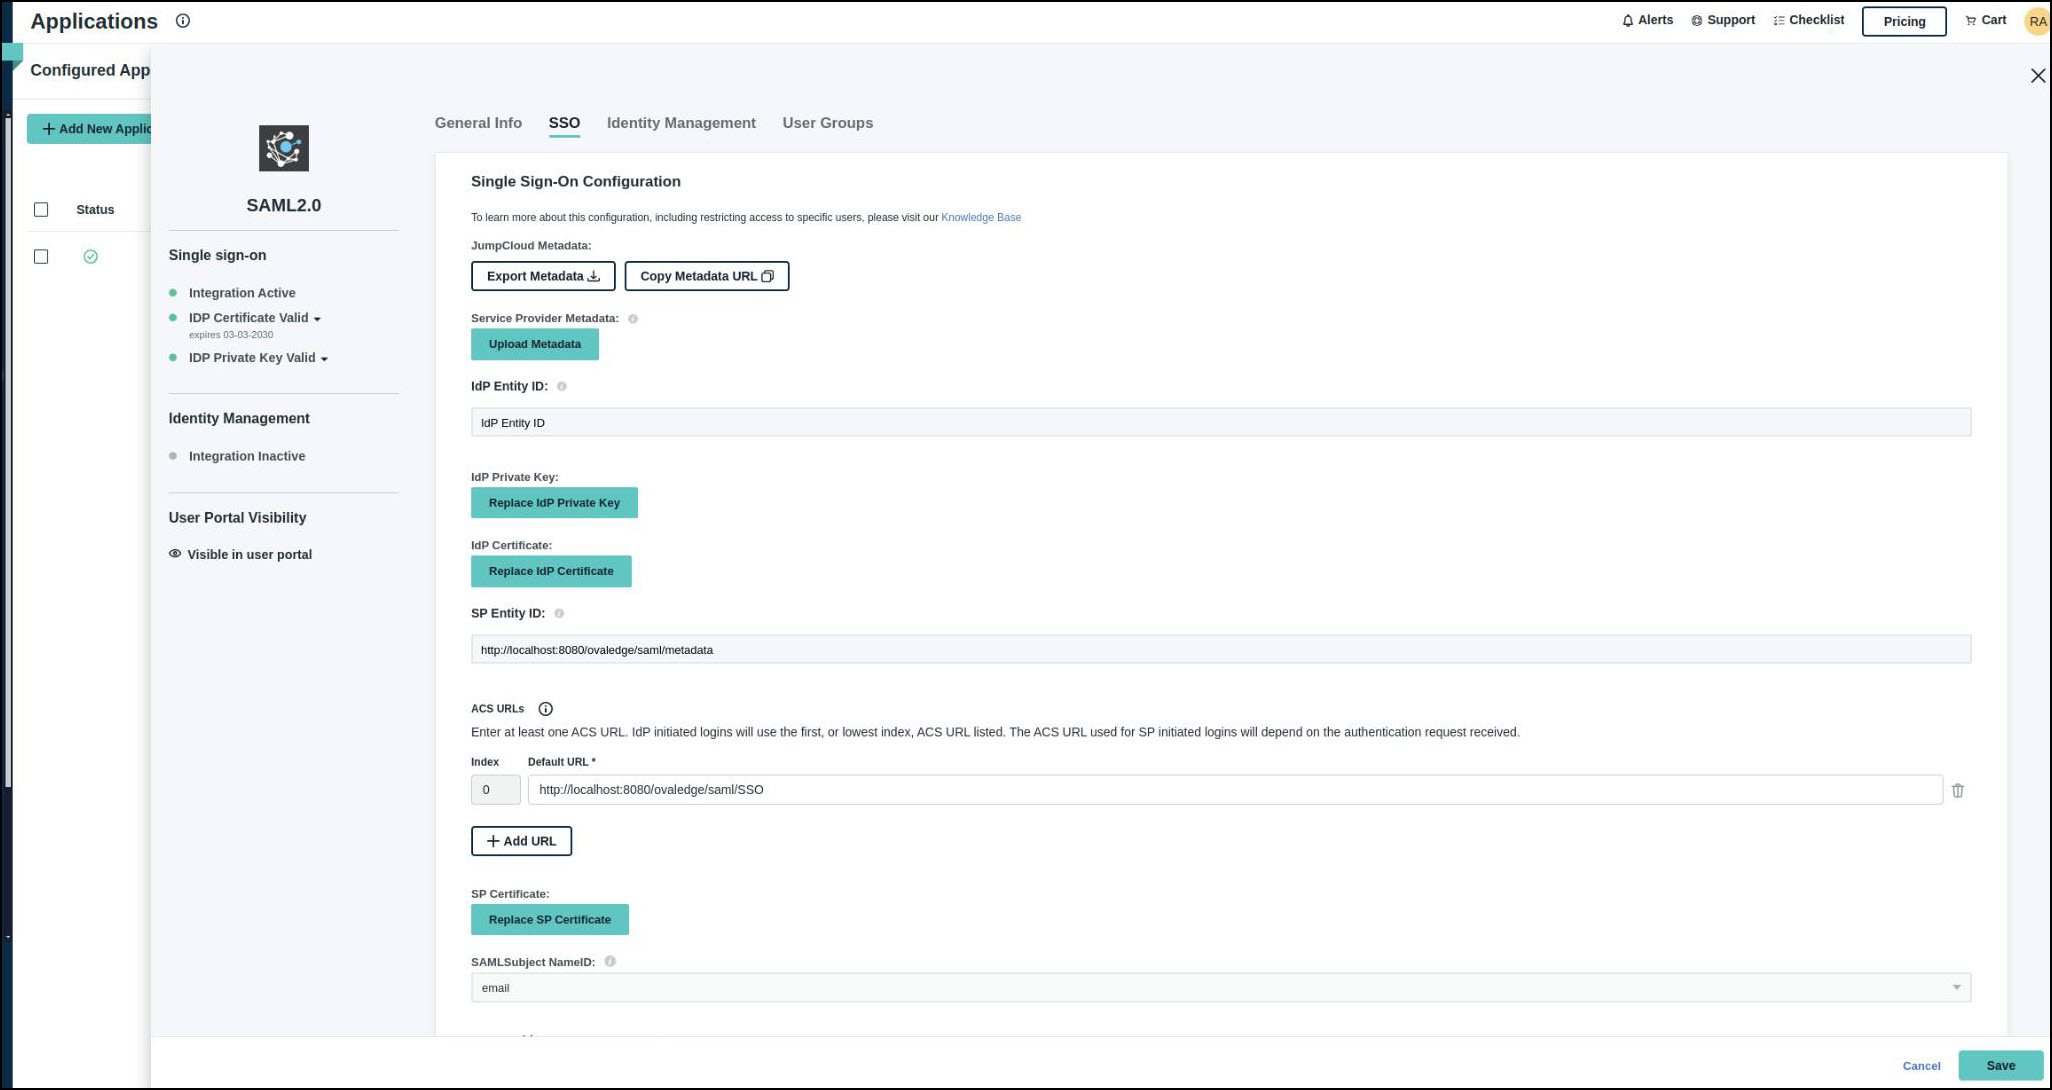
   * Provide the required SAML configuration values as per the mentioned screenshot:

     * **SP Entity ID**
     * **ACS URL(s)**
     * **IdP URL**

     <figure><img src="/files/SAnITFclNWqiNnf8Gowp" alt=""><figcaption></figcaption></figure>
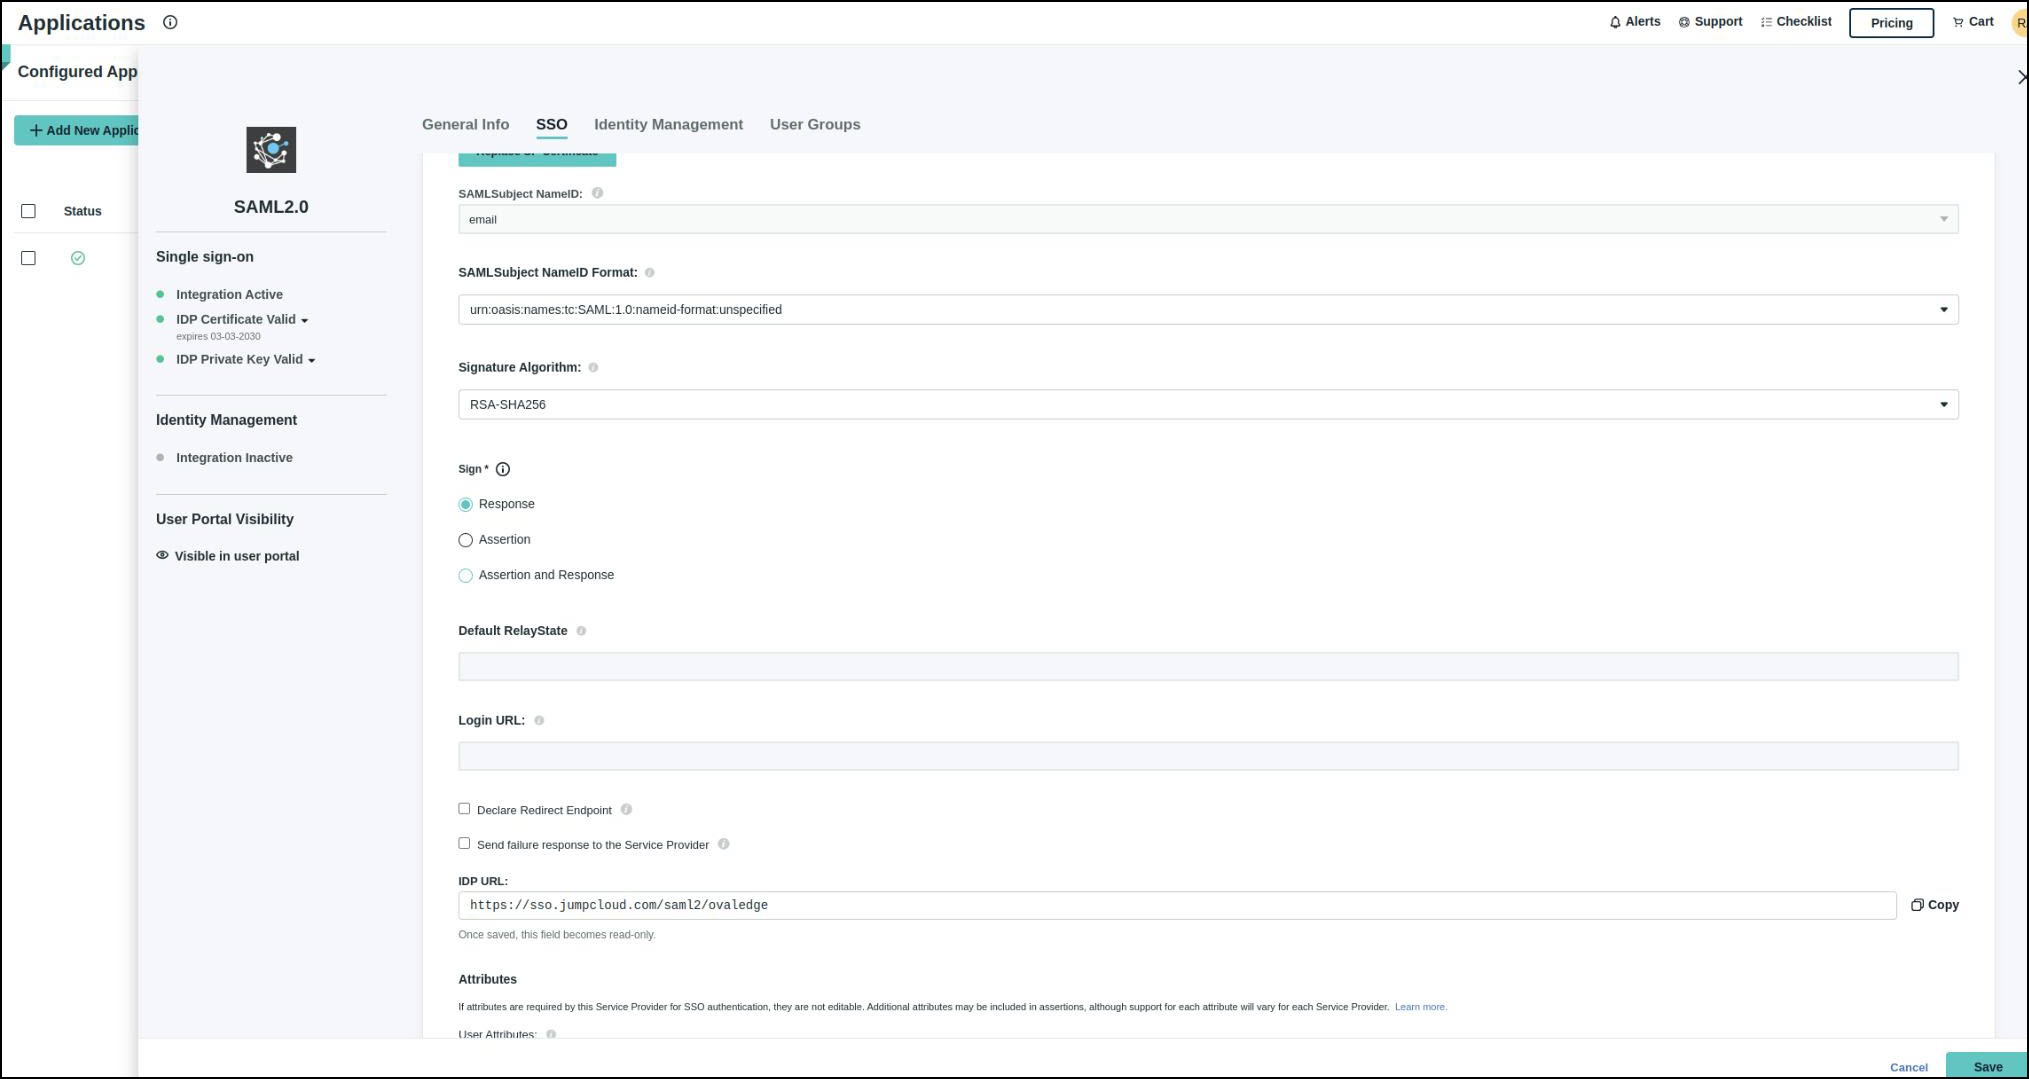
   * Select **SSO** and enter the required (**IDP URL**) details as shown below.

     <figure><img src="/files/G8qoSqn7sHQkUdMOFoQa" alt=""><figcaption></figcaption></figure>

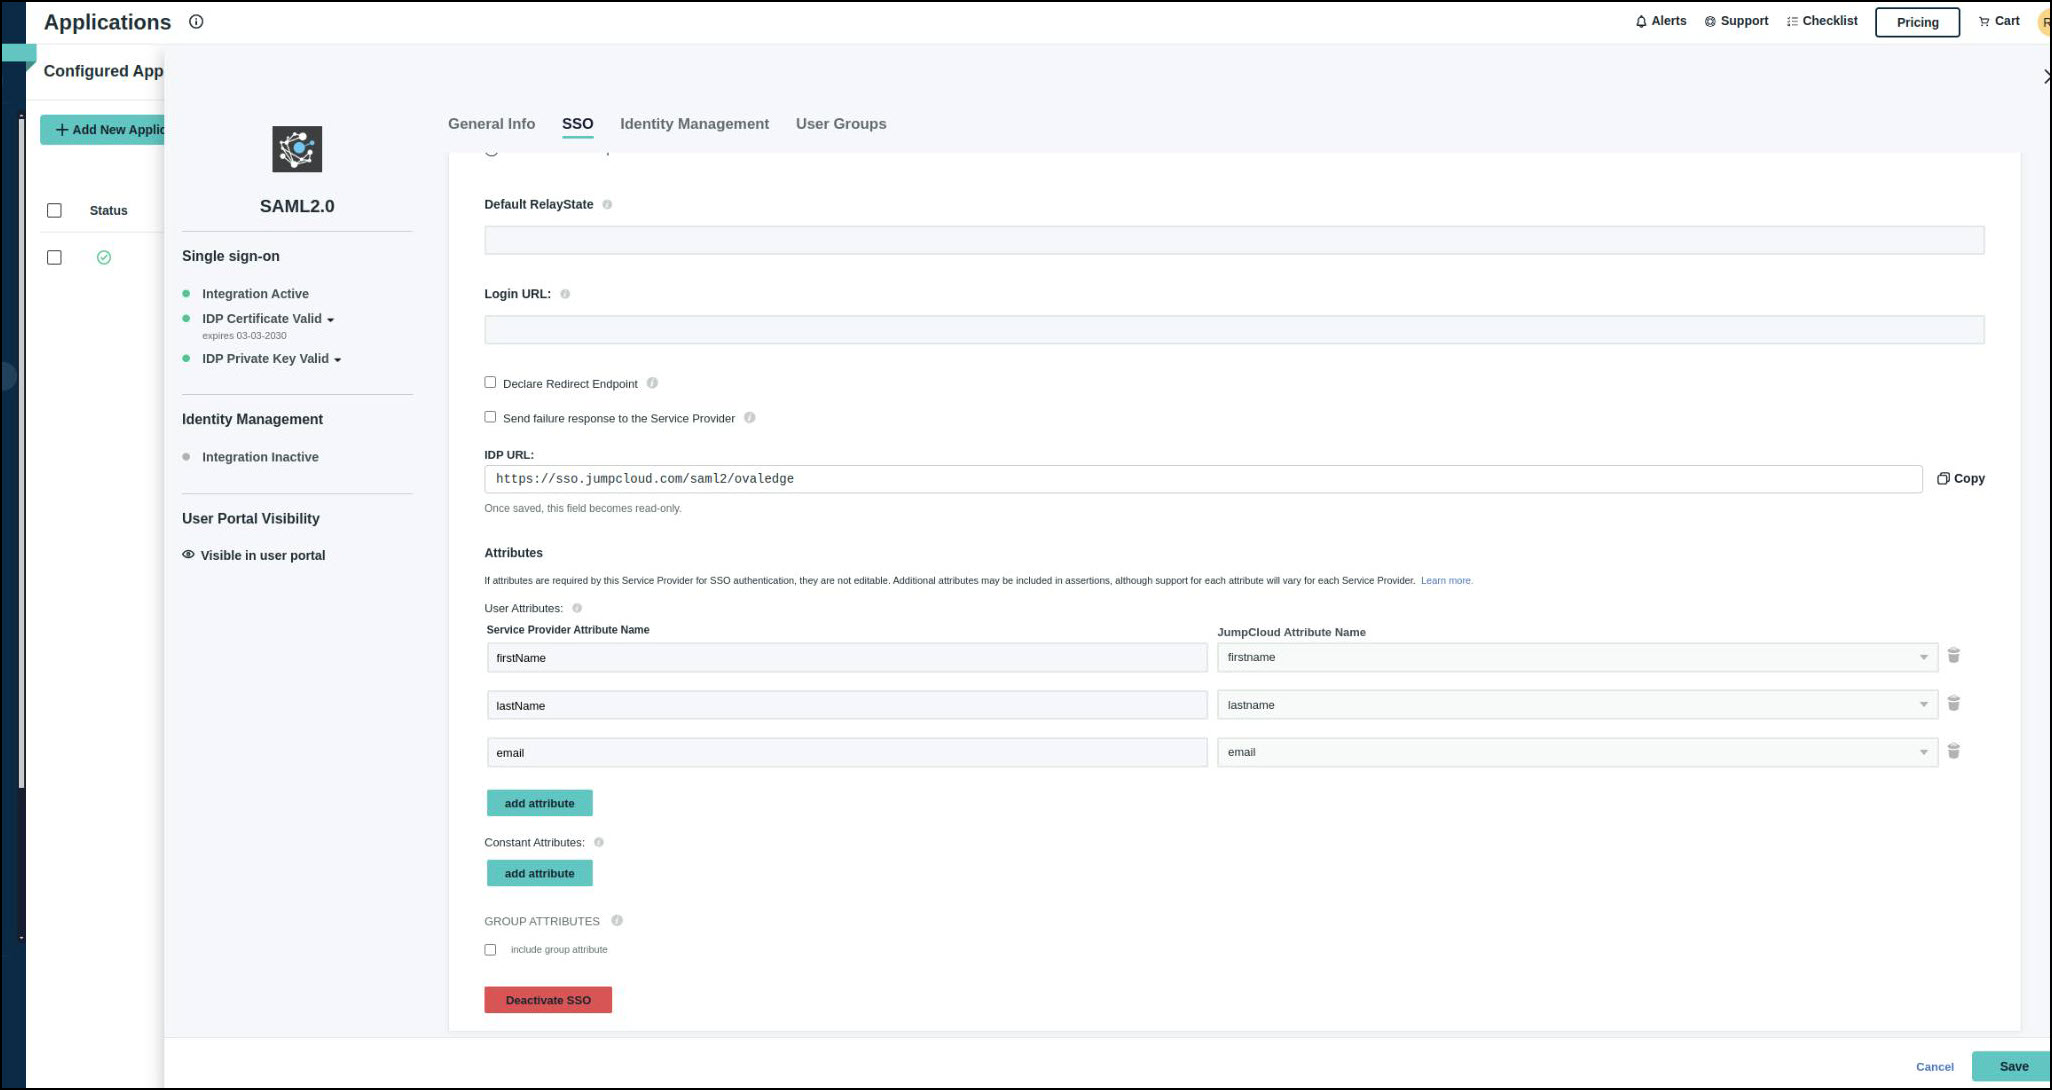
3. **Configure Attribute Mapping**
   * Navigate to the **User Attributes** section in JumpCloud.
   * Map the following attributes as needed:
     * `email → email`
     * `firstName → firstname`
     * `lastName → lastname`
     * (Optional) `group → user.groups`
   * Click **Save**.

     <figure><img src="/files/XvImlijtKeP4fffB1HK0" alt=""><figcaption></figcaption></figure>

4. **Assign Users to the Application**
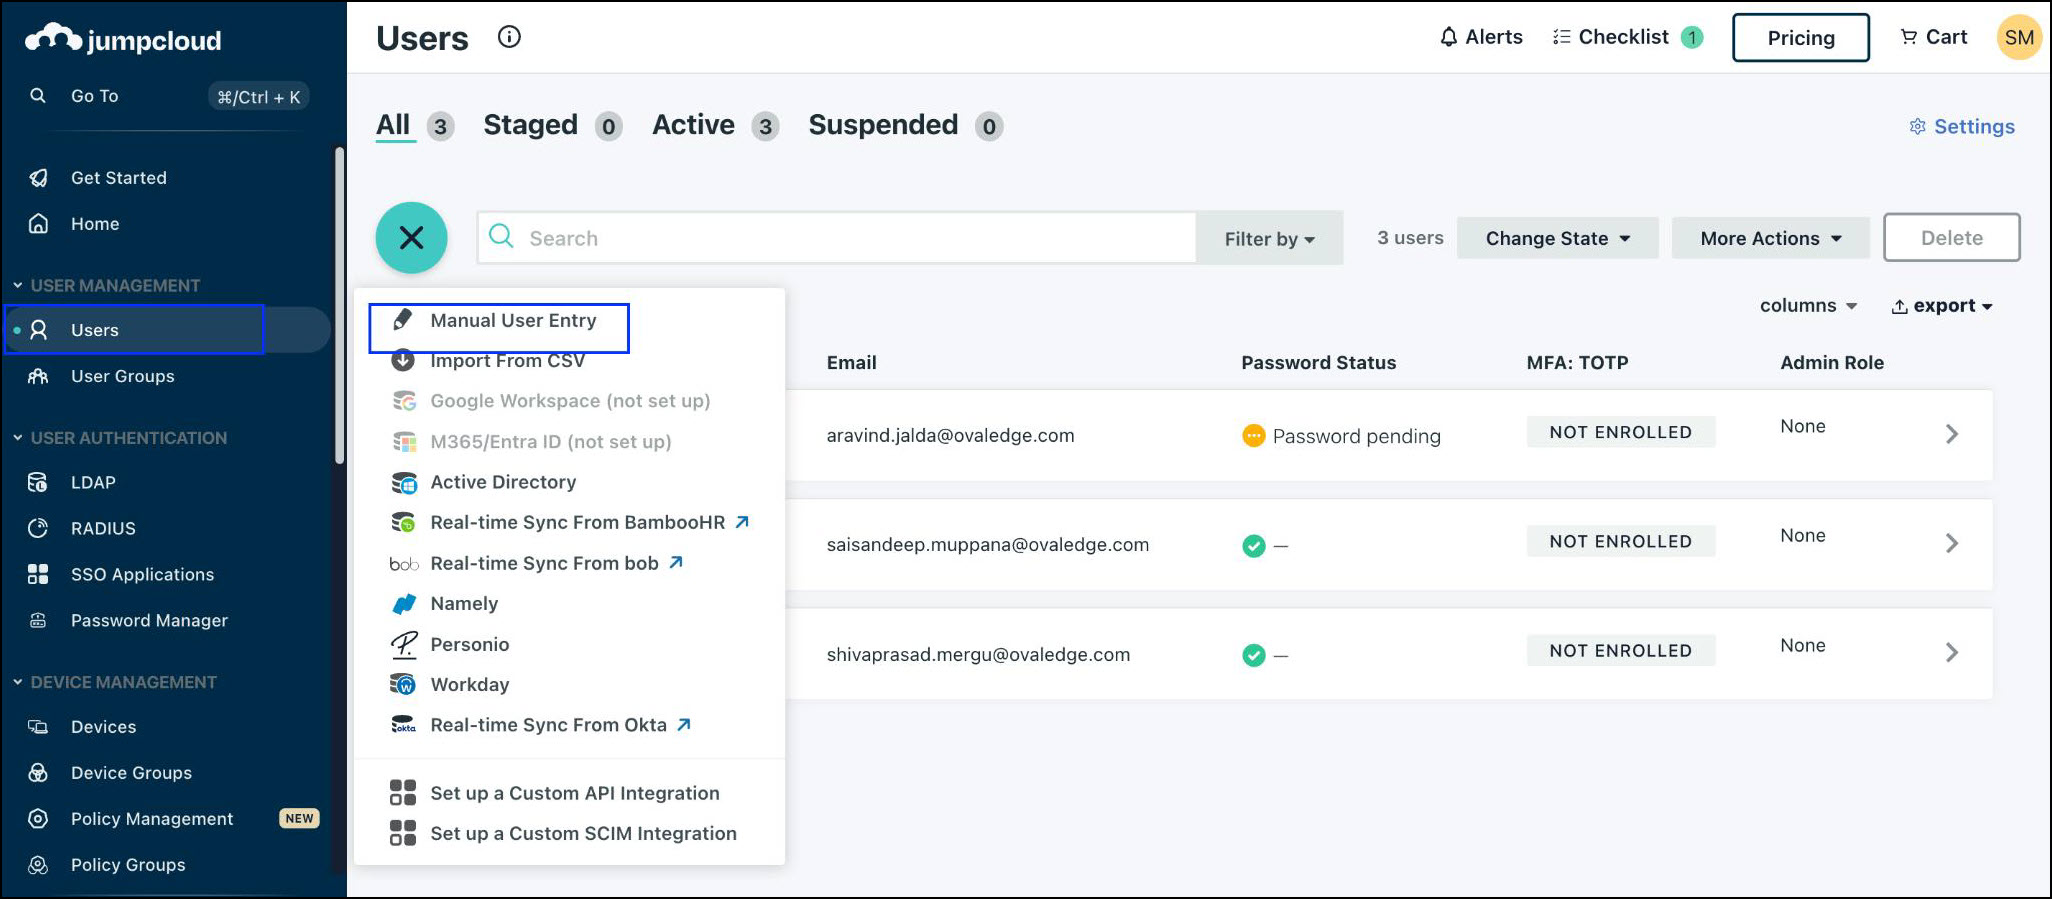
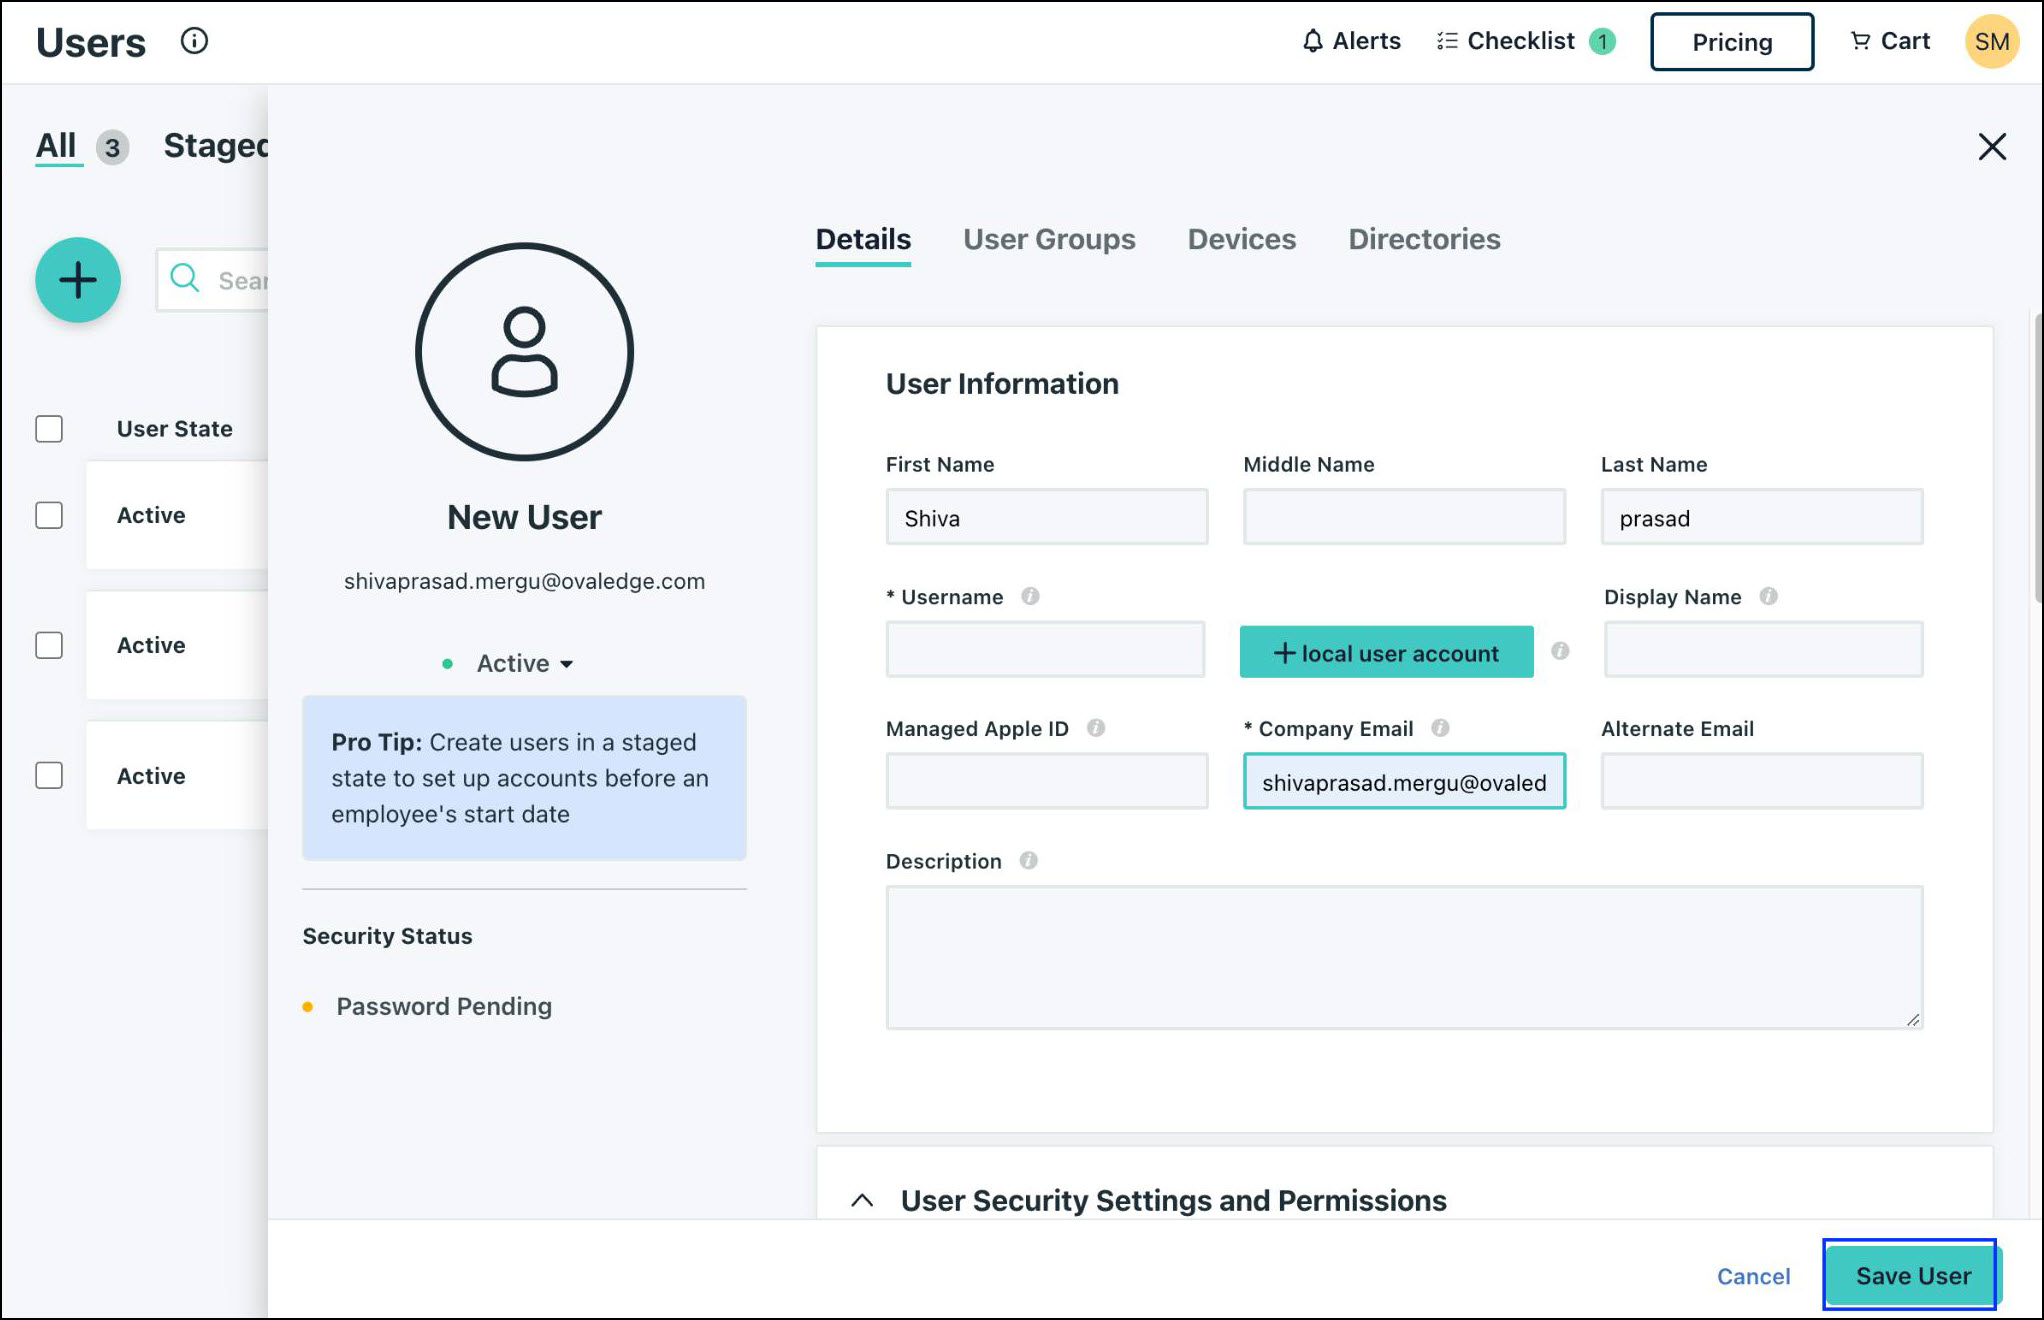
   * **User Creation Process**
     * Provide the required user details and click **Save**.
     * Navigate to the **User Group** section to assign the user to the appropriate group.<br>

       <figure><img src="/files/A6CfltEQX0ZWZFw0M85Y" alt=""><figcaption></figcaption></figure>
     * Provide necessary details and click **Save**.<br>

       <figure><img src="/files/Er89kBekOMS78hvH5r0x" alt=""><figcaption></figcaption></figure>

   * #### **Group Configuration**
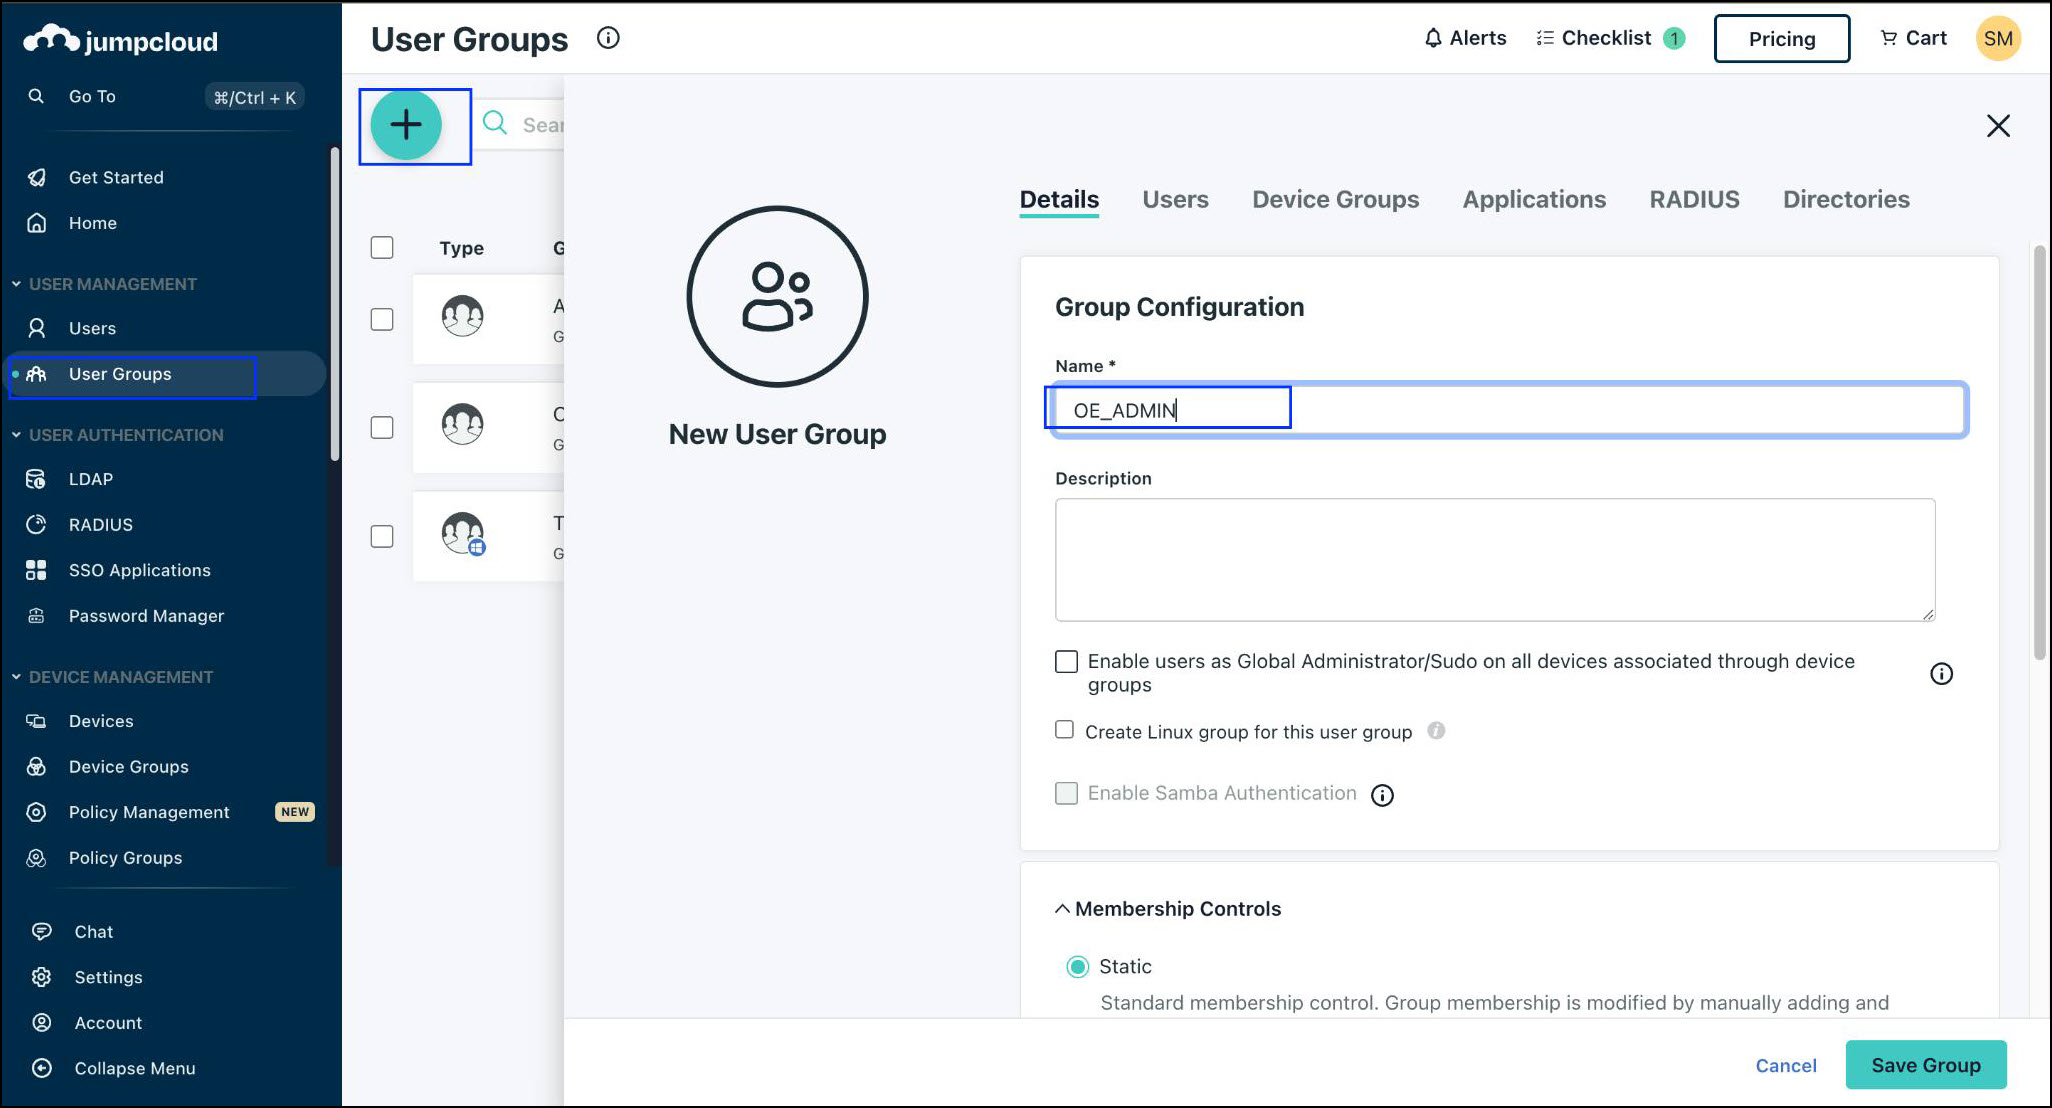
     * Go to **User Groups**.
     * Click the **(+) icon**, then provide the **OvalEdge defined role** in the Group configuration.<br>

       <figure><img src="/files/dMLhEtVPITdp8UTFYbUf" alt=""><figcaption></figcaption></figure>
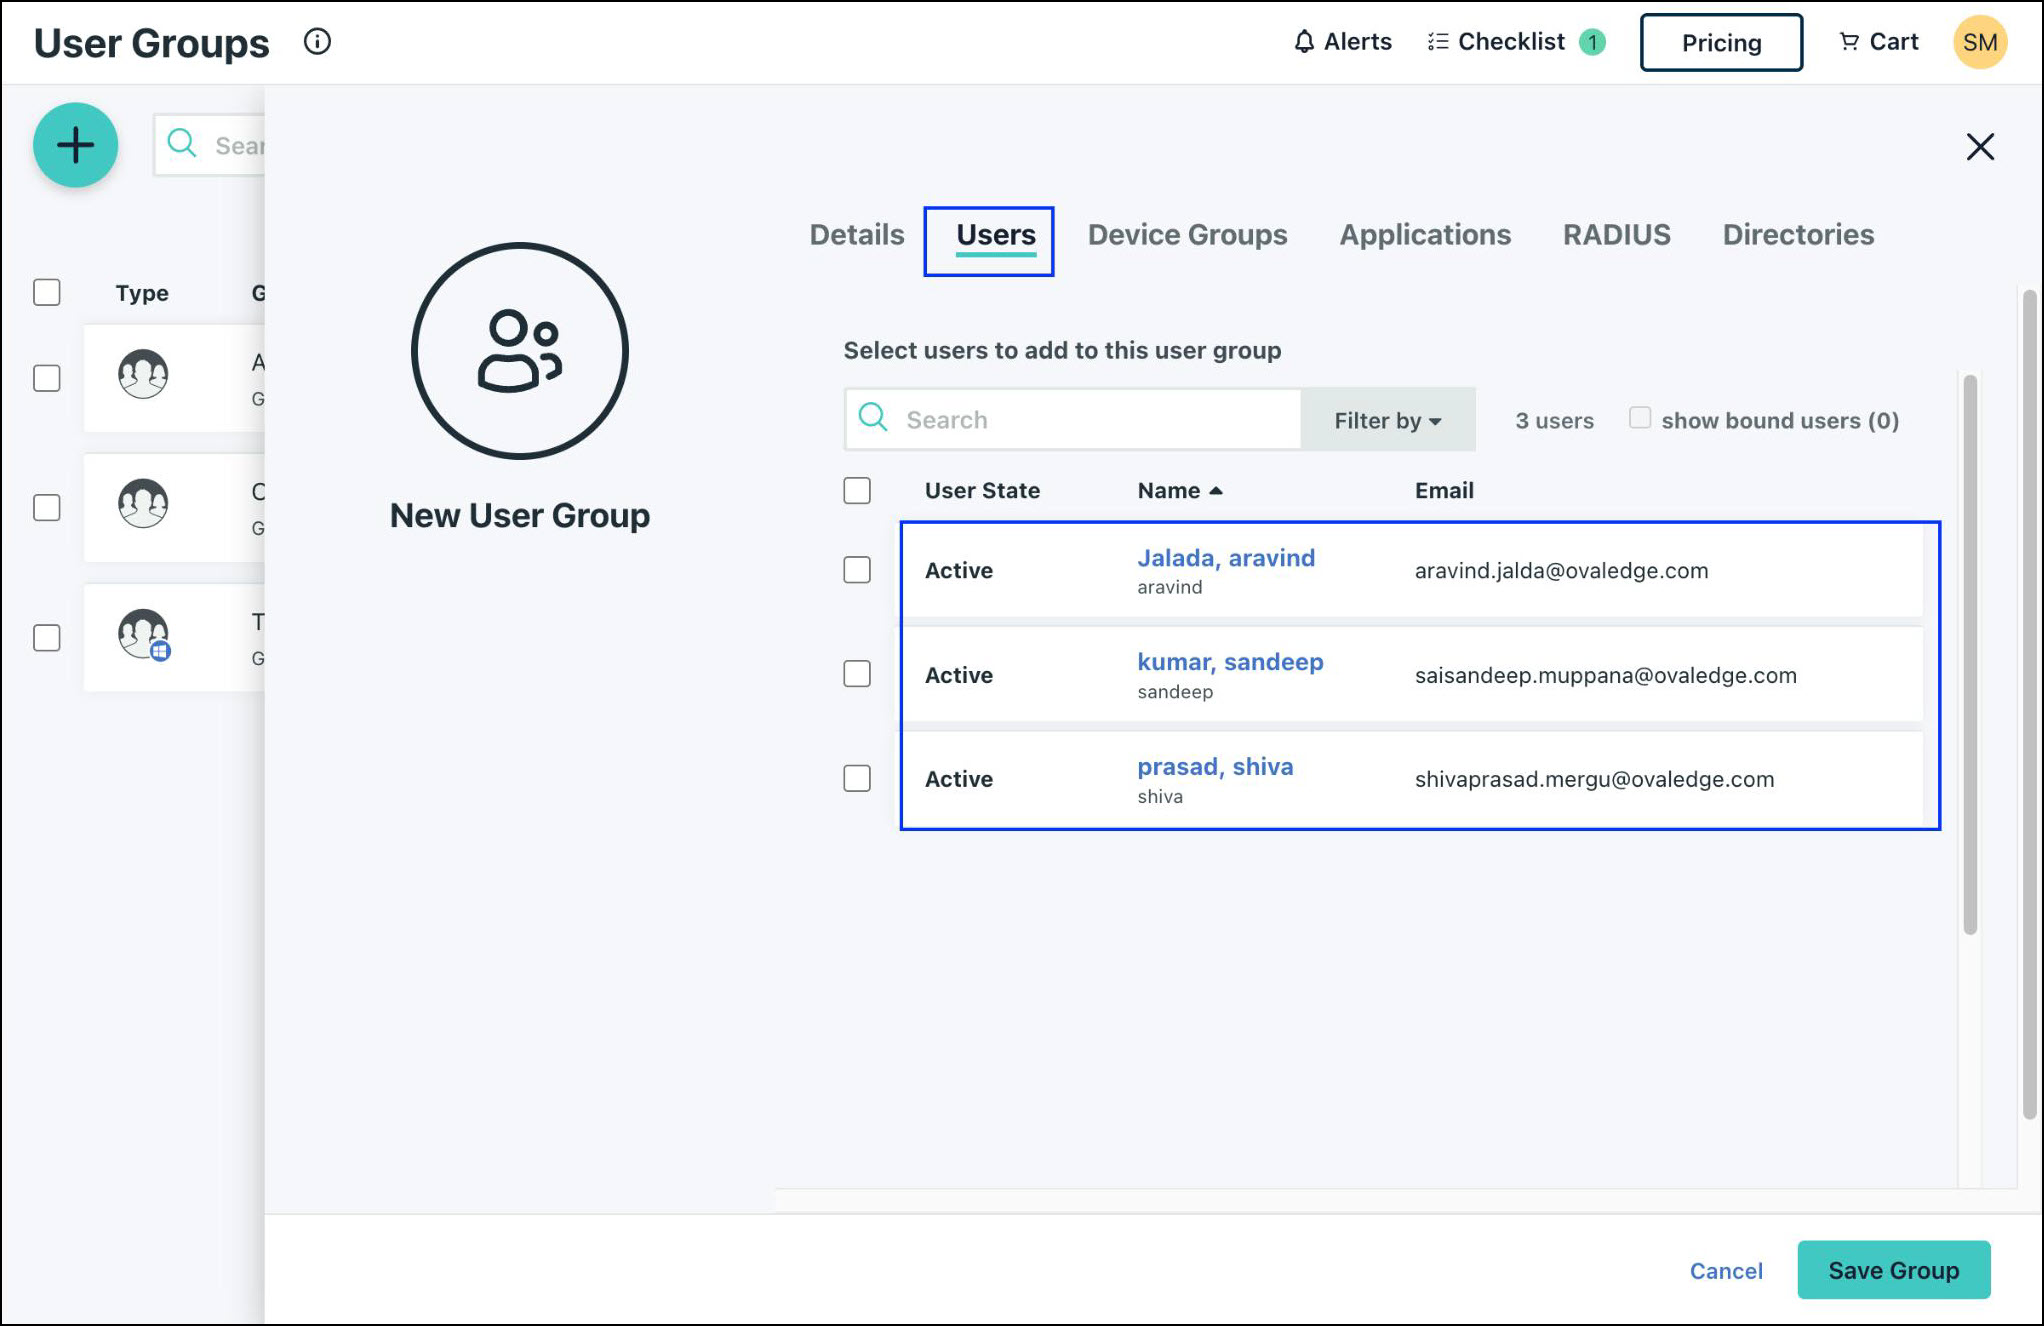
     * Go to the **users** and add a previously created user to this group.

       <figure><img src="/files/usZhUui8QItpZsTAPh4D" alt=""><figcaption></figcaption></figure>
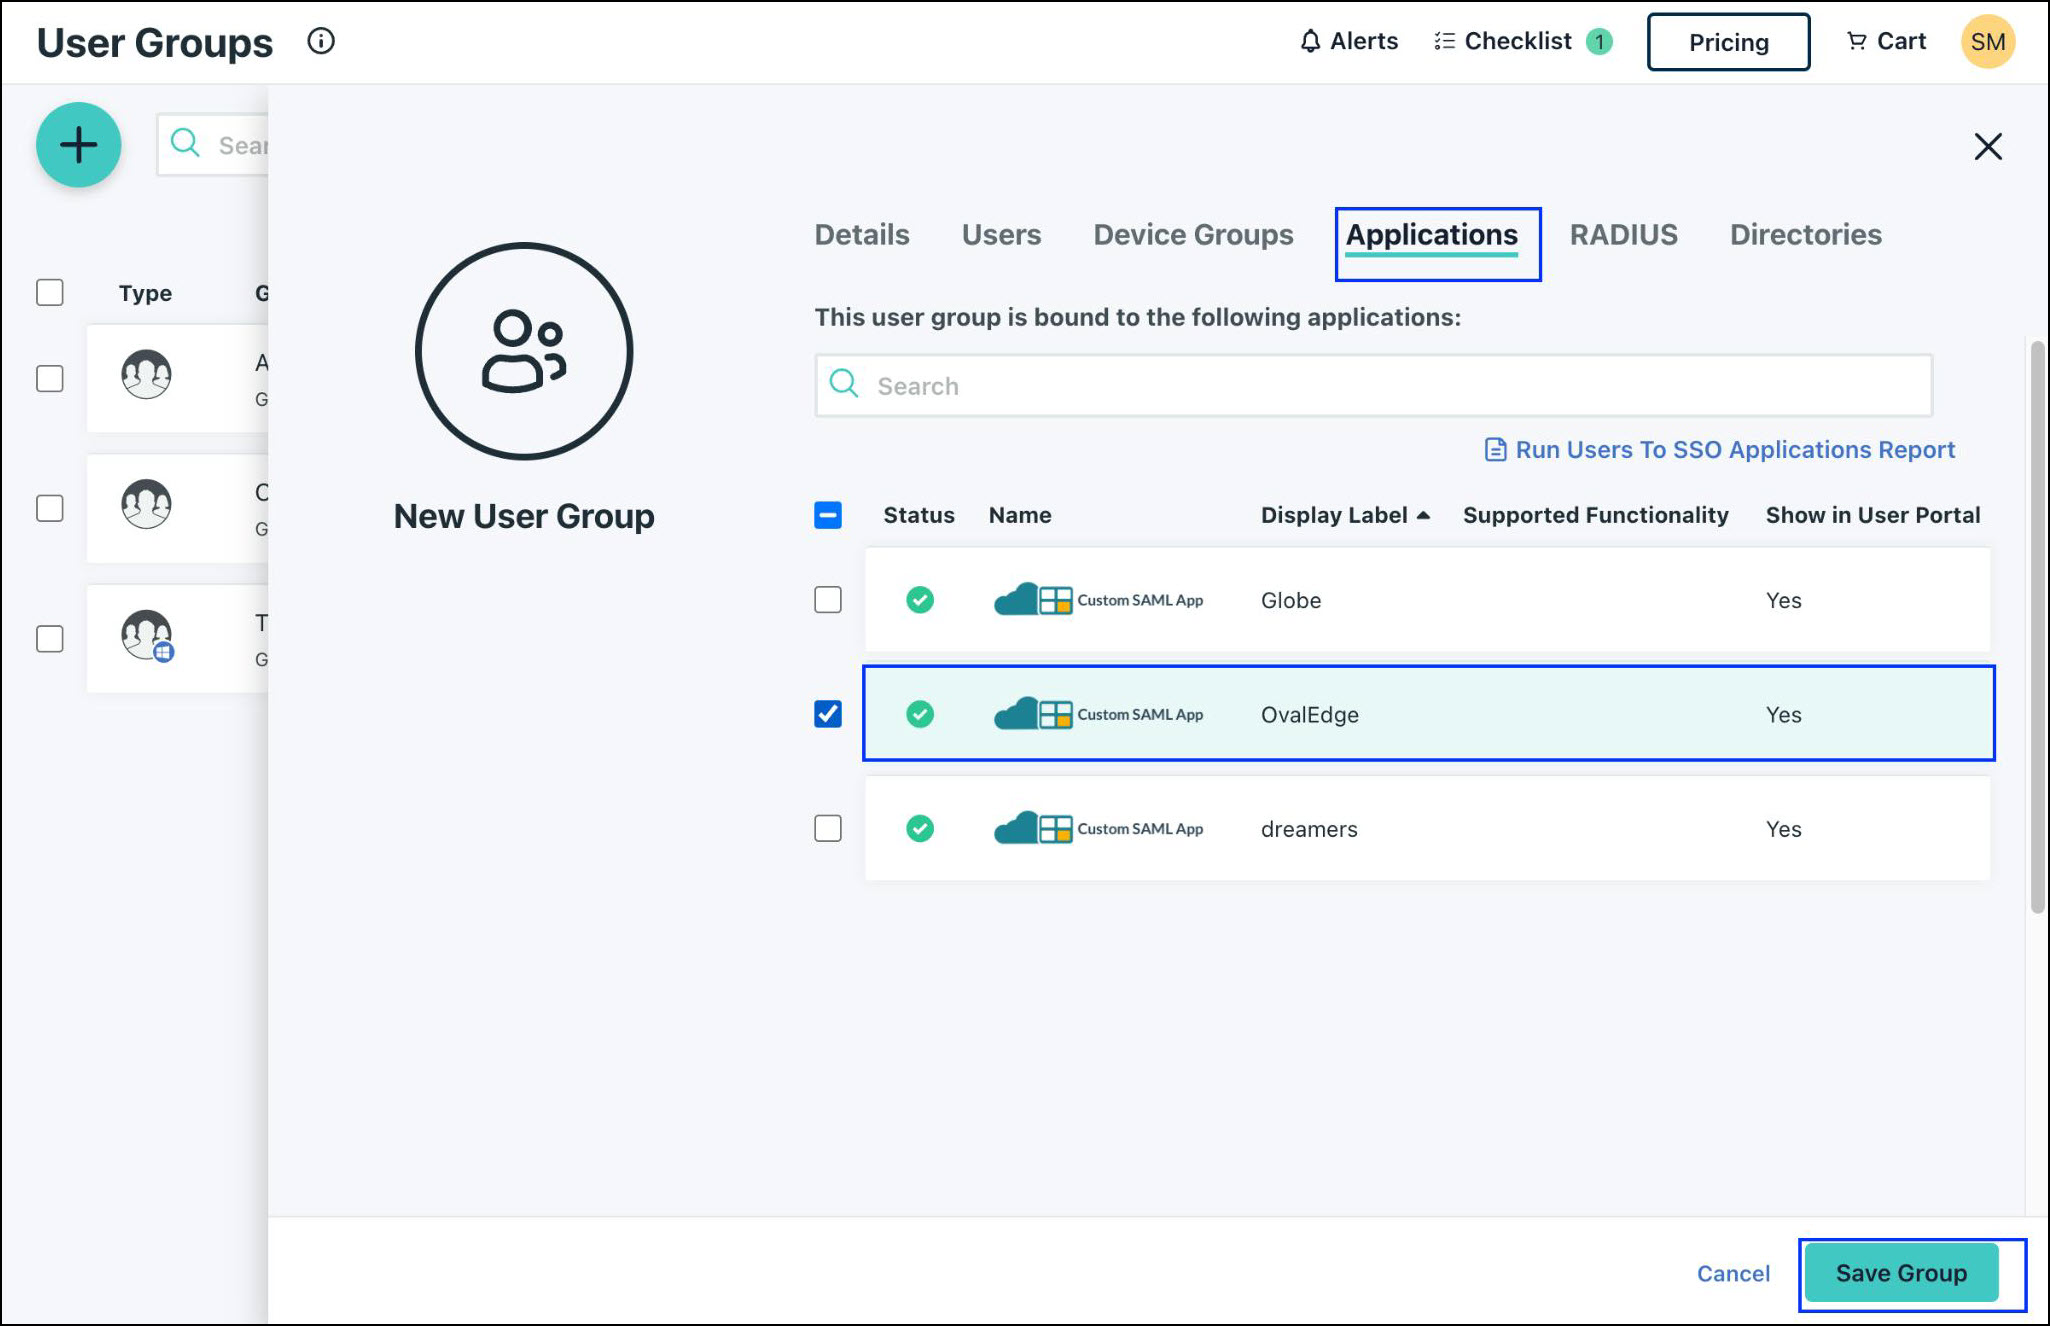
     * Go to the application and add the above-created application as per the screenshot.

       <figure><img src="/files/hdQKsvYQY40Kt7YWI4rt" alt=""><figcaption></figcaption></figure>
     * Click **Save Group & Apply Changes**.<br>

5. **Configure SAML in Your Custom Application**

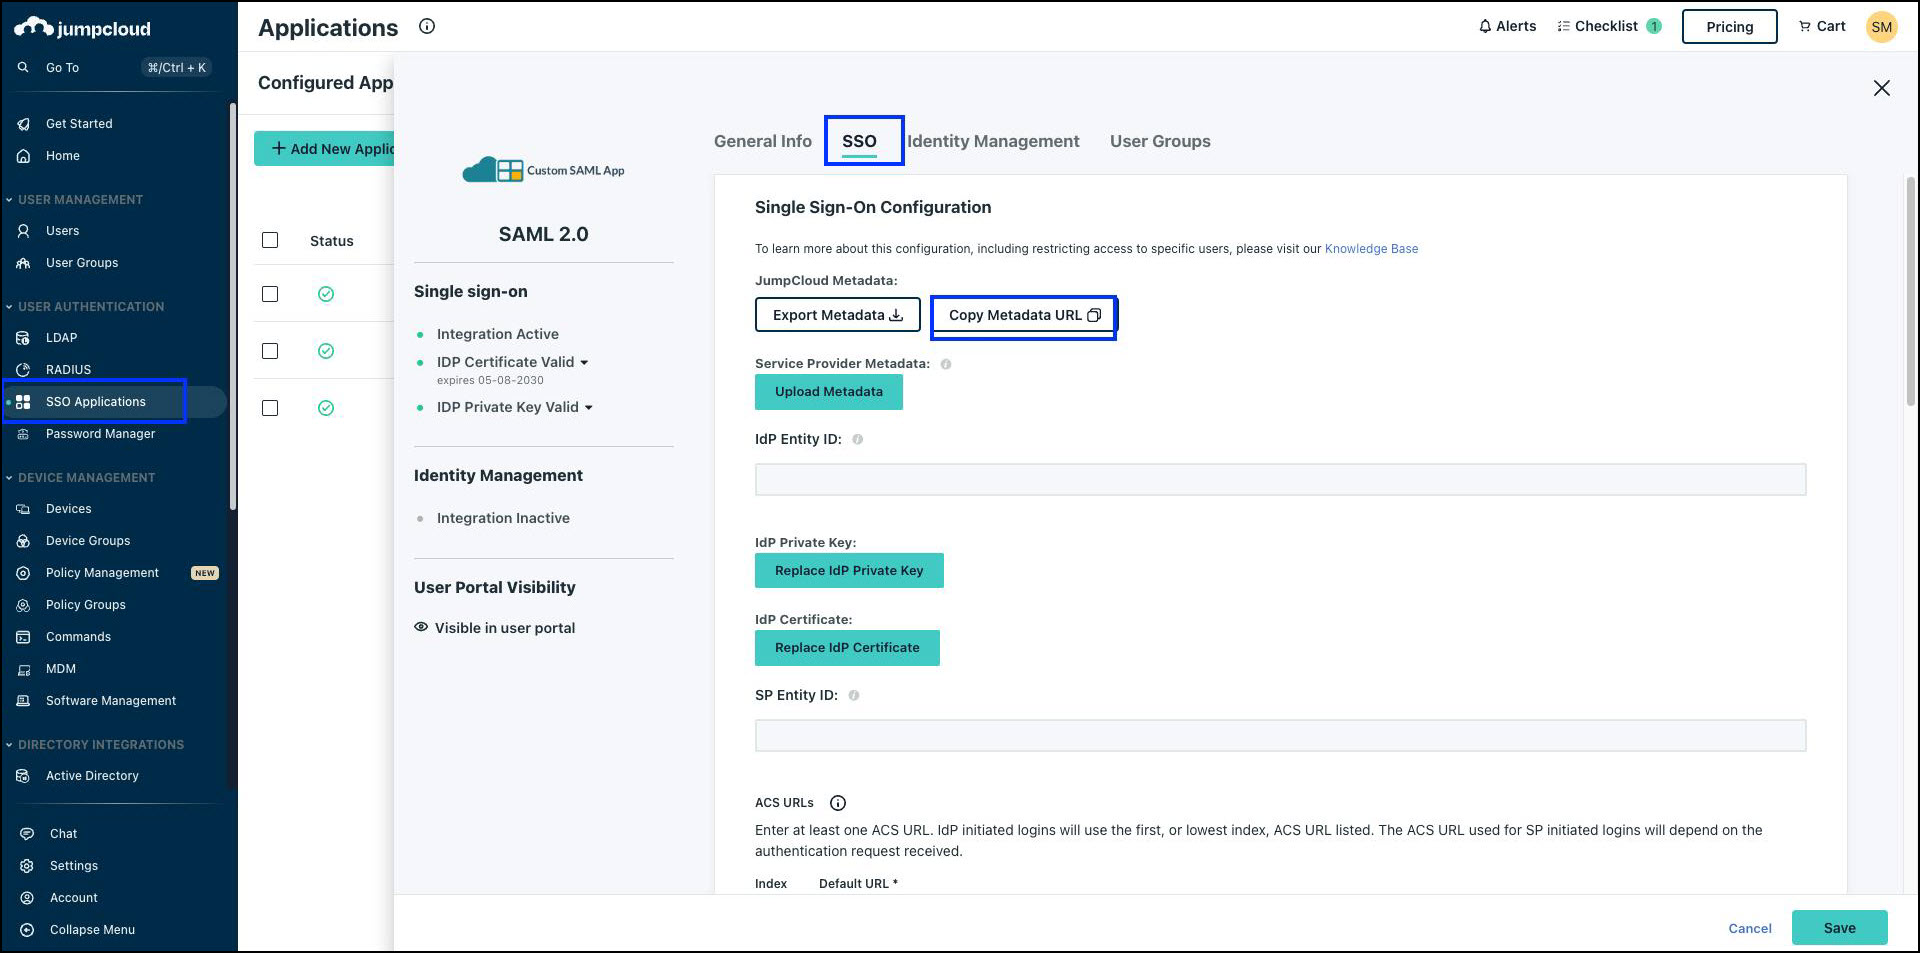
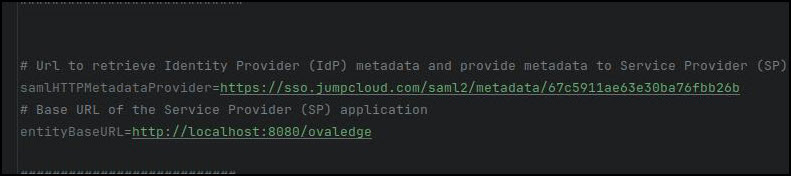
   * Until the above configuration is done, copy the **METADATA URL** as per the screenshot.

     <figure><img src="/files/in7v6xBLKVsEyDXPGKiV" alt=""><figcaption></figcaption></figure>
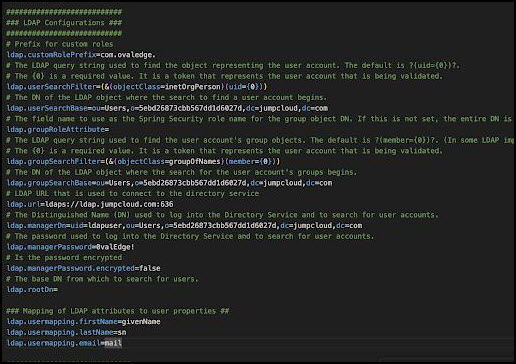
   * Go to `oasis.properties` and update the below configurations with the URLs configured above.
     <figure><img src="/files/3K0sTP8alLO3QQ0LyCGl" alt=""><figcaption></figcaption></figure>

     <div align="left"><figure><img src="/files/P9cpS9Y52ohOkjkLz4fs" alt=""><figcaption></figcaption></figure></div>
   * Once the above configuration is updated, add the parameter in the `setenv` file as shown below:

   ```bash
   -DOVALEDGE_SECURITY_TYPE=ldap
   ```

   * Once it is done, restart the service and check the logs.<br>

6. Test the SSO Integration
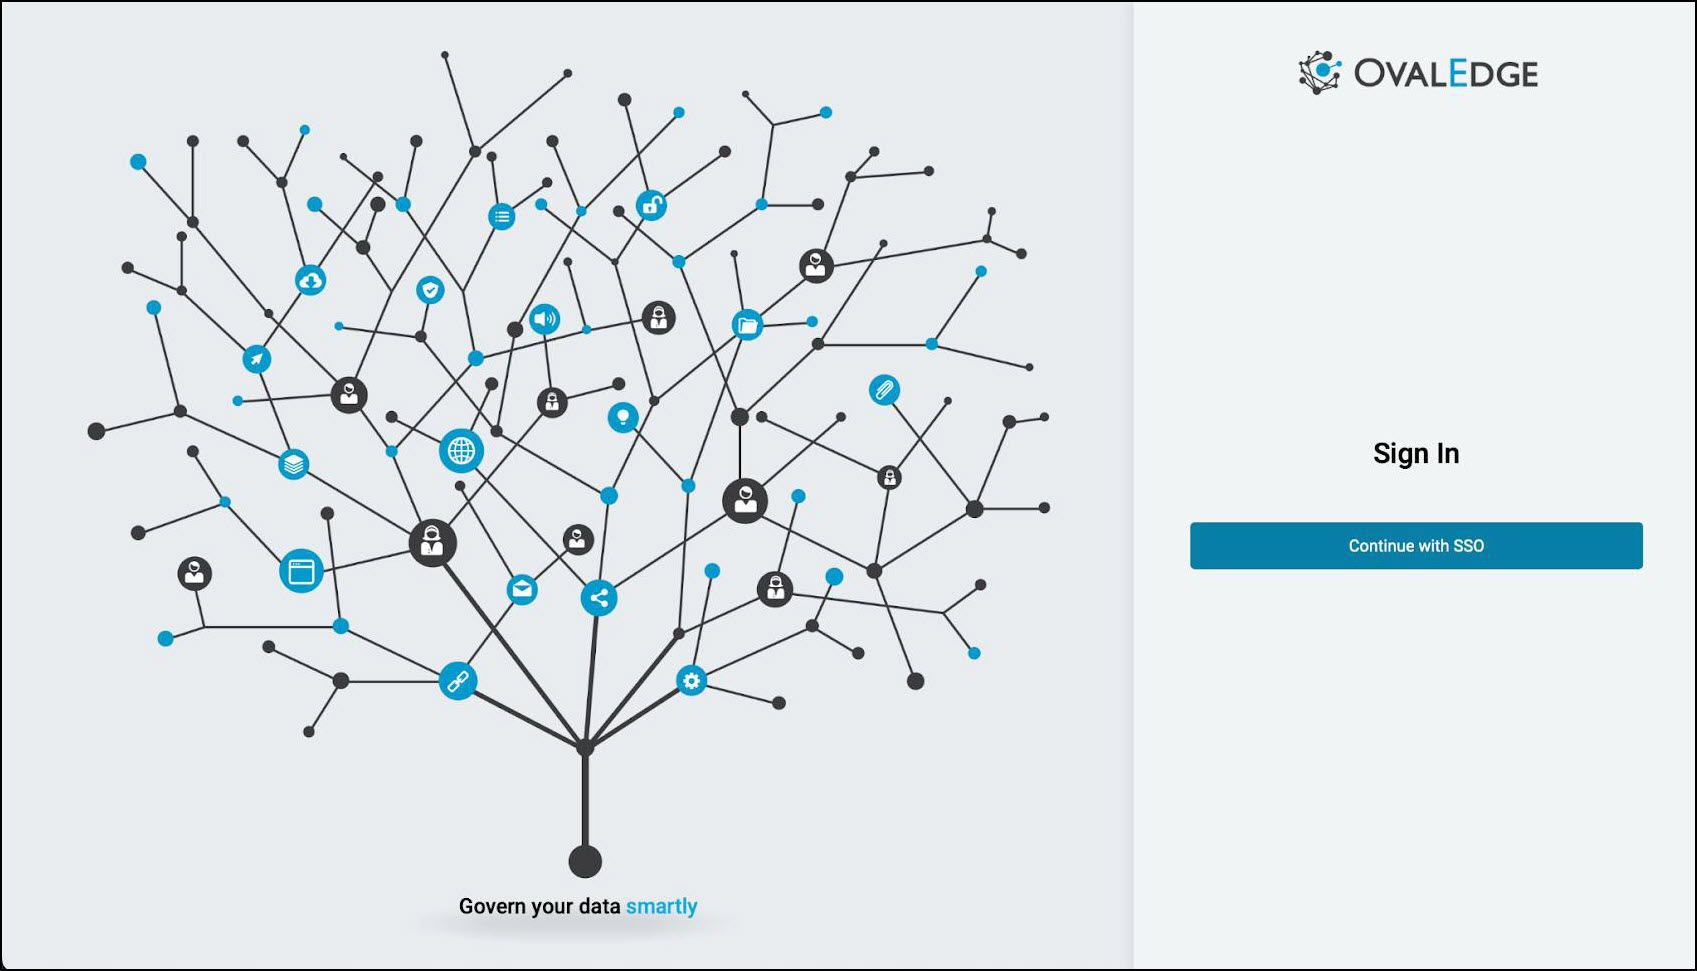
   * Open a new **incognito/private browser** window.
   * Navigate to your custom application's login page.
   * Click **Login with SSO**.<br>

     <figure><img src="/files/XcUGeKRhTl5Y2a8olBn7" alt=""><figcaption></figcaption></figure>
   * Enter your **JumpCloud credentials**.

     <figure><img src="/files/S6VjOykdY1MpocMG4L0B" alt=""><figcaption></figcaption></figure>

7. **Troubleshooting Common Issues**
   * Incorrect Credentials / Access Denied
     * Ensure the user is assigned to the application in JumpCloud.
     * Verify attribute mapping matches the required fields.
   * Signature Validation Failed
     * Ensure the correct **IdP Certificate** is uploaded to your application.
     * Verify that the SP Entity ID matches the one configured in JumpCloud.
   * Redirect Loop / Infinite Login Attempts
     * Verify the **ACS URL** is correct.
     * Ensure the application handles SAML authentication responses correctly.

***

Copyright © 2025, OvalEdge LLC, Peachtree Corners, GA, USA.


---

# Agent Instructions: Querying This Documentation

If you need additional information that is not directly available in this page, you can query the documentation dynamically by asking a question.

Perform an HTTP GET request on the current page URL with the `ask` query parameter:

```
GET https://docs.ovaledge.com/release8.1/installation-and-settings/authentication-and-sso-setup/jumpcloud.md?ask=<question>
```

The question should be specific, self-contained, and written in natural language.
The response will contain a direct answer to the question and relevant excerpts and sources from the documentation.

Use this mechanism when the answer is not explicitly present in the current page, you need clarification or additional context, or you want to retrieve related documentation sections.