> For the complete documentation index, see [llms.txt](https://docs.ovaledge.com/llms.txt). Markdown versions of documentation pages are available by appending `.md` to page URLs; this page is available as [Markdown](https://docs.ovaledge.com/release8.1/installation-and-settings/authentication-and-sso-setup/github.md).
# GitHub
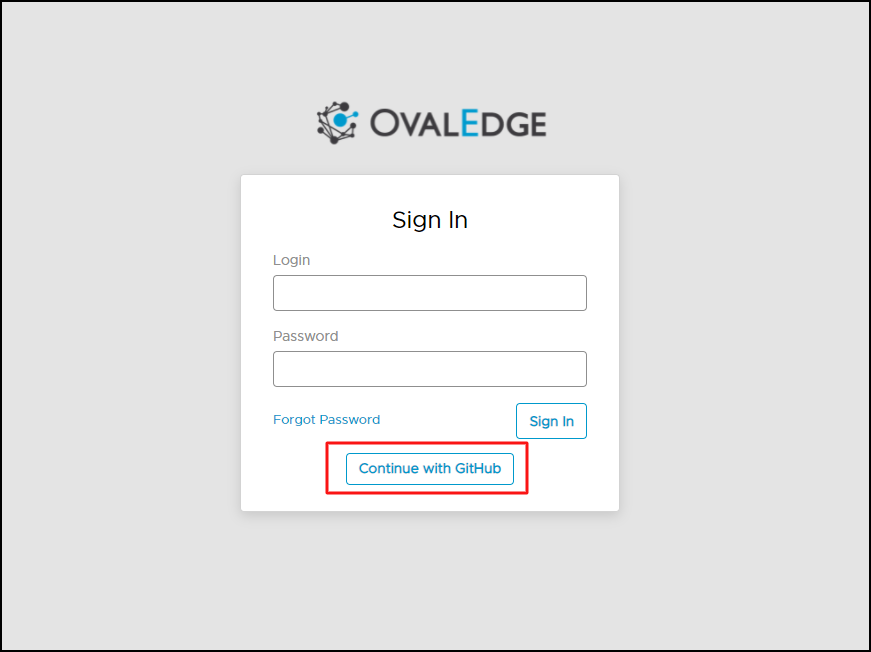
OvalEdge is a data catalog that compiles a comprehensive list of all data sources within an organization, facilitating improved data access and analysis. The OvalEdge application can be accessed with the regular user credentials provided by the OvalEdge administrator team or through the GitHub user credentials. Here, users accessing GitHub can also access OvalEdge through the OAuth Configuration.
## Prerequisites
* Administrator access to the GitHub Web Console.
* Access to the OvalEdge application server.
* Access to the external OvalEdge configuration file (`oasis.properties`).
* Tomcat service restart privileges.
## Steps Involved
1. Create an OAuth App in GitHub
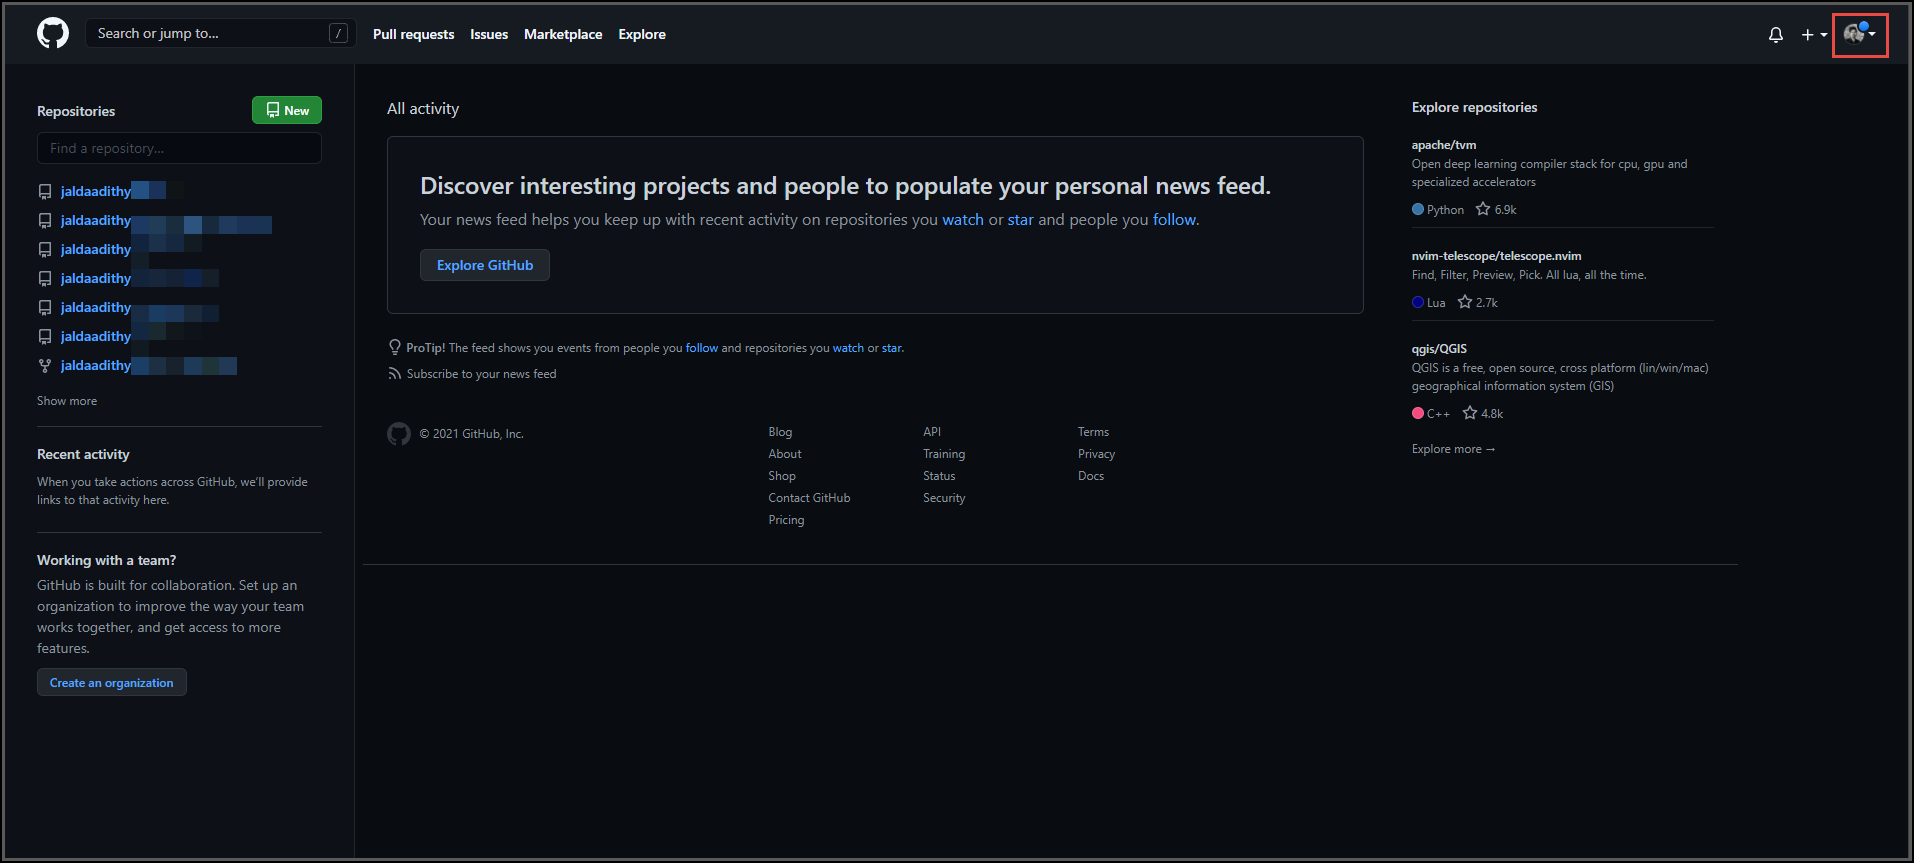
* Enter the GitHub web address ([**https://github.com/**](https://github.com/?utm_source=chatgpt.com)) in your web browser; the GitHub home page will be displayed.
* On the GitHub homepage, click the **Sign In** button. The sign-in page in GitHub is displayed.\

* In the **Sign in GitHub** page, enter the required username or email address and password in the respective **Username or email address** and **Password** fields.
* Click the **Sign in** button to validate the entered user credentials, and the GitHub home page will be displayed.
If the entered user credentials are invalid, an appropriate error message is displayed.
* On the GitHub home page in the header menu, click on the **User Profile** icon, and the user profile settings dropdown is displayed.
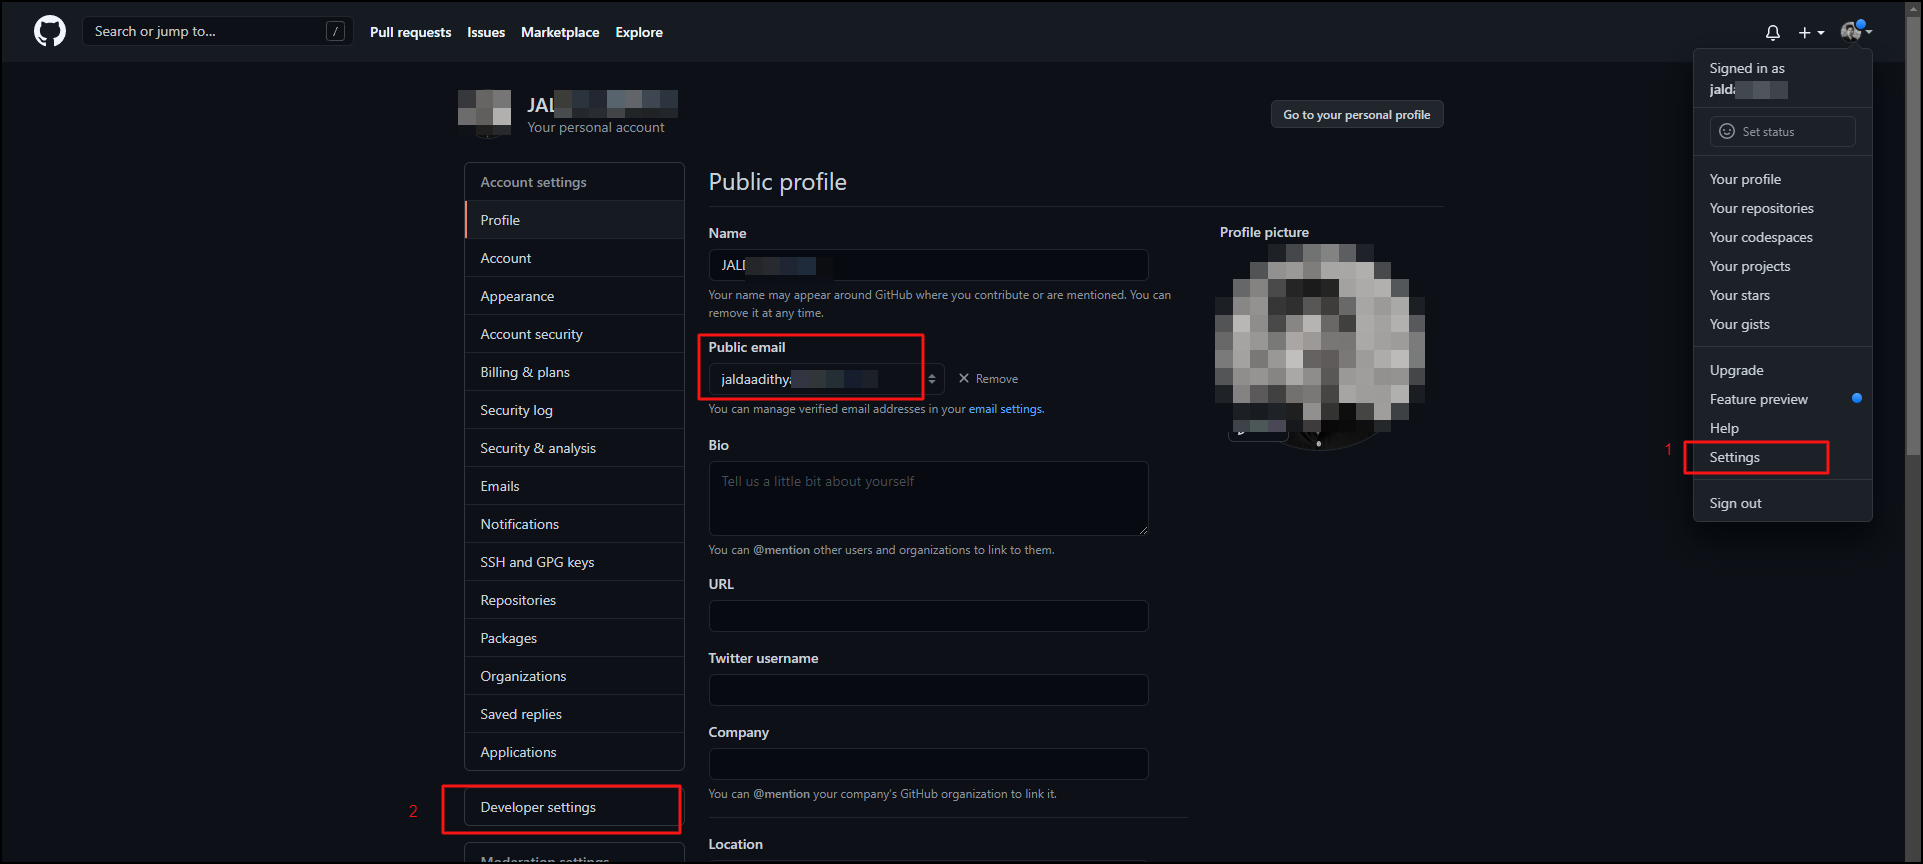
* In the user profile settings dropdown, select the **Settings** option. The Public profile home page is displayed.
* On the public profile home page, click the **Public Email** field. The email address associated with the logged-in user is displayed in the Public email field.
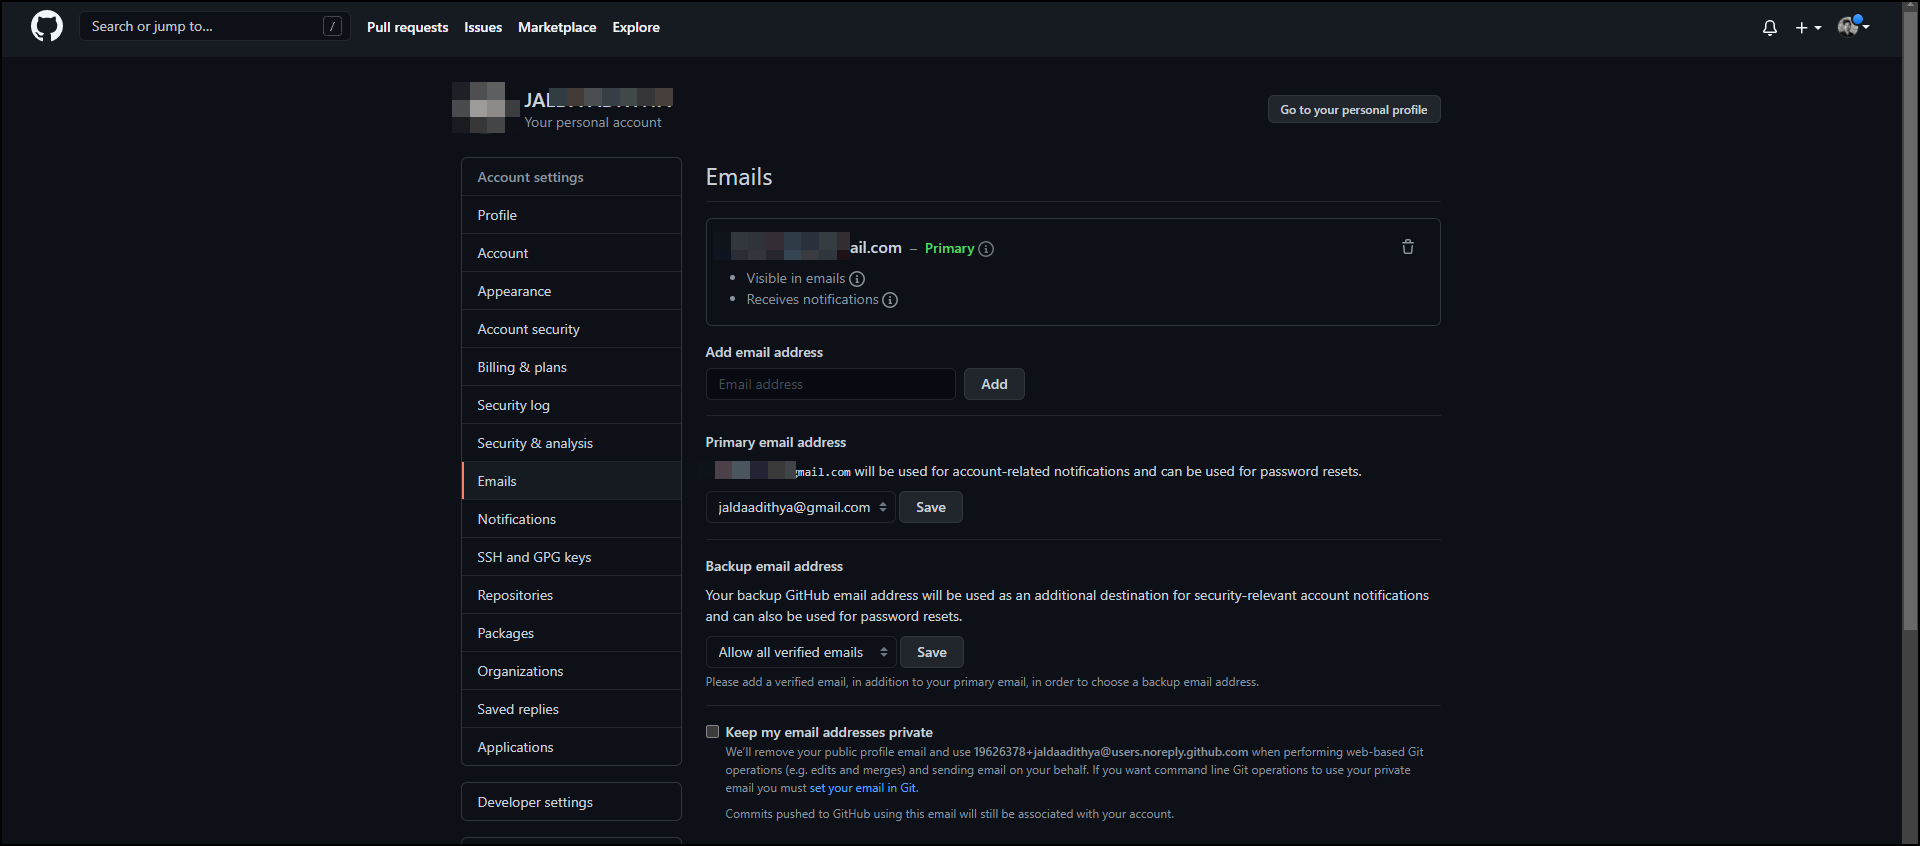
* If the logged-in user's email address is not displayed in the **Public email** field, then click on the **email settings** hyperlink. The Emails page is displayed.
* In the **Emails** page, uncheck the **“Keep my email addresses private”** checkbox. Here, the system will automatically update the email settings and set the user's email address as public.
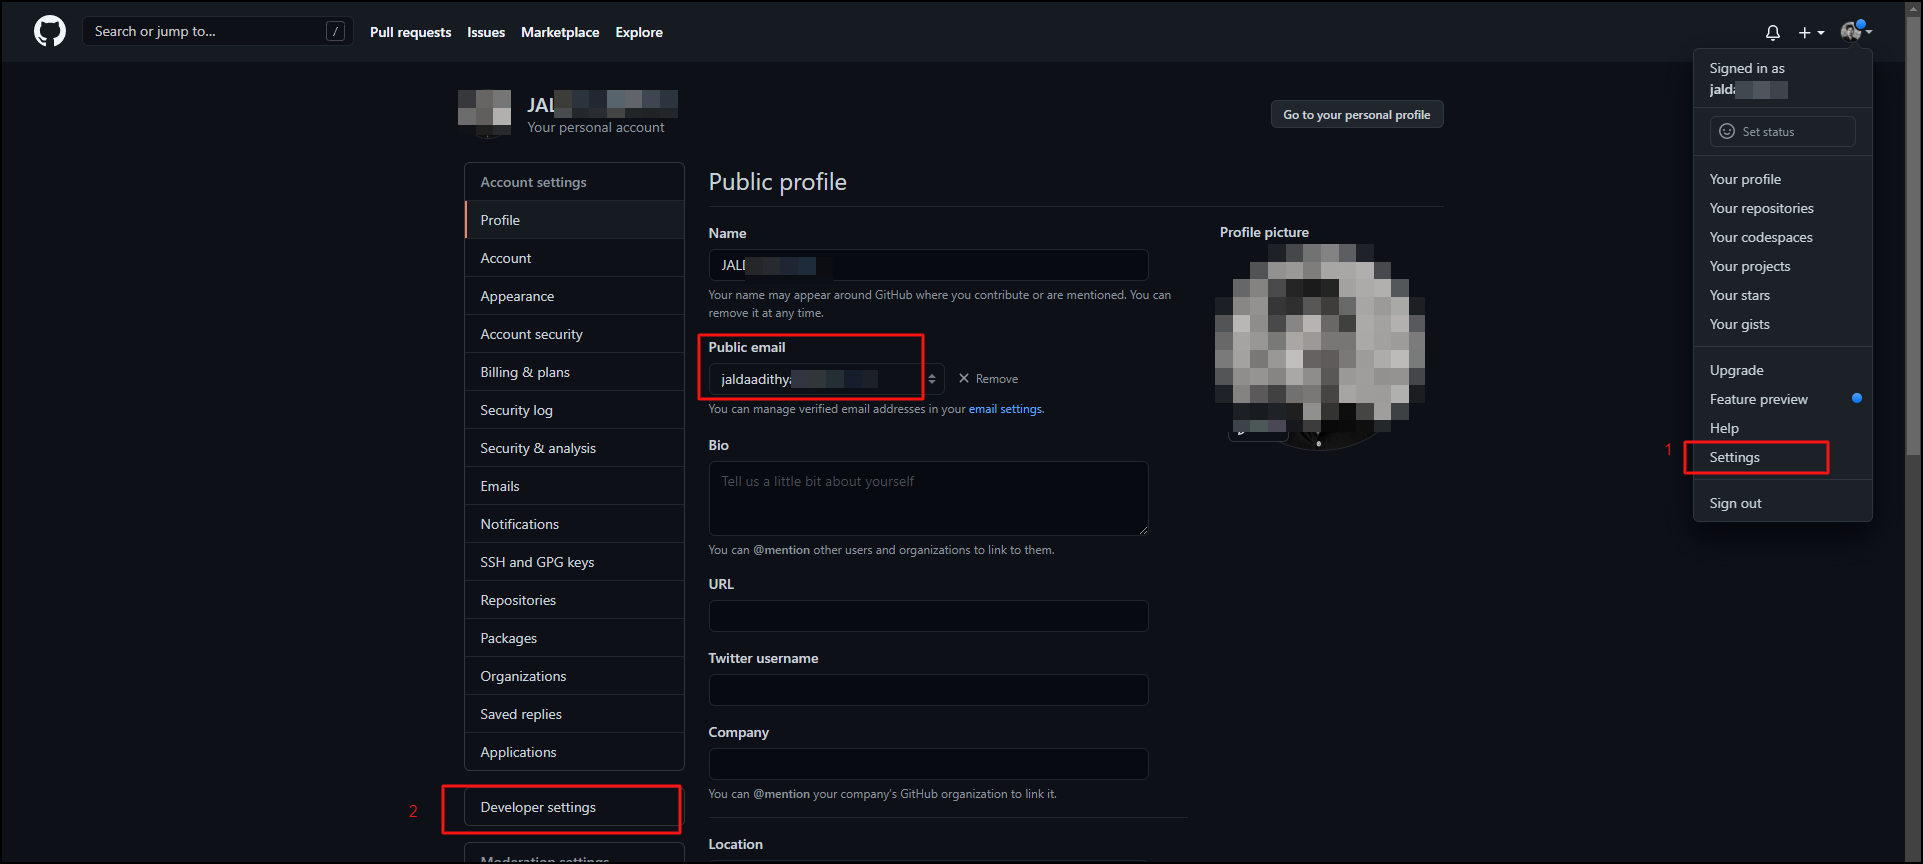
* To verify the email address as public, click on the **Profile** link. The Public Profile main page is displayed.
* In the Public profile page, click on the **Public email** field. The email address associated with the logged-in user is displayed in the dropdown.
* Select the email address from the **Public email** dropdown list and set it as public.
By default, the logged-in user's First Name and Last Name are displayed in the Name field. Enter the user's first and last name if the name is not shown.
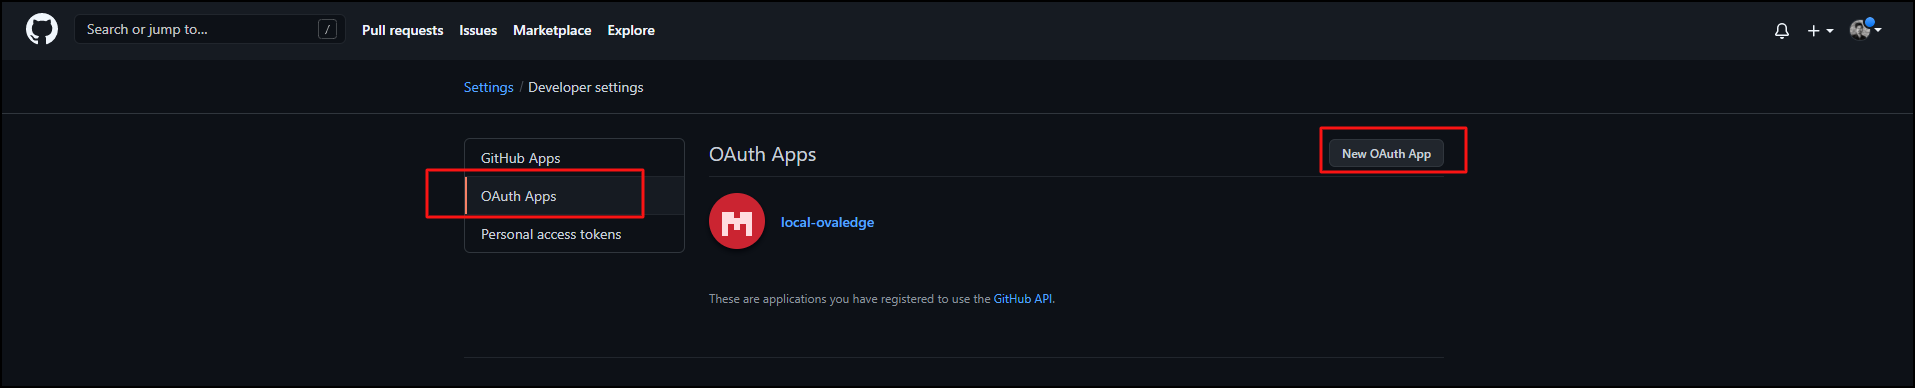
* Click the **Developer Settings** link on the Public profile page, located in the left menu. The Developer Settings home page is displayed.
* In the Developer Settings page, click on the **OAuth Apps** link. The OAuth Apps section is displayed in the right section of the page.
* In the OAuth Apps section, click on the **New OAuth App** button. The **Register a new OAuth application** page is displayed.
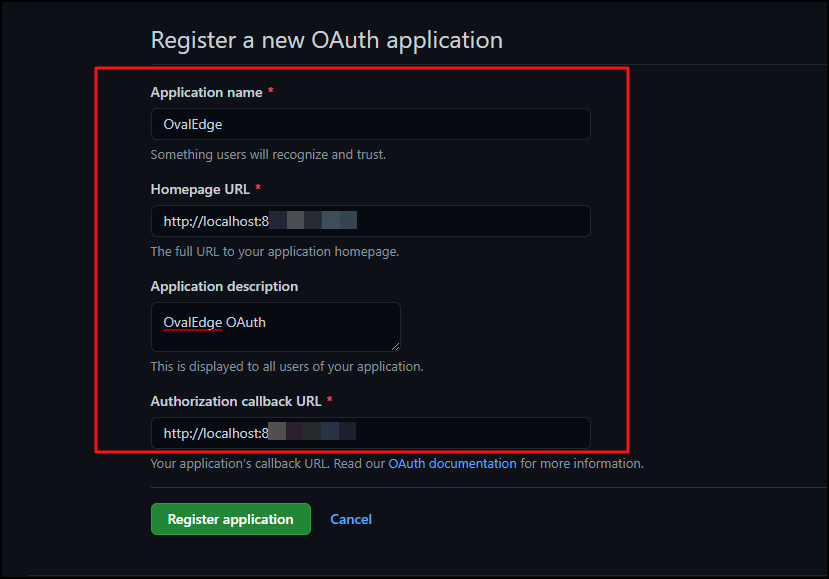
* On the **Register a new OAuth application** page, enter the following details:
* **Application Name:** Example: `OvalEdge`
* **Homepage URL:** Example: `http://localhost:8080/ovaledge`
* **Application description:** Example: `OvalEdge OAuth`
* **Authorization callback URL:** Example: `http://localhost:8080/ovaledge`
All mandatory fields on the Register a new OAuth application page are marked with a "*", without entering the details in the mandatory fields, if the user clicks on the Register application button, an appropriate error message is displayed.
* After entering the details in the required fields, click the Register Application button, and the newly created application page will be displayed.
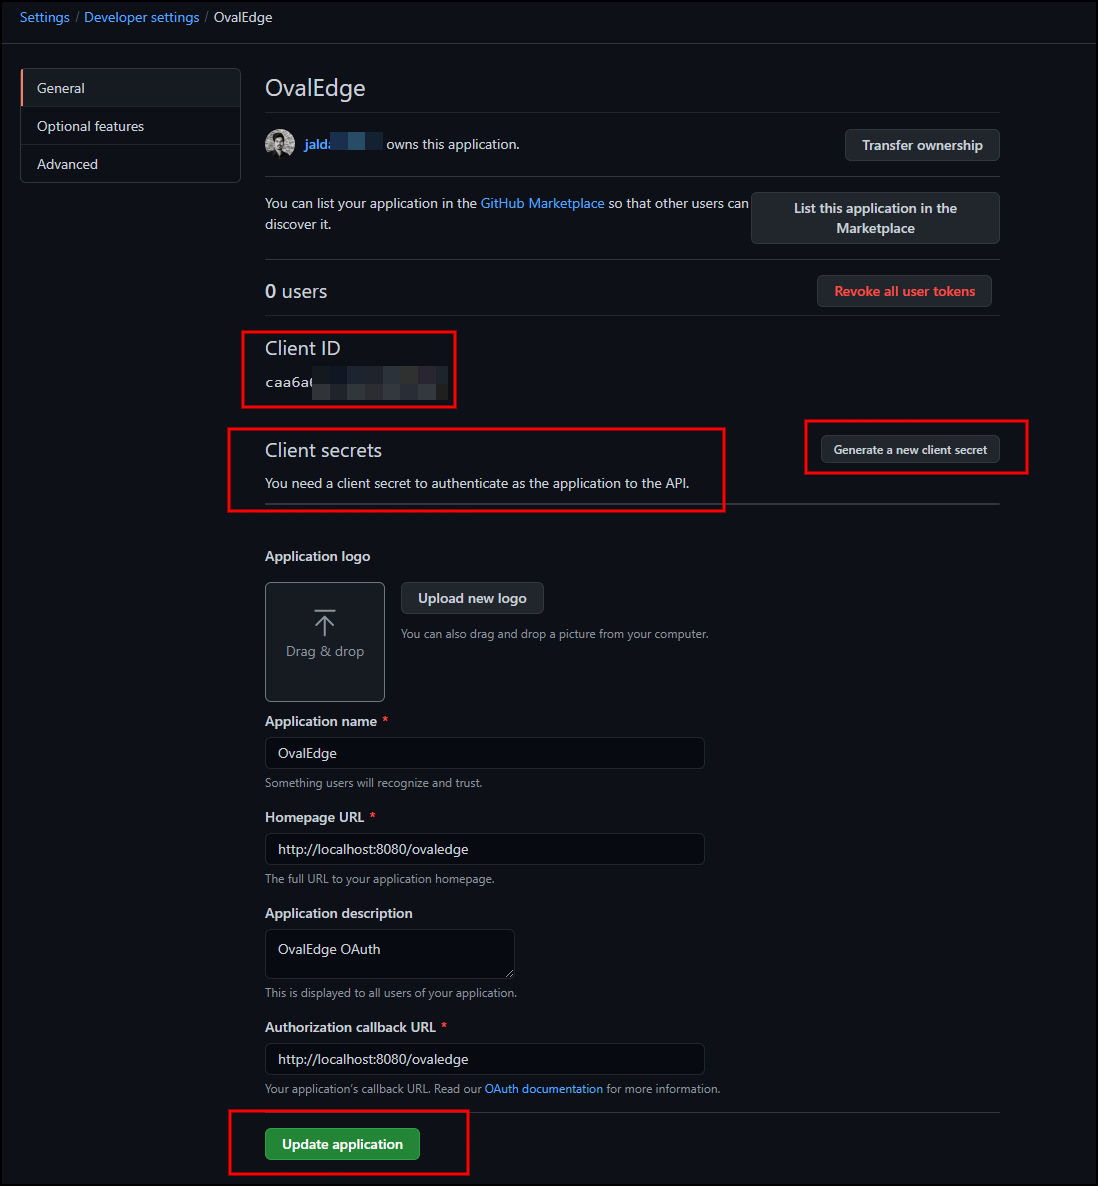
* On the newly created application page, verify the **Client ID** and **Client secrets**, and capture the Client details. These details will be used in the OAuth Properties configuration.
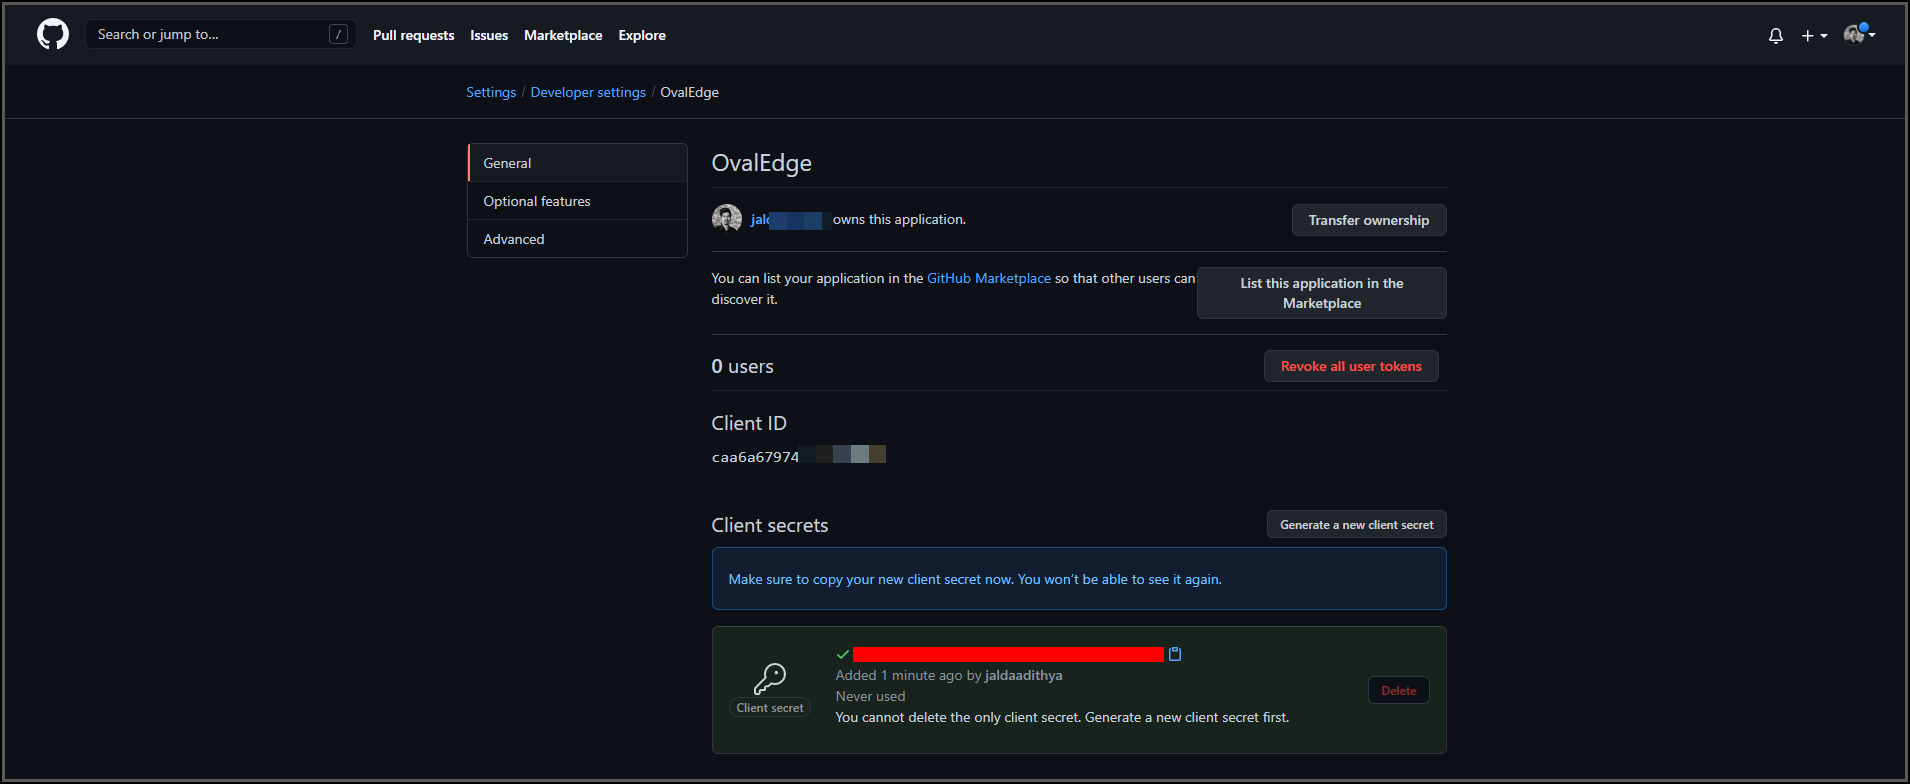
* If the **Client secrets** are unavailable, click the **Generate a new client secret** button. The Client secrets textbox is displayed.
* In the Client secrets textbox, enter the required client secrets code and click the **Generate a new client secret** button. The entered client secrets code is generated, and the newly created application page is displayed.
* After verifying the Client ID and Client secrets details, click the **Update application** button. The “application updated successfully” message will be displayed.
2. Configuring OAuth Properties
* Locate the `oasis.properties` file. The default path is:
```
/home/ovaledge/extprop/oasis.properties
```
This path may vary depending on the client environment.
* Update the following properties:
* **Existing Properties (Google OAuth example):**
```
spring.security.oauth2.client.registration.google.clientId=clientId
spring.security.oauth2.client.registration.google.clientSecret=clientSecret
spring.security.oauth2.client.registration=google
```
* **Modified Properties (GitHub OAuth):**
```
spring.security.oauth2.client.registration.github.clientId=
spring.security.oauth2.client.registration.github.clientSecret=
spring.security.oauth2.client.registration=github
spring.security.oauth2.client.registration.github.orgs=
spring.security.oauth2.client.registration.github.scopes=user:email,read:org
```
* Replace `` and `` with values obtained from the GitHub OAuth App.
spring.security.oauth2.client.registration.github.orgs can include multiple organization names, separated by commas.
spring.security.oauth2.client.registration.github.scopes must include user:email and read:org for email and organization validation.
3. Enable OAuth Authentication
* Update Tomcat environment variables to enable OAuth authentication:
* **Windows:** Modify `setenv.bat` in the Tomcat bin directory:
```
set CATALINA_OPTS="-DOVALEDGE_SECURITY_TYPE=oauth2"
```
* **Linux:** Modify `setenv.sh` in the Tomcat bin directory:
```
export CATALINA_OPTS="-DOVALEDGE_SECURITY_TYPE=oauth2"
```
* Restart the OvalEdge application after changes:
```
systemctl restart tomcat
```
(Or use the equivalent Tomcat restart command in your environment.)