> For the complete documentation index, see [llms.txt](https://docs.ovaledge.com/llms.txt). Markdown versions of documentation pages are available by appending `.md` to page URLs; this page is available as [Markdown](https://docs.ovaledge.com/release8.1/deployment-and-maintenance/installation/tomcat-10.1.x-on-amazon-linux.md).
# Tomcat 10.1.x on Amazon Linux
This document provides step-by-step instructions for installing and configuring the **OvalEdge application** on **Amazon Linux** using Apache Tomcat 10.1.x. It covers user creation, Java and Tomcat setup, database and Elasticsearch integration, and deployment of the OvalEdge application.
## Prerequisites
* **User Access**: Installer must have **sudo privileges**.
* **System**: Amazon Linux VM with sufficient CPU, memory (≥8 GB), and disk space for two Tomcat instances.
* **Network**: Internet access; required ports open: 8080 (UI), 8081 (Job), 3306 (MySQL), 9200 (Elasticsearch, if used).
* **Artifacts**: `ovaledge.war`, external JARs, `log4j.properties`, and `oasis.properties` available in the user’s home directory.
* **Database & Elasticsearch**: Target MySQL and Elasticsearch must be accessible with credentials for `oasis.properties`.
## Steps Involved
1. **Create OvalEdge User**
* Create a new system user for OvalEdge:
```bash
sudo adduser ovaledge
```
* Set a password for the new user:
```bash
sudo passwd ovaledge
```
* Add the user to the `wheel` group for administrative privileges:
```bash
sudo usermod -aG wheel ovaledge
```
* Switch to the OvalEdge user account:
```bash
sudo su - ovaledge
```
2. **Create Required Directories**
* Create the following directories under the OvalEdge user home directory or a mounted directory:
```bash
mkdir -p ovaledge/extprop
mkdir -p ovaledge/temp
mkdir -p ovaledge/third_party_jars
```
* Download all shared artifacts (`.jars` & `.war`) into the `ovaledge` folder under the user's home directory.
* Download the `log4j.properties` and `oasis.properties` files into the `ovaledge/extprop` folder.
3. **Java Installation**
* Update system packages:
```bash
sudo yum update
```
* Install **Java 17 (Amazon Corretto)**:
```bash
sudo yum install java-17-amazon-corretto -y
```
* Verify the Java installation:
```bash
java -version
```
4. **Tomcat Setup**
* Tomcat UI Installation
* Download Tomcat in the `ovaledge` directory:
```bash
wget https://archive.apache.org/dist/tomcat/tomcat-10/v10.1.40/bin/apache-tomcat-10.1.40.tar.gz
```
* Extract the downloaded archive:
```bash
tar xvf apache-tomcat-10.1.40.tar.gz
```
* Rename the extracted folder to `tomcatui`:
```bash
mv apache-tomcat-10.1.40 tomcatui
```
* Move the `ovaledge.war` file to the `webapps` folder:
```bash
mv /home//ovaledge/ovaledge.war /home//ovaledge/tomcatui/webapps
```
* Create `setenv.sh` in `tomcatui/bin/` with the following parameters:
```bash
export CATALINA_OPTS="-Duse.http=true \
-DOVALEDGE_SECURITY_TYPE=db \
-Dext.properties.dir=file:/home//ovaledge/extprop/ \
-Xms7g -Xmx9g \
-Dpod.type=ovaledge-ui-deployment \
-Dlog4j.configuration=file:/home//ovaledge/extprop/log4j.properties"
```
* Tomcat Job Installation
* Copy `tomcatui` to create `tomcatjob`:
```bash
cp -R tomcatui tomcatjob
```
* Edit the `server.xml` file in `tomcatjob/conf/` to update ports:
* Change HTTP port from `8080` → `8081`\
\

* Change shutdown port from `8005` → `8006`
 * In `tomcatjob/bin/`, create `setenv.sh` with the following:
```bash
export CATALINA_OPTS="-Duse.http=true \
-DOVALEDGE_SECURITY_TYPE=db \
-Dext.properties.dir=file:/home//ovaledge/extprop/ \
-Xms7g -Xmx9g \
-Dpod.type=ovaledge-job-deployment \
-Dlog4j.configuration=file:/home//ovaledge/extprop/log4j.properties"
```
5. **Tomcat as a Service**
* Go to `/etc/systemd/system` and create service files:
* **Tomcat UI (`tomcat1.service`)**:
```ini
[Unit]
Description=Apache Tomcat Web Application Container
After=network.target
[Service]
Type=forking
ExecStart=/home//ovaledge/tomcatui/bin/startup.sh
ExecStop=/home//ovaledge/tomcatui/bin/shutdown.sh
User=
Group=
[Install]
WantedBy=multi-user.target
```
* **Tomcat Job (`tomcat2.service`)**:
```ini
[Unit]
Description=Apache Tomcat Web Application Container
After=network.target
[Service]
Type=forking
ExecStart=/home//ovaledge/tomcatjob/bin/startup.sh
ExecStop=/home//ovaledge/tomcatjob/bin/shutdown.sh
User=
Group=
[Install]
WantedBy=multi-user.target
```
* Apply SELinux context for Tomcat directories:
```bash
sudo semanage fcontext -a -t bin_t "/home//ovaledge/tomcatui(/.*)?"
sudo semanage fcontext -a -t bin_t "/home//ovaledge/tomcatjob(/.*)?"
sudo restorecon -Rv /home//ovaledge/tomcatui
sudo restorecon -Rv /home//ovaledge/tomcatjob
```
6. **Set up Database**
* Navigate to `extprop`:
```bash
cd /home//ovaledge/extprop/
```
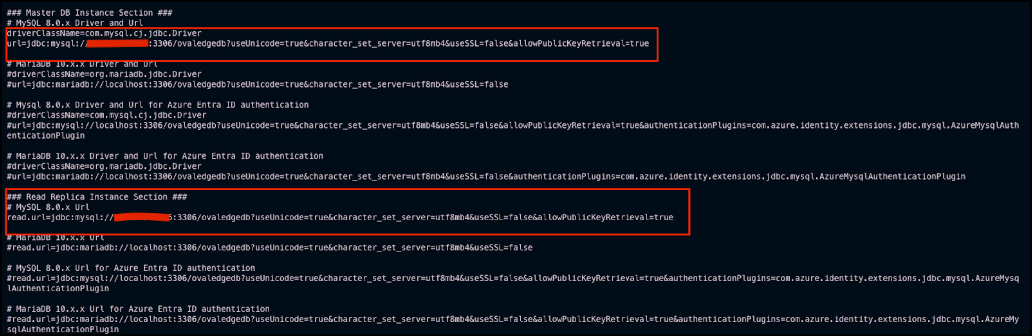
* Update `oasis.properties` with database details:
```properties
url=jdbc:mysql://:3306/ovaledgedb?useUnicode=true&character_set_server=utf8mb4&useSSL=false&allowPublicKeyRetrieval=true
```
⚠️ After executing the OvalEdge Master database, change the default user password and update it in `oasis.properties`.\
\
*Sample Reference Screenshot:*
* In `tomcatjob/bin/`, create `setenv.sh` with the following:
```bash
export CATALINA_OPTS="-Duse.http=true \
-DOVALEDGE_SECURITY_TYPE=db \
-Dext.properties.dir=file:/home//ovaledge/extprop/ \
-Xms7g -Xmx9g \
-Dpod.type=ovaledge-job-deployment \
-Dlog4j.configuration=file:/home//ovaledge/extprop/log4j.properties"
```
5. **Tomcat as a Service**
* Go to `/etc/systemd/system` and create service files:
* **Tomcat UI (`tomcat1.service`)**:
```ini
[Unit]
Description=Apache Tomcat Web Application Container
After=network.target
[Service]
Type=forking
ExecStart=/home//ovaledge/tomcatui/bin/startup.sh
ExecStop=/home//ovaledge/tomcatui/bin/shutdown.sh
User=
Group=
[Install]
WantedBy=multi-user.target
```
* **Tomcat Job (`tomcat2.service`)**:
```ini
[Unit]
Description=Apache Tomcat Web Application Container
After=network.target
[Service]
Type=forking
ExecStart=/home//ovaledge/tomcatjob/bin/startup.sh
ExecStop=/home//ovaledge/tomcatjob/bin/shutdown.sh
User=
Group=
[Install]
WantedBy=multi-user.target
```
* Apply SELinux context for Tomcat directories:
```bash
sudo semanage fcontext -a -t bin_t "/home//ovaledge/tomcatui(/.*)?"
sudo semanage fcontext -a -t bin_t "/home//ovaledge/tomcatjob(/.*)?"
sudo restorecon -Rv /home//ovaledge/tomcatui
sudo restorecon -Rv /home//ovaledge/tomcatjob
```
6. **Set up Database**
* Navigate to `extprop`:
```bash
cd /home//ovaledge/extprop/
```
* Update `oasis.properties` with database details:
```properties
url=jdbc:mysql://:3306/ovaledgedb?useUnicode=true&character_set_server=utf8mb4&useSSL=false&allowPublicKeyRetrieval=true
```
⚠️ After executing the OvalEdge Master database, change the default user password and update it in `oasis.properties`.\
\
*Sample Reference Screenshot:*
 7. **Elasticsearch Integration**
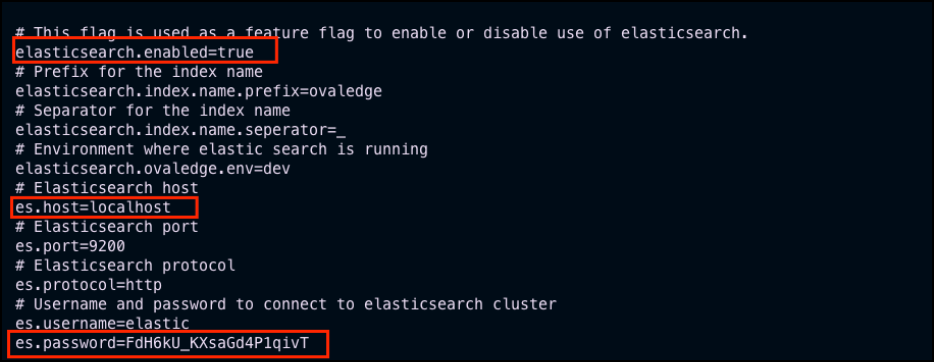
* Edit `oasis.properties` in `extprop` to configure Elasticsearch variables (`es.password`, `es.host`, etc.).\
\
*Sample Reference Screenshot:*
7. **Elasticsearch Integration**
* Edit `oasis.properties` in `extprop` to configure Elasticsearch variables (`es.password`, `es.host`, etc.).\
\
*Sample Reference Screenshot:*
 8. **External Jars Path**
* In `oasis.properties`, update the path to the external JARs:
```properties
/home//ovaledge/third_party_jars/
```
\
*Sample Reference Screenshot:*
8. **External Jars Path**
* In `oasis.properties`, update the path to the external JARs:
```properties
/home//ovaledge/third_party_jars/
```
\
*Sample Reference Screenshot:*
 9. **Run OvalEdge**
* Reload systemd and enable services:
```bash
sudo systemctl daemon-reload
sudo systemctl enable tomcat1.service
sudo systemctl enable tomcat2.service
```
* Start the Tomcat services:
```bash
sudo systemctl start tomcat1.service
sudo systemctl start tomcat2.service
```
* Check the status of both services:
```bash
sudo systemctl status tomcat1.service
sudo systemctl status tomcat2.service
```
* Check Tomcat UI logs:
```bash
tail -f /home//ovaledge/tomcatui/logs
```
* Access the application at:
```
http://:8080/ovaledge/login
```
* Apply the license provided by the OvalEdge CSM Team.
* Log in with the one-time admin credentials and immediately change the default password.
***
Copyright © 2025, OvalEdge LLC, Peachtree Corners, GA, USA.
---
# Agent Instructions
This documentation is published with GitBook. GitBook is the documentation platform designed so that both humans and AI agents can read, navigate, and reason over technical content effectively. Learn more at gitbook.com.
## Querying This Documentation
If you need additional information that is not directly available in this page, you can query the documentation by asking a question.
Perform an HTTP GET request on the following URL with the `ask` and `goal` query parameters:
```
GET https://docs.ovaledge.com/release8.1/deployment-and-maintenance/installation/tomcat-10.1.x-on-amazon-linux.md?ask=&goal=
```
`ask` is the immediate question: it should be specific, self-contained, and written in natural language.
`goal` is what the user is ultimately trying to achieve, the reason they need the answer. Sharing it helps GitBook give you a better, more relevant answer. A goal is most helpful when it describes the outcome the user wants rather than restating the question. For example, with `ask=how do I create an API token`, a goal like `automate deployments from our CI pipeline` lets GitBook tailor the answer to that use case.
The response will contain a direct answer to the question and relevant excerpts and sources from the documentation.
Use this mechanism when the answer is not explicitly present in the current page, you need clarification or additional context, or you want to retrieve related documentation sections.
9. **Run OvalEdge**
* Reload systemd and enable services:
```bash
sudo systemctl daemon-reload
sudo systemctl enable tomcat1.service
sudo systemctl enable tomcat2.service
```
* Start the Tomcat services:
```bash
sudo systemctl start tomcat1.service
sudo systemctl start tomcat2.service
```
* Check the status of both services:
```bash
sudo systemctl status tomcat1.service
sudo systemctl status tomcat2.service
```
* Check Tomcat UI logs:
```bash
tail -f /home//ovaledge/tomcatui/logs
```
* Access the application at:
```
http://:8080/ovaledge/login
```
* Apply the license provided by the OvalEdge CSM Team.
* Log in with the one-time admin credentials and immediately change the default password.
***
Copyright © 2025, OvalEdge LLC, Peachtree Corners, GA, USA.
---
# Agent Instructions
This documentation is published with GitBook. GitBook is the documentation platform designed so that both humans and AI agents can read, navigate, and reason over technical content effectively. Learn more at gitbook.com.
## Querying This Documentation
If you need additional information that is not directly available in this page, you can query the documentation by asking a question.
Perform an HTTP GET request on the following URL with the `ask` and `goal` query parameters:
```
GET https://docs.ovaledge.com/release8.1/deployment-and-maintenance/installation/tomcat-10.1.x-on-amazon-linux.md?ask=&goal=
```
`ask` is the immediate question: it should be specific, self-contained, and written in natural language.
`goal` is what the user is ultimately trying to achieve, the reason they need the answer. Sharing it helps GitBook give you a better, more relevant answer. A goal is most helpful when it describes the outcome the user wants rather than restating the question. For example, with `ask=how do I create an API token`, a goal like `automate deployments from our CI pipeline` lets GitBook tailor the answer to that use case.
The response will contain a direct answer to the question and relevant excerpts and sources from the documentation.
Use this mechanism when the answer is not explicitly present in the current page, you need clarification or additional context, or you want to retrieve related documentation sections.