# Power BI (On-Prem)

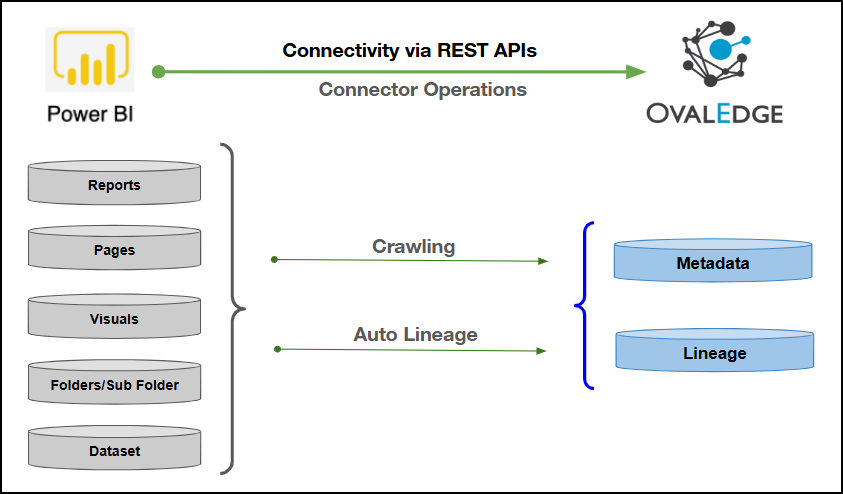
This article outlines the integration with the **Power BI (On-Prem)** connector, enabling efficient data management through features such as **crawling** and **lineage building** (both automatic and manual), providing visibility into reports, datasets, pages, and visuals within on-premises environments.

The Power BI (On-Prem) connector uses **REST APIs** to securely extract metadata from the **Power BI Report Server** for cataloging and lineage analysis. It also ensures secure authentication via Credential Manager.

<figure><img src="/files/lUzrJxtweXCrrYEFOhcv" alt=""><figcaption></figcaption></figure>

## Overview

### Connector Details

<table data-header-hidden><thead><tr><th width="469.8333740234375"></th><th></th></tr></thead><tbody><tr><td>Connector Category</td><td>Reporting Tools</td></tr><tr><td>OvalEdge Release Supported</td><td>Release 6.3.X and later</td></tr><tr><td><p>Connectivity</p><p>[How the connection is established with Power BI (On-Prem)]</p></td><td>REST APIs</td></tr><tr><td>Verified Power BI (On-Prem) Version</td><td>1.1.6513.3500 - 1.22.9153.7886</td></tr></tbody></table>

{% hint style="info" %}
The Power BI (On-Prem) connector has been validated with the mentioned "Verified Power BI (On-Prem) Versions". It is expected to be compatible with other supported Power BI (On-Prem) versions. If there are any issues with validation or metadata crawling, please submit a support ticket for investigation and feedback.
{% endhint %}

### Connector Features

| Feature                                                                                                                                     | Availability |
| ------------------------------------------------------------------------------------------------------------------------------------------- | :----------: |
| Crawling                                                                                                                                    |       ✅      |
| Delta Crawling                                                                                                                              |       ✅      |
| Profiling                                                                                                                                   |       ❌      |
| Query Sheet                                                                                                                                 |       ❌      |
| Report Preview                                                                                                                              |       ❌      |
| Auto Lineage                                                                                                                                |       ✅      |
| Manual Lineage                                                                                                                              |       ✅      |
| Secure Authentication via Credential Manager                                                                                                |       ✅      |
| Data Quality                                                                                                                                |       ❌      |
| DAM (Data Access Management)                                                                                                                |       ❌      |
| Bridge                                                                                                                                      |       ✅      |
| [Chrome Extension Supported](https://docs.ovaledge.com/release8.1/home/browser-extension/features-and-operations#view-certification-status) |       ✅      |

### Metadata Mapping

The following objects are crawled from Power BI (On-Prem) and mapped to the corresponding UI assets.

<table><thead><tr><th width="222.3333740234375">Power BI (On-Prem) Object</th><th width="238.49993896484375">Power BI (On-Prem) Attribute</th><th width="171.333251953125">OvalEdge Attribute</th><th width="198">OvalEdge Category</th><th width="158.8333740234375">OvalEdge Type</th></tr></thead><tbody><tr><td>Folders</td><td>Folder</td><td>Report Group</td><td>Reports</td><td>Folders</td></tr><tr><td>Sub folder</td><td>subfolder</td><td>Report Group</td><td>Reports</td><td>Sub folder</td></tr><tr><td>Reports</td><td>Reports Name</td><td>Report Name</td><td>Reports</td><td>Reports</td></tr><tr><td>Reports</td><td>Report description</td><td>Report description</td><td>Descriptions</td><td>Reports</td></tr><tr><td>Reports</td><td>Report Type</td><td>Type</td><td>Reports</td><td>Reports</td></tr><tr><td>Dataset</td><td>Dataset Name</td><td>Dataset Name</td><td>Reports</td><td>Dataset</td></tr><tr><td>Dataset</td><td>Dataset Description</td><td>Source description</td><td>Descriptions</td><td>Dataset</td></tr><tr><td>Dataset</td><td>Dataset Type</td><td>Type</td><td>Reports</td><td>Dataset</td></tr><tr><td>Pages</td><td>Page Name</td><td>Report Name</td><td>Reports</td><td>Pages</td></tr><tr><td>Pages</td><td>Page description</td><td>Source description</td><td>Reports</td><td>Pages</td></tr><tr><td>Pages</td><td>Page type</td><td>Type</td><td>Reports</td><td>Pages</td></tr><tr><td>Visuals</td><td>Visual Name</td><td>Report Name</td><td>Reports</td><td>Visuals</td></tr><tr><td>Visuals</td><td>Visual type</td><td>Type</td><td>Reports</td><td>Visuals</td></tr><tr><td>Visuals</td><td>Visual Filed</td><td>Report Columns</td><td>Report Columns</td><td>Visuals</td></tr></tbody></table>

## Set up a Connection

### Prerequisites

The following are the prerequisites to establish a connection:

#### Whitelisting IP Address

{% hint style="warning" %}
Ensure that the **data source IP address** is **whitelisted** before establishing a connection to OvalEdge. IP whitelisting helps prevent connectivity issues, ensures a secure connection, and protects data from unauthorized access.
{% endhint %}

For detailed prerequisite configuration steps for **Power BI Report Server (On-Prem),** including **Windows service account creation**, **Content Manager permission assignment**, and **optional environment variable configuration** - refer to the [**Power BI (On-Prem) System Configuration**](/release8.1/connectors/connector-repositories/reporting-tool/power-bi/power-bi-on-prem/power-bi-on-prem-system-configuration.md).

For detailed authentication configuration steps for **Power BI Report Server (On-Prem)**, including **Windows Authentication** and **Basic Authentication** setup, refer to the [**Power BI (On-Prem) Report Server Configuration**](https://docs.ovaledge.com/release8.1/connectors/connector-repositories/reporting-tool/power-bi/power-bi-on-prem/power-bi-on-prem-report-server-configuration)**.**

#### **Service Account User Permissions**

{% hint style="warning" %}
It is recommended to use a separate service account to establish the connection to the data source, configured with the following minimum set of permissions.
{% endhint %}

{% hint style="info" %}
👨‍💻Who can provide these permissions? These permissions are typically granted by the Power BI (On-Prem) administrator, as users may not have the required access to assign them independently.
{% endhint %}

<table><thead><tr><th width="144">Operation</th><th width="198.83331298828125">Objects</th><th>Access Permission</th></tr></thead><tbody><tr><td>Validation</td><td>Connector Validation</td><td>Windows user with a Content Manager permission</td></tr><tr><td>Crawling</td><td>Crawling</td><td>Windows user with a Content Manager permission</td></tr><tr><td>Build Lineage</td><td>Lineage</td><td>Windows user with a Content Manager permission</td></tr><tr><td>Crawling</td><td>Delta Crawl</td><td>Windows user with a Content Manager permission</td></tr><tr><td>Crawling</td><td>Semantic Model / Dataset</td><td>Windows user with a Content Manager permission</td></tr><tr><td>Crawling</td><td>Report</td><td>Windows user with a Content Manager permission</td></tr><tr><td>Crawling</td><td>Pages</td><td>Windows user with a Content Manager permission</td></tr><tr><td>Crawling</td><td>Visuals</td><td>Windows user with a Content Manager permission</td></tr></tbody></table>

### Connection Configuration Steps

{% hint style="info" %}
Users are required to have the Connector Creator role in order to configure a new connection.
{% endhint %}

1. Log into **OvalEdge**, go to **Administration > Connectors**, click **+ (New Connector)**, search for **Power BI**, and complete the required parameters.

{% hint style="info" %}
Fields marked with an asterisk (\*) are mandatory for establishing a connection.
{% endhint %}

<table><thead><tr><th width="219.8333740234375">Field Name</th><th>Description</th></tr></thead><tbody><tr><td>Connector Type</td><td>By default, "Power BI" is displayed as the selected connector type.</td></tr><tr><td>Server Type*</td><td>From the dropdown list options (powerbionpremise/powerbicloud), select <strong>powerbionpremise</strong>.</td></tr><tr><td>Credential Manager*</td><td><p>Select the desired credentials manager from the drop-down list. Relevant parameters will be displayed based on your selection.</p><p>Supported Credential Managers:</p><ul><li>OE Credential Manager</li><li>AWS Secrets Manager</li><li>HashiCorp</li><li>Azure Key Vault</li></ul></td></tr><tr><td>License Add Ons</td><td>Select the checkbox for <strong>Auto Lineage Add-On</strong> to build data lineage automatically.</td></tr><tr><td>Connector Name*</td><td><p>Enter a unique name for the Power BI (On-Prem) connection              </p><p>(Example: "PowerBIOnPrem").</p></td></tr><tr><td>Connector Environment</td><td>Select the environment (Example: PROD, STG) configured for the connector.</td></tr><tr><td>Connector Description</td><td>Enter a brief description of the connector.</td></tr><tr><td>Server Domain*</td><td>Enter the On-Premises Domain name. The Power BI Report Server allows organizations to host and share reports with users within their own domain or network.</td></tr><tr><td>Host Name*</td><td>This is the Hostname or IP address of the Power-BI Server. Database instance URL (on-premises). Example: app.powerbi.com [Localhost (on-premises)]</td></tr><tr><td>Connection URL*</td><td>Enter the On-Premise Database Connection URL. It is a URL string that the JDBC driver uses to connect to a database.</td></tr><tr><td>Files Path*</td><td>Enter the server files path. A user needs to create or take any existing path from the OvalEdge server and paste it here.</td></tr><tr><td>PBIT Files Path</td><td>Enter the server folder path where the PBIT files are stored. This path is used to read and process the PBIT files during the connection setup.</td></tr><tr><td>Connection String*</td><td>Set the Connection String toggle button to automatic to get the details automatically from the credentials provided. Alternatively, users can manually enter the string. https://app.powerbi.com/</td></tr><tr><td>Username*</td><td>A username is required to connect to the Power BI On-Premise server. Enter the Service Account Name established to access the Power BI-on premise environment.</td></tr><tr><td>Password*</td><td>Password is required to connect to the Power BI on-premises server.</td></tr><tr><td>Windows Authentication (Y/N)</td><td>To validate the connection using Windows Authentication, enter 'Y'; otherwise, enter 'N'.</td></tr><tr><td>Check With Certs (Y/N)</td><td>To validate the connection using certificates, export the certificates and place them in the Java path, then enter 'Y'; otherwise, enter 'N'.</td></tr><tr><td>Read From NFS(Y/N)</td><td>To retrieve reports directly from the folder without connecting to the Power BI service, enter 'Y'; otherwise, enter 'N'.</td></tr><tr><td>Proxy Enabled*</td><td>Select Yes to route API calls through a proxy server. Select No to bypass the proxy and connect directly.</td></tr></tbody></table>

**Default Governance Roles**

<table data-header-hidden><thead><tr><th width="219.8333740234375"></th><th></th></tr></thead><tbody><tr><td>Default Governance Roles*</td><td>Select the appropriate users or teams for each governance role from the drop-down list. All users configured in the security settings are available for selection.</td></tr></tbody></table>

**Admin Roles**

<table data-header-hidden><thead><tr><th width="219.83331298828125"></th><th></th></tr></thead><tbody><tr><td>Admin Roles*</td><td>Select one or more users from the dropdown list for Integration Admin and Security &#x26; Governance Admin. All users configured in the security settings are available for selection.</td></tr></tbody></table>

**No of Archive Objects**

<table data-header-hidden><thead><tr><th width="219.8333740234375"></th><th></th></tr></thead><tbody><tr><td>No Of Archive Objects*</td><td><p>This shows the number of recent metadata changes to a dataset at the source. By default, it is off. To enable it, toggle the Archive button and specify the number of objects to archive.</p><p>Example: Setting it to 4 retrieves the last four changes, displayed in the 'Version' column of the 'Metadata Changes' module.</p></td></tr></tbody></table>

**Bridge**

<table data-header-hidden><thead><tr><th width="219.83331298828125"></th><th></th></tr></thead><tbody><tr><td>Select Bridge*</td><td><p>If applicable, select the bridge from the drop-down list.</p><p>The drop-down list displays all active bridges that have been configured. These bridges facilitate communication between data sources and the system without requiring changes to firewall rules.</p></td></tr></tbody></table>

2. After entering all connection details, the following actions can be performed:
   1. Click **Validate** to verify the connection.
   2. Click **Save** to store the connection for future use.
   3. Click **Save & Configure** to apply additional settings before saving.
3. The saved connection will appear on the Connectors home page.

## Manage Connector Operations

### Crawl/Profile

{% hint style="warning" %}
To perform crawl operations, users must be assigned the Integration Admin role.
{% endhint %}

The **Crawl/Profile** button allows users to select one or more schemas for crawling.&#x20;

1. Navigate to the **Connectors** page and click **Crawl/Profile**.
2. Select the schemas to be crawled.
3. The **Crawl** option is selected by default.
4. After a successful crawl, the information appears in the **Data Catalog > Report / Report Column** tab.

The **Schedule checkbox** allows automated crawling for a selected timeframe, from a minute to a year.

1. Click the **Schedule** checkbox to enable the **Select Period drop-down**.
2. Select a **time period** for the operation from the **drop-down menu**.
3. Click **Schedule** to initiate metadata collection from the connected source.
4. The system will automatically execute the crawl operation at the scheduled time.

### Other Operations

The **Connectors** page provides a centralized view of all configured connectors, along with their health status.

**Managing connectors includes:**

* **Connector Health:** Displays the current status of each connector using a **green** icon for active connections and a **red** icon for inactive connections, helping to monitor the connectivity with data sources.
* **Viewing**: Click the **Eye icon** next to the connector name to view connector details, including databases, tables, columns, and codes.

**Nine Dots Menu Options:**

To view, edit, validate, build lineage, configure, or delete connectors, click on the **Nine Dots** menu.

* **Edit Connector**: Update and revalidate the data source.
* **Validate Connector**: Check the connection's integrity.
* **Settings**: Modify connector settings.
  * **Crawler**: Configure data extraction.
  * **Access Instructions**: Add notes on how data can be accessed.
  * **Business Glossary Settings**: Manage term associations at the connector level.
  * **Lineage**: Configure Server Dialects for source code parsing and Connector Priority for table lineage connection.
  * **Others**: Configure notification recipients for metadata changes.
* **Build Lineage**: Automatically build data lineage using source code parsing.
* **Delete Connector**: Remove a connector with confirmation.

## Limitations

### PBIX / PBIT Export Limitations

<table><thead><tr><th width="91.66665649414062">Sl. No.</th><th width="143.3333740234375">Scenario</th><th>Limitation</th></tr></thead><tbody><tr><td>1</td><td>PBIX Export from Power BI Report Server</td><td>Reports can be exported from Power BI Report Server; however, in some cases, exported <strong>.pbix</strong> files contain an <strong>encrypted DataModel or DataModelSchema</strong> that cannot be parsed or processed.</td></tr><tr><td>2</td><td>Encrypted Data Models</td><td>Metadata extraction and lineage generation are <strong>not supported</strong> for <strong>.pbix</strong> files with encrypted data models.</td></tr><tr><td>3</td><td>PBIT File Requirement</td><td>When encryption is present, the corresponding <strong>.pbit (Power BI template)</strong> file is required to extract metadata and build lineage.</td></tr></tbody></table>

### SSL and Certificate Limitations

<table><thead><tr><th width="92.33334350585938">Sl. No.</th><th width="140.33331298828125">Scenario</th><th>Limitation</th></tr></thead><tbody><tr><td>1</td><td>HTTPS Connectivity</td><td>Secure connectivity fails if the <strong>Power BI Report Server SSL certificate</strong> is not trusted by the Java runtime used by OvalEdge.</td></tr><tr><td>2</td><td>Java Trust Store</td><td>SSL certificates must be manually imported into the <strong>Java keystore (cacerts)</strong> to establish a trusted HTTPS connection.</td></tr><tr><td>3</td><td>Certificate Renewal</td><td>When server certificates are renewed or replaced, the updated certificates must be <strong>re-imported</strong> into the Java keystore.</td></tr></tbody></table>

### Environment and Deployment Limitations

<table><thead><tr><th width="92.33334350585938">Sl. No.</th><th width="141">Scenario</th><th>Limitation</th></tr></thead><tbody><tr><td>1</td><td>Multiple Environments</td><td>Separate SSL certificate entries are required for <strong>each environment</strong> (for example, QA, UAT, PROD), each using a unique alias.</td></tr><tr><td>2</td><td>Containerized Java Deployments</td><td>In containerized or isolated Java environments, the default <strong>cacerts</strong> file may need to be <strong>copied and maintained separately</strong>.</td></tr></tbody></table>

***

Copyright © 2026, OvalEdge LLC, Peachtree Corners GA USA


---

# Agent Instructions: Querying This Documentation

If you need additional information that is not directly available in this page, you can query the documentation dynamically by asking a question.

Perform an HTTP GET request on the current page URL with the `ask` query parameter:

```
GET https://docs.ovaledge.com/release8.1/connectors/connector-repositories/reporting-tool/power-bi/power-bi-on-prem.md?ask=<question>
```

The question should be specific, self-contained, and written in natural language.
The response will contain a direct answer to the question and relevant excerpts and sources from the documentation.

Use this mechanism when the answer is not explicitly present in the current page, you need clarification or additional context, or you want to retrieve related documentation sections.
