> For the complete documentation index, see [llms.txt](https://docs.ovaledge.com/llms.txt). Markdown versions of documentation pages are available by appending `.md` to page URLs; this page is available as [Markdown](https://docs.ovaledge.com/release8.1/askedgi/deployment-and-installation/installation/vm-ubuntu.md).
# VM-Ubuntu
This article provides step-by-step instructions for installing and configuring **askEdgi Data Services on Ubuntu** environments. It outlines the setup of required components such as **Python** and **Poetry**, followed by service configuration and deployment. The document also covers integration with the OvalEdge platform, including required configurations in system properties and application settings.
### Prerequisites
Ensure the following prerequisites are met before starting the installation:
* **Sudo privileges** are available on the target VM
* The OvalEdge application is installed and configured
* Install askEdgi on the same VM where the OvalEdge application is installed.
* Network access is available for the required repositories
### Software Requirements
The following software components must be installed:
* **Python 3.13**
* **Poetry 2.1.3**
### Install Python 3.13
#### Install required packages
1. Log in to the **Linux VM** and open the terminal.
2. Run the following commands:
```
sudo apt install software-properties-common -y
sudo add-apt-repository ppa:deadsnakes/ppa -y
sudo apt update
```
\
Sample Reference Screenshots:
#### Verify Existing Python Version
```
python3 --version
```
1. If the version is below Python **3.13.x**, proceed with installation.\
Sample Reference Screenshot:
**Note:** Do not uninstall the existing Python version to avoid system issues.
#### Install Python 3.13
1. Run the following commands to install **Python 3.13** and set it as the default.
```
sudo apt install -y build-essential python3.13 python3.13-dev
```
\
Sample Reference Screenshot:
### Install Poetry (Version 2.1.3)
#### Install Poetry
1. Run the following commands to install Poetry.
```
curl -sSL https://install.python-poetry.org | python3 - --version 2.1.3
echo 'export PATH="$HOME/.local/bin:$PATH"' >> ~/.bashrc
source ~/.bashrc
poetry --version
```
\
Sample Reference Screenshot:
### askEdgi Setup
#### Create Directory Structure
1. Create a directory for askedgi configurations as shown below.
```
mkdir askedgi
```
Sample Reference Screenshot:
2. Navigate to the askEdgi folder and create the following directories (asset, dbfolder, and service logs)
cd askedgi
   mkdir asset
   mkdir dbfolder
   mkdir logs
Sample Reference Screenshot:
#### Create Environment Configuration File
1. Inside the askEdgi directory, create a **.env file** and **add** the following configuration:
```
## Required VM Configuration
DEPLOYMENT_TYPE=vm #( default)
ENV=production #( default)
# MySQL (required)
mysql_url=jdbc:mysql://localhost:3306/ovaledgedb?useUnicode=true&character_set_server=utf8mb4&useSSL=false&allowPublicKeyRetrieval=true
mysql_user=
mysql_password= # special characters @ not taking edgi services
# Workspace Identification (required)
WORKSPACE_PROJECT_ID=0001 #( default)
WORKSPACE_USER=unknown #( default)
# Logging (recommended)
EDGI_ASSET_PATH=/home/ovaledge/ovaledge/askedgi/asset
LOG_PATH=/home/ovaledge/ovaledge/askedgi/logs
LOG_MODE=INFO #( default)
# DuckDB (recommended)
DB_FOLDER=/home/ovaledge/ovaledge/askedgi/dbfolder
# Pooling (optional)
MYSQL_POOL=10
MYSQL_POOL_NAME=ovaledge_pool
# Edgi Data Service port
APP_PORT=8000
# Recipe connection (optional)
OVALEDGE_RECIPE_CONNECTION_ID=-1
# Elasticsearch Configuration
es_host=
es_port=9200
es_username=
es_password=
es_protocol=http
elasticsearch.enabled=true
elasticsearch.index.name.prefix=ovaledge
elasticsearch.index.name.seperator=_
elasticsearch.ovaledge.env=uat
CREDENTIAL_PROVIDER=jceks
LOG_FILE_NAME=edgi-data.log
```
Sample Reference Screenshot:
2. Save the file and exit the editor.
{% hint style="info" %}
* Ensure MySQL, Elasticsearch, asset, log, and DB paths are configured correctly
* Avoid unsupported special characters in credentials where applicable
{% endhint %}
#### Extract askEdgi Package
1. Obtain the askEdgi **tar file** from the **OvalEdge team** and run the following command inside the askEdgi directory:
```
tar -xvf
```
Sample Reference Screenshot:
#### Install Dependencies
1. Navigate to the extracted directory and perform the following activities as shown.\
Sample Reference Screenshot:
#### Validate Service Execution
1. Start the askEdgi data services manually using the following command.
```
poetry run service
```
Sample Reference Screenshot:
2. Verify that the service starts successfully
3. Stop the service using Ctrl + C
### Configure askEdgi as a System Service
#### Identify Poetry Path
```
which poetry
```
Sample Reference Screenshot:
#### Create Systemd Service File
```
sudo vim /etc/systemd/system/data.service
```
1. Add the following configuration:
```
[Unit]
Description=AskEdgi Data Service
After=network.target
[Service]
User=ovaledge
WorkingDirectory=/home/ovaledge/ovaledge/askedgi/
ExecStartPre=/home/ovaledge/.local/bin/poetry install
ExecStart=/home/ovaledge/.local/bin/poetry run service
Restart=always
StandardOutput=append:/home/ovaledge/ovaledge/askedgi/logs/edgi-data.log
StandardError=append:/home/ovaledge/ovaledge/askedgi/logs/edgi-data.log
Environment="PATH=/home/ovaledge/.local/bin:/usr/local/bin:/usr/bin"
[Install]
WantedBy=multi-user.target
```
Sample Reference Screenshot:
2. Update the configuration with the correct paths and save the file.
#### Enable and Start Service
1. Run the following commands
```
sudo systemctl daemon-reload
sudo systemctl start data.service
sudo systemctl enable data.service
sudo systemctl status data.service
```
Sample Reference Screenshot:
### Update OvalEdge Configuration
#### Update oasis.properties
1. Navigate to the OvalEdge configuration directory and open:
```
oasis.properties
```
2. Add the following configuration:
```
oe.edgi.enabled=true
oe.edgi.client.prefix=oe_dev
oe.edgi.bucket.name=edgi_data_sync_bucket
oe.edgi.consumer.queue=data_sync_queue
oe.edgi.credential.type=static
oe.edgi.aws.region=us-east-1
oe.edgi.aws.secret-key=xxxx
oe.edgi.aws.access-id=xxxxx
oe.edgi.workspace.discovery=static
oe.edgi.workspace.host=localhost
oe.edgi.workspace.port=8000
oe.edgi.asset.path=~/assets
oe.edgi.cluster.name=cdw
oe.edgi.subnets=subnet-xxxx,subnet-xxxx
oe.edgi.security.groups=sg-xxxx
oe.edgi.standard.task.family=edgi-data-service
oe.edgi.medium.task.family=edgi-data-service-medium
oe.edgi.large.task.family=edgi-data-service-xl
```
Sample Reference Screenshot:
VM Deployment
For a Single VM deployment, update the highlighted parameters in the oasis.properties file and save the changes.
For a Multi-VM deployment, update the highlighted parameters in the oasis.properties file on both VM1 and VM2, and then save the changes.Restart Tomcat
3. **Restart** the **Tomcat service** after updating the configuration.
## Application Configuration
#### Validate Connector
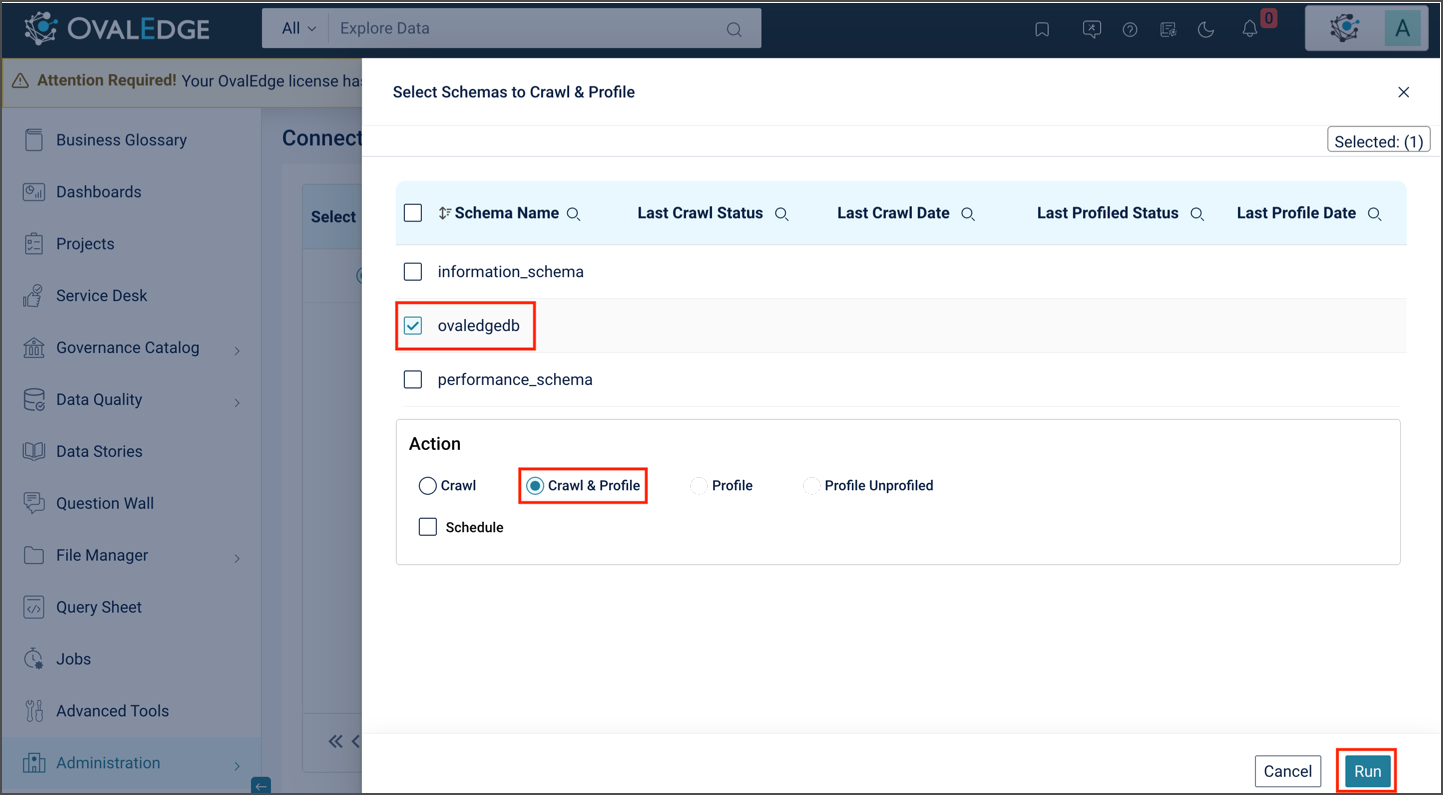
1. Navigate to **Administration → Connectors**.
2. From the connectors list, select the **MySQL connector**.
3. Click the **9 dots** menu at the top-right corner.
4. Select **Validate Connector** and ensure validation is successful.
5. Click the **Crawl/Profile** button at the top right corner.
#### Update System Settings
1. Navigate to **Administration → System Settings**.
2. Click on the **AI tab**.
3. Locate the required **system setting keys**.
4. Update the keys with the **appropriate values** as specified.
5. Save the changes.
1. askedgi.edition = Data Analytics
2. askedgiplus.enable = true
3. askedgi.ovaledge.recipe.connection.id = -1
4. ai.config = \
5. Ai.config = (Developer will provide the KEY), and the remaining settings are the same as below.
6. Ensure marketplace configurations are populated correctly.
#### Access askEdgi
1. Log out of the OvalEdge application after completing the configuration changes.
2. Log in again to apply the updated settings.
3. From the application header, click on the askEdgi icon.