ECS-Variant-2: New Customers
This document outlines the end-to-end process for enabling AskEdgi components for newly onboarded SaaS customers on ECS-Variant-2. The implementation leverages AWS Control Tower automation to create and manage core AWS resources, while incorporating manual verification steps to ensure correct configuration and functionality.
AskEdgi components rely on a combination of AWS services such as ECS, RDS, EFS, S3, SQS, IAM, and Secrets Manager. These components are configured to interact seamlessly, enabling secure and scalable operations for the SaaS environment. This document provides a structured, step-by-step guide for setting up network security, IAM roles, ECS tasks, S3 buckets, SQS queues, event notifications, Bridge server and client setup, and feature validation for AskEdgi.


Purpose of the document
The purpose of this document is to provide a detailed, professional, and structured process for implementing AskEdgi components on ECS-Variant-2 for new SaaS customers. It ensures all AWS resources, ECS tasks, S3 buckets, SQS queues, IAM configurations, and application services are configured correctly. It also provides verification steps to validate operational readiness and integration of AskEdgi within the Ovaledge environment.
Prerequisites
ECS
ECS cluster and service access
Required for deploying Edgi Data and Insight services
SQS
Access to create and manage queues
Needed for data sync between services
IAM
Permissions to create roles, users, and attach policies
Ensure IAM policies include required permissions for ECS, SQS, and S3
RDS
Database instance
Used for storing Edgi data and metadata
EFS
File system access
Required for persistent storage for the Insight service
Secrets Manager
Create and manage secrets
Used to store database credentials and other sensitive keys
Ensure AWS Control Tower automation is active and operational before starting.
Manual verification is required for ECS task roles, IAM user credentials, S3 bucket permissions, and event notifications.
All services should comply with corporate security policies regarding VPCs, subnets, and access controls.
Implementation Steps
Step 1: Network Security Configuration
Create two private subnets for the Edgi-Data.
Create a Security Group for the Edgi-Data ECS service with the following rules:
TCP
8000
Destination VPC range
TCP
9200
Private Elasticsearch Security Group
TCP
3306
Private RDS Security Group
All
All
Private EFS Security Group
Ensure that ports 8000, 9200, and 3306 are allowed only from specified sources.
Security Group configuration ensures proper communication between Edgi ECS, RDS, EFS, and Elasticsearch.
Step 2: EFS Access Points
Create EFS Access Points for askEdgi Insight Service and one common for Ovaledge UI/Job, data task definition, and insight.
/oe_edgi_assets_store
Stores assets
Assign correct mount permissions to ECS tasks to ensure persistent storage access.
Step 3: S3 Bucket Creation
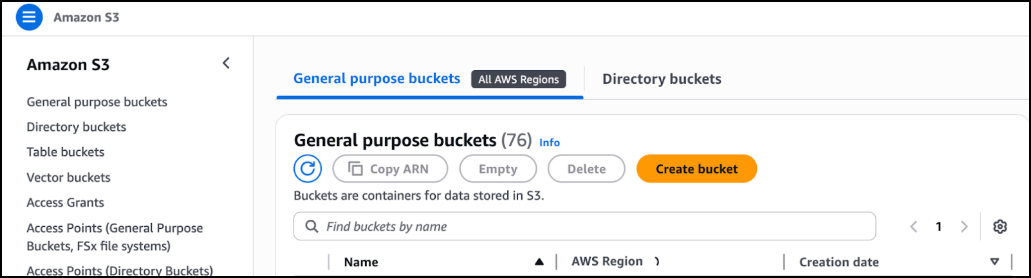
Create a new S3 bucket for storing Edgi-related data.

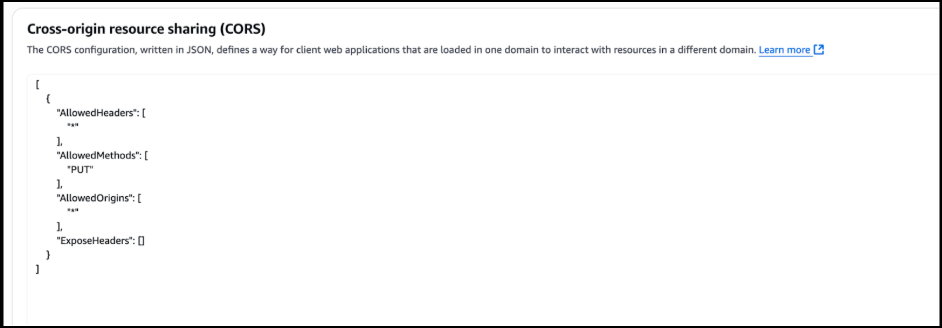
Configure CORS permissions in the bucket settings as shown below:

The bucket will store all data uploaded via Edgi Data Service and processed by the Insight Service.
Ensure correct permissions to allow S3 to send events to SQS.
Step 4: IAM User Configuration
IAM User for AskEdgi Python
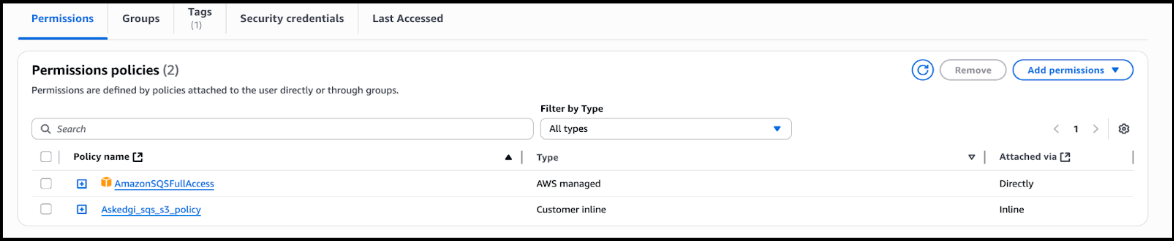
Create IAM user (example: edgi_user) with:
AskEdgi_policy_Saas


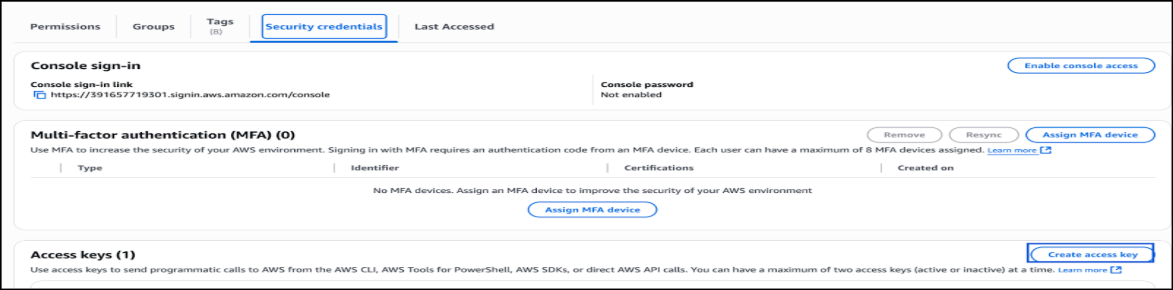
Generate Access Key and Secret Key for CLI access.

Use credentials in Ovaledge Task Definition environment variables:
EDGI_AWS_ACCESS_ID
<access key>
EDGI_AWS_SECRET_KEY
<secret key>
IAM User for Bridge Server and Client
Create another IAM user with S3 PutObject permissions only.

Use credentials in Ovaledge Task Definition environment variables:
BRIDGE_AWS_USER_ACCESS_KEY
<bridge IAM access key>
BRIDGE_AWS_USER_SECRET_KEY
<bridge IAM secret key>
Bridge user credentials are required for secure S3 uploads.
Validate IAM policies before ECS task deployment.
Step 5: ECS Task Role Configuration
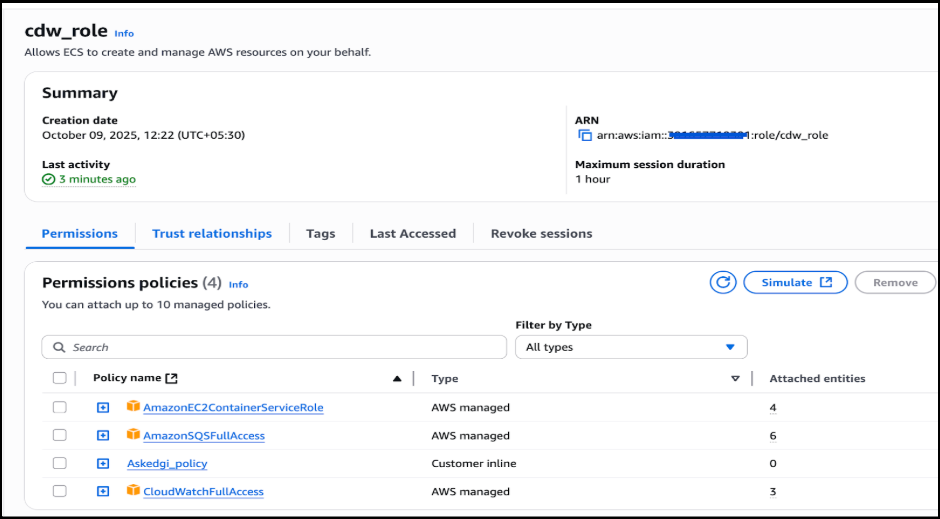
Create an IAM Role with ECS task execution permissions.
Attach the custom policy: AskEdgi ECS Policy JSON.

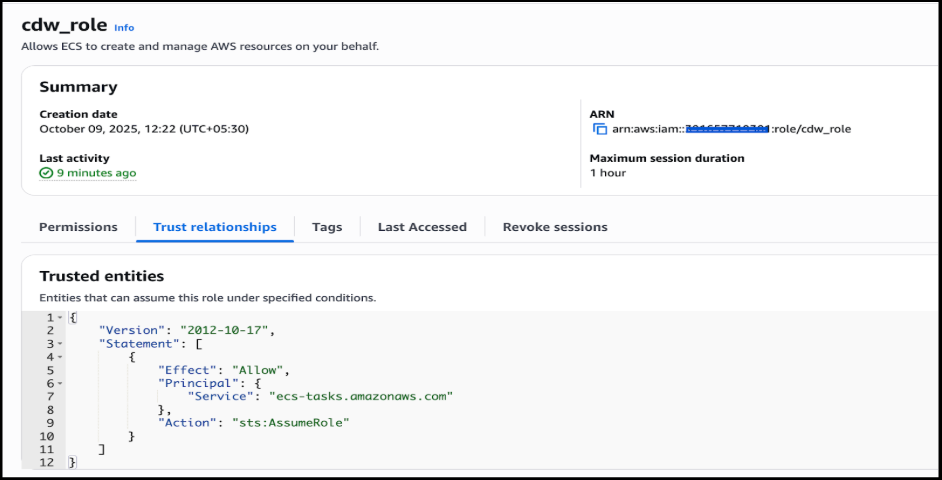
Modify the Trust Relationship for ECS.

This IAM role is shared across all ECS Task Definitions to ensure consistent and secure access.
Automation scripts handle permission setup automatically, but verification is recommended.
Step 6: S3 Event Notifications
Amazon S3 Event Notifications allow automatic triggering of actions when certain events happen in an S3 bucket - like when an object is uploaded, deleted, or restored.
To enable automated processing of uploaded files, configure S3 Event Notifications to trigger the SQS queue:
Navigate to the S3 bucket > Properties > Event Notifications > Click Create Event Notification.
Create Notification for CSV Files
Name: csv_event_to_sqs (customizable)
File Suffix: .csv
Event Type: All object creation events
Destination: SQS
SQS ARN: {PREFIX}_data_sync_queue


Create Additional Notifications Repeat the above steps for the following file types, ensuring each notification points to the same SQS queue:
avro_event
.avro
All object creation events
data_sync_queue
json_event
.json
All object creation events
data_sync_queue
parquet_event
.parquet
All object creation events
data_sync_queue
xlsx_event
.xlsx
All object creation events
data_sync_queue

These notifications enable real-time processing of files uploaded to the S3 bucket.
Verify that the correct SQS queue ARN is used for each notification.
Step 7: ECS Task Definition – Data Service
Create an ECS Task Definition for the Edgi Data Service with the following configuration:
CPU
0.5 vCPU
Memory
2 GB
Container Name
edgi-data-service
Port
8000
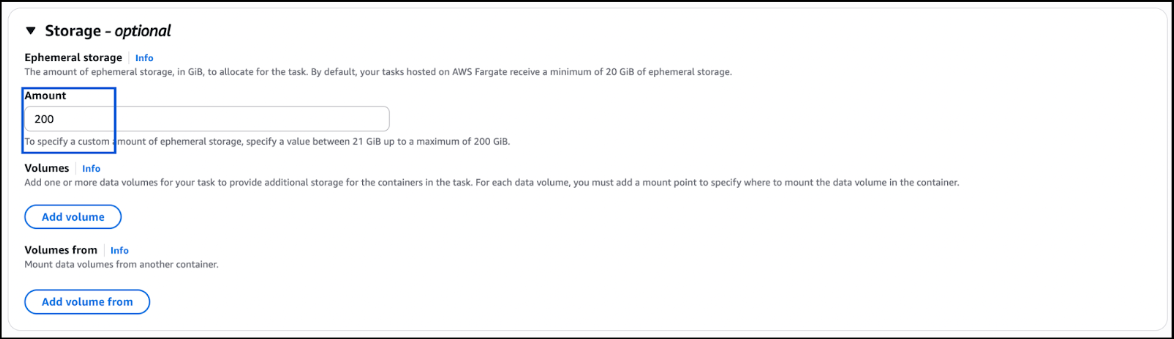
Storage
200 GB
CloudWatch Logs
Enabled
Environment Variables:
AWS_REGION
<Region>
AWS_SCTNAME
<Database secret name>
BUCKET_NAME
<Bucket Name>
CREDENTIAL_TYPE
container
DEPLOYMENT_TYPE
ecs
ENV
production
EDGI_ASSET_PATH
/app/asset
OVALEDGE_URL
<OE_Application_URL>
LOG_LEVEL
debug

Additional Configuration
Enable CloudWatch Logs for the container.
Allocate a maximum of 200 GB under the storage configuration.

CloudWatch logging is essential for monitoring Data Service activity.
Elastic File System Configuration
Add EFS mounts for the data task definition.

Step 8: ECS Task Definition - Data Service Medium
Create an ECS Task Definition for the Edgi Data Service Medium with the following configuration details.
CPU
1 vCPU
Memory
8 GB
Container Name
edgi-data-service
Port
8000
Storage
200 GB
CloudWatch Logs
Enabled
Environment Variables
AWS_REGION
<Region>
AWS_SCTNAME
<Database secret name>
BUCKET_NAME
<Bucket name>
CREDENTIAL_TYPE
container
DEPLOYMENT_TYPE
ecs
ENV
production
EDGI_ASSET_PATH
/app/asset
OVALEDGE_URL
<OE_Application_URL
LOG_LEVEL
debug

Additional Configuration
Enable CloudWatch Logs for the container to capture logs.
Under Storage configuration, allocate a maximum of 200 GB.

CloudWatch logging is essential for monitoring Data Service activity.
Elastic File System Configuration
Add EFS mounts for the data task definition.

Step 9: ECS Task Definition – Data Service-XL
Create an ECS Task Definition for the Edgi Data Service-XL with the following configuration details.
CPU
2 vCPU
Memory
16 GB
Container Name
edgi-data-service
Port
8000
Storage
200 GB
CloudWatch Logs
Enabled
Environment Variables
AWS_REGION
<Region>
AWS_SCTNAME
<Database secret name>
BUCKET_NAME
<Bucket Name>
CREDENTIAL_TYPE
container
DEPLOYMENT_TYPE
ecs
ENV
production
EDGI_ASSET_PATH
/app/asset
OVALEDGE_URL
<OE_Application_URL
LOG_LEVEL
debug

Enable CloudWatch Logs for the container to capture logs.
Under Storage configuration, allocate a maximum of 200 GB.

CloudWatch logging is essential for monitoring Data Service activity.
Elastic File System Configuration
Add EFS mounts for the data task definition.

Service Discovery endpoint is required in Ovaledge task definitions.
Step 10: API Key set in the AWS Secret Manager
In the 8.1 Feature, an API Key update is introduced in the AWS Secret Manager.
The user needs to add a key without a value in the Secret Manager, which you are using for the DB details secret.
apiaccesskeyforedgi

Once the application is started, the value will be stored in the secret manager with encryption.
Permissions: Provide the Update permission to the IAM role.
After the application is up and running, the API key will be added to the secret manager.

Step 11: Update Ovaledge Task Definition (UI and Job)
Update both the UI and Job ECS Task Definitions with the following environment variables to enable AskEdgi functionality:
Environment Variables for UI and Job Tasks
BRIDGE_AWS_USER_ACCESS_KEY
<Bridge user access key>
BRIDGE_AWS_USER_SECRET_KEY
<Bridge user secret key>
EDGI_AI_FUNCTION_QUEUE
ai_functions_queue
EDGI_AWS_ACCESS_ID
<edgi user access key>
EDGI_AWS_SECRET_KEY
<edgi user secret key>
EDGI_AWS_REGION
<region>
EDGI_BUCKET_NAME
<s3 bucket name>
EDGI_CLIENT_PREFIX
<sqs prefix name>
EDGI_CONSUMER_CREDENTIAL_TYPE
static
EDGI_ENABLE
true
EDGI_INSIGHT_SERVICE_HOST
<insight service endpoint>
EDGI_WORKSPACE_DISCOVERY
dynamic
EDGI_WORKSPACE_HOST
<edgi data task definition family name>
EDGI_WORKSPACE_NAMESPACE
<ECS cluster namespace>
EDGI_ASSET_PATH
/app/asset
EDGI_WORKSPACE_NAMESPACE_ID
<ECS cluster namespace ID>
EDGI_CLUSTER_NAME
<ECS Cluster name>
EDGI_SUBNETS
<ECS Private subsets az1,az2>
EDGI_SECURITY_GROUP
<secuirty group>
EDGI_STANDARD_DATATASK_FAMILYNAME
< data-service task definition family name
EDGI_MEDIUM_DATATASK_FAMILYNAME
< data-service-medium task definition family name
EDGI_LARGE_DATATASK_FAMILYNAME
< data-service-xl task definition family name
Optional OAUTH2 Configuration
OAUTH2_BASE_URL
<dev team will provide the URL>
OAUTH2_CLIENTID
<dev team will provide the URL>
OAUTH2_CLIENT_REGISTRATION
auth0
OAUTH2_ROLE_ATTRIBUTE
https://<Domain_name>/roles
OAUTH2_SECRET
<dev team will provide the URL>
OVALEDGE_SECURITY_TYPE
oauth2


Elastic File System Configuration
Add asset EFS mounts for both the UI and Job service
Both UI and Job task definitions must be updated before deploying new ECS services.
Always deploy the latest task definition revision to apply changes.
Step 12: AskEdgi Feature Verification
Once the application is up and running.
Log in with the admin user.
Once the OvalEdge application is up and running, follow these steps.
1. Navigate to System Settings Administration > System Settings > AI Tab
Update the following settings
askedgi.edition = Data Analytics
askedgiplus.enable = true
askedgi.ovaledge.recipe.connection.id = -1 (MySQL connector ID)


Ai.config = (Developer will provide the KEY), and the remaining settings are the same as below.

Ensure that all Marketplace details are correctly populated in the settings.

Once done, the changes are logged out and relogged into the application.
Navigate to the AskEdgi feature.

It will take a few seconds to create a workspace.


Try to add the Catalog and Files Upload to the workspace.


Now, ask anything in the search option, and it should give an answer.
Once it gives the result, we are good with the complete setup.
If Workspace is not created:
Check Insight Service logs.
Validate IAM Role permissions.
Verify user entry in the database:
Do not run delete queries unless confirmed by the development team.
Remove User Entry from Service Discovery
Navigate to AWS Cloud Map > Service Discovery Resource.
Locate and delete the user entry associated with the application.
Log back into the application to verify that the changes have taken effect.
Check if the files have been uploaded or not.

Ensure that the Bridge Client certificate ZIP file is stored securely.
Do not share AWS credentials externally; they are sensitive and allow direct access to S3.
Always confirm that the S3 bucket exists and the region is correct before starting the Bridge Client.
Copyright © 2025, OvalEdge LLC, Peachtree Corners, GA, USA.
Last updated
Was this helpful?