Connectivity
\[How the connection is established with Salesforce Reports]
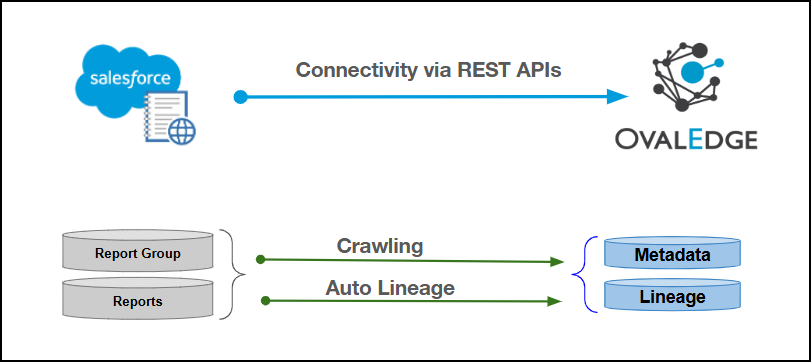
| REST APIs | | Verified Salesforce Reports Version | 64 | {% hint style="info" %} The Salesforce Reports connector validates with the listed “Verified Salesforce Reports Version” and supports other compatible Salesforce Reports versions. If there are any issues with validation or metadata crawling, please submit a support ticket for investigation and feedback. {% endhint %} ### Connector Features | Feature | Availability | | -------------------------------------------- | :----------: | | Crawling | ✅ | | Profiling | NA | | Query Sheet | NA | | Report Preview | ❌ | | Auto Lineage | ✅ | | Manual Lineage | ✅ | | Secure Authentication via Credential Manager | ✅ | | Data Quality | NA | | DAM (Data Access Management) | ❌ | | Bridge | ✅ | {% hint style="info" %} 'NA' indicates that the respective feature is 'Not Applicable.' {% endhint %} ### Metadata Mapping The following objects are crawled from Salesforce Reports and mapped to the corresponding UI assets.| Salesforce Reports Object | Salesforce Reports Attribute | OvalEdge Attribute | OvalEdge Category | OvalEdge Type |
|---|---|---|---|---|
| Report Group | Default | Report Group | Report Group | Report Group |
| Reports | Value | Report Name | Reports | - |
| Reports | Report Description | Source Description | Description | - |
| Reports | Report Type | Type | Reports | - |
| Field Name | Description |
|---|---|
| Connector Type | By default, "Salesforcereports" is displayed as the selected connector type. |
| Credential Manager* | Select the desired credentials manager from the drop-down list. Relevant parameters will be displayed based on the selection. Supported Credential Managers:
|
| License Add-On |
|
| Connector Name* | Enter a unique name for the Salesforce Reports connection (Example: "Salesforcereports_Prod"). |
| Authentication Type | The following two types of authentication are supported for Salesforce Reports Server:
|
| Field Name | Description |
|---|---|
| Connector Description | Enter the description related to the connector. |
| Extended Validation(Y/N) | Set to Y to enable extended validation or N to perform standard validation only. |
| Connector Environment | Select the environment (Example: PROD, STG) configured for the connector. |
| Username* | Enter the Salesforce Reports account username associated with the connected Salesforce organization. |
| Password* | Enter the password associated with the Salesforce Reports account username. |
| Client id* | Enter the unique Consumer Key generated from the connected app in Salesforce. |
| Client secret* | Enter the client secret generated during the Salesforce connected app creation. |
| Security Token | Enter the Salesforce Security Token associated with the account used for integration. |
| Is SANDBOX ?* | The Sandbox drop-down list allows either Yes or No selection. Enter Yes or No (to specify whether the instance is a sandbox or not) |
| API Version* | Enter the Salesforce API version number that the connector should use to communicate with the Salesforce instance. |
| Proxy Enabled* | Select Yes to route the connection through a configured proxy, or No to connect directly without a proxy. |
| Field Name | Description |
|---|---|
| Connector Description | Enter the description related to the connector. |
| Extended Validation(Y/N) | Set to Y to enable extended validation or N to perform standard validation only. |
| Connector Environment | Select the environment (Example: PROD, STG) configured for the connector. |
| Username* | Enter the Salesforce Reports account username associated with the connected Salesforce organization. |
| Password* | Enter the password associated with the Salesforce Reports account username. |
| Client id* | Enter the unique Consumer Key generated from the connected app in Salesforce. |
| Client secret* | Enter the client secret generated during the Salesforce connected app creation. |
| Security Token | Enter the Salesforce Security Token associated with the account used for integration. |
| Is SANDBOX ?* | The Sandbox drop-down list allows either Yes or No selection. Enter Yes or No (to specify whether the instance is a sandbox or not) |
| API Version* | Enter the Salesforce API version number that the connector should use to communicate with the Salesforce instance. |
| Keystore password* | Enter the password that was set when creating the keystore containing the private key. |
| Alias name* | Enter a unique identifier for the Salesforce Reports connection in the Alias name field. |
| Keystore file path* | Enter the full file path of the keystore (.jks) file containing the private key used for JWT authentication. |
| Proxy Enabled* | Select Yes to route the connection through a configured proxy, or No to connect directly without a proxy. |
This shows the number of recent metadata changes to a dataset at the source. By default, it is off. To enable it, toggle the Archive button and specify the number of objects to archive.
Example: Setting it to 4 retrieves the last four changes, displayed in the 'Version' column of the 'Metadata Changes' module.
| | ----------------------- | ------------------------------------------------------------------------------------------------------------------------------------------------------------------------------------------------------------------------------------------------------------------------------------------------------------------------------------ | **Bridge** | Select Bridge\* |If applicable, select the bridge from the drop-down list.
The drop-down list displays all active bridges configured in OvalEdge. These bridges enable communication between data sources and OvalEdge without altering firewall rules.
| | --------------- | --------------------------------------------------------------------------------------------------------------------------------------------------------------------------------------------------------------------------------------------------- | 2. After entering all connection details, the following actions can be performed: 1. Click **Validate** to verify the connection. 2. Click **Save** to store the connection for future use. 3. Click **Save & Configure** to apply additional settings before saving. 3. The saved connection will appear on the Connectors home page. ## Manage Connector Operations ### Crawl {% hint style="warning" %} To perform crawl operations, users must be assigned the Integration Admin role. {% endhint %} The **Crawl/Profile** button allows users to select one or more schemas for crawling. 1. Navigate to the **Connectors** page and click **Crawl/Profile**. 2. Select the schemas to crawl. 3. Click **Run** to collect metadata from the connected source and load it into the Data Catalog. 4. After a successful crawl, the information appears in the **Data Catalog > Report / Report Column** tab. The **Schedule** checkbox allows automated crawling for a selected timeframe, from a minute to a year. 1. Click the **Schedule** checkbox to enable the **Select Period** drop-down. 2. Select a time period for the operation from the drop-down menu. 3. Click **Schedule** to initiate metadata collection from the connected source. 4. The system will automatically execute the crawl operation at the scheduled time. ### Other Operations The Connectors page provides a centralized view of all configured connectors and their health status. **Managing connectors includes:** * **Connectors Health**: Displays the current status of each connector, with a **green** icon for active connections and a **red** icon for inactive connections, helping monitor connectivity to data sources. * **Viewing**: Click the **Eye** icon next to the connector name to view connector details, including Report Groups and Reports. **Nine Dots Menu Options:** To view, edit, validate, build lineage, configure, or delete connectors, click on the Nine Dots menu. * **Edit Connector**: Update and revalidate the data source. * **Validate Connector**: Check the integrity of the connection. * **Settings**: Modify connector settings. * **Crawler**: Configure data extraction. * **Access Instructions**: Add notes on how data can be accessed. * **Business Glossary Settings**: Manage term associations at the connector level. * **Lineage**: Select server dialects for parsing and setting connector priority for table lineage. * **Others**: Configure notification recipients for metadata changes. * **Build Lineage**: Automatically build data lineage using source code parsing. * **Delete Connector**: Remove a connector with confirmation. ### Connectivity Troubleshooting If incorrect parameters are entered, error messages may appear. Ensure all inputs are accurate to resolve these issues. If issues persist, contact the assigned support team.| S.No. | Error Message(s) | Error Description & Resolution |
|---|---|---|
| 1 | Error while validating SALESFORCEREPORTS connection | Root cause: 400 Bad Request on POST request for "https://test.salesforce.com/services/oauth2/token": "{"error":"invalid_grant","error_description":"authentication failure"}" | Error Description: The connection validation failed because Salesforce rejected the authentication request with an “invalid_grant” error, indicating that the JWT credentials are incorrect or expired. Resolution: Verify the connected app settings, JWT certificate, and credentials (client ID, username, and private key). Re-generate and re-authorize the JWT token if necessary. |