| Connector Category | Reporting Tools |
| Connector Version | Release6.3.4 |
| Releases Supported (Available from) | Release3.0 |
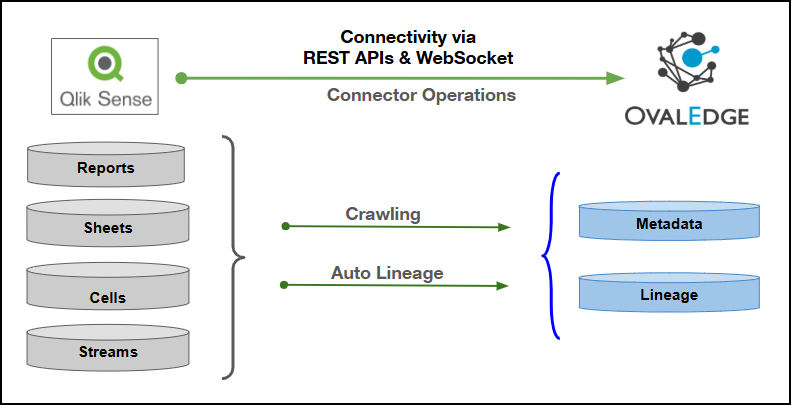
Connectivity [How the connection is established with Qlik Sense] | REST APIs and WebSocket |
| Verified Qlik Sense (On-Prem) Version | November 2024 Release |
| Qlik Sense Object | Qlik Sense Attribute | OvalEdge Attribute | OvalEdge Category | OvalEdge Type |
|---|---|---|---|---|
| Apps | App | Report Group | Report Group | Apps |
| Apps | Report | Report | Presentation Layer | Apps |
| Apps | App Description | Source Description | Description | Apps |
| Sheets | Sheet | Report | Report | Sheets |
| Sheets | Sheet Description | Source Description | Description | Sheets |
| Cells | Cell | Report | Report | Cells |
| Cells | Cell Description | Source Description | Description | Cells |
| Streams | Stream | Report Group | Report Group | Streams |
| Objects | Access Permission |
|---|---|
| Connector Validation | Windows Service user with Audit Admin rights |
| Crawling | Windows Service user with Audit Admin rights |
| Lineage | Windows Service user with Audit Admin rights |
| Delta Crawl | Windows Service user with Audit Admin rights |
| Apps | Windows Service user with Audit Admin rights |
| sheets | Windows Service user with Audit Admin rights |
| Field Name | Description |
|---|---|
| Connector Type | By default, "Qlik Sense" is displayed as the selected connector type. |
| Type of Server* | Select QliksenseOnPrem from the dropdown menu. |
| Credential Manager* | Select the desired credentials manager from the drop-down list. Relevant parameters will be displayed based on your selection. Supported Credential Managers:
|
| License Add Ons |
|
| Connector Name* | Enter a unique name for the Qlik Sense (On-Prem) connection (Example: "Qlik Sense_test"). |
| Connector Environment | Select the environment (Example: PROD, STG) configured for the connector. |
| Connector Description | Enter a brief description of the connector. |
| Authentication* | The following three types of authentication are supported for Qlik Sense (On-Prem):
|
| Field Name | Description |
|---|---|
| Connection url* | Enter the Hostname or IP address of the Qlik Sense (On-Prem) (Example: xxxx-sqlserver.xxxx4ijtzasl.xx-xxx-1.xxx.xxxx.com or 1xx.xxx.1.xx). |
| Qlik Sense User Id* | Provide the service account User ID with required permissions to connect to Qlik Sense. |
| Qlik Sense User Password* | Enter the password associated with the Qlik Sense service account. |
| Alias Host Name | Enter the alias host name of the Qlik Sense (On-Prem) server used for establishing connectivity. |
| Logs Path | Enter the directory path where Qlik Sense logs will be stored for monitoring and troubleshooting. |
| Proxy Enabled* | Select Yes if a proxy server is required for connectivity, otherwise select No. |
| QVDs Path | Provide the path where QVD files are stored for metadata crawling. |
| Xml files generation path | Enter the path created in the OvalEdge server to generate metadata files by the node server. |
| Path to store QVDS | Enter path to save extension-modified QVD files for later use. |
| QVS Path | Enter the directory path where QVS script files are located. |
| Certificate Path | Enter the path where the Qlik Sense certificates are stored for secure authentication. |
| Certificates Password | Enter the password associated with the Qlik Sense certificates. |
| User Directory | Enter the Qlik Sense user directory name configured for authentication. |
| Crawl Streams | Select Y to enable crawling of Qlik Sense streams, or N to skip them. |
| Exclude UnPublished Apps(Y/N) | Select Y to exclude unpublished apps during crawling, or N to include them. |
| Exclude UnPublished Sheets(Y/N) | Select Y to exclude unpublished sheets during crawling, or N to include them. |
| Field Name | Description |
|---|---|
| Connection url* | Enter the Hostname or IP address of the Qlik Sense (On-Prem) (Example: xxxx-sqlserver.xxxx4ijtzasl.xx-xxx-1.xxx.xxxx.com or 1xx.xxx.1.xx). |
| JWT Token* | Enter the JSON Web Token (JWT) required for authentication with Qlik Sense. |
| Prefix* | Enter the user directory prefix associated with the JWT token for successful authentication. |
| Alias Host Name | Enter the alias host name of the Qlik Sense (On-Prem) server used for establishing connectivity. |
| Logs Path | Enter the directory path where Qlik Sense logs will be stored for monitoring and troubleshooting. |
| Proxy Enabled | Select Yes if a proxy server is required for connectivity, otherwise select No. |
| QVDs Path | Provide the path where QVD files are stored for metadata crawling. |
| Xml files generation path | Enter the path created in the OvalEdge server to generate metadata files by the node server. |
| Path to store QVDS | Enter path to save extension-modified QVD files for later use. |
| QVS Path | Enter the directory path where QVS script files are located. |
| Certificate Path | Enter the path where the Qlik Sense certificates are stored for secure authentication. |
| Certificates Password | Enter the password associated with the Qlik Sense certificates. |
| User Directory | Enter the Qlik Sense user directory name configured for authentication. |
| Crawl Streams | Select Y to enable crawling of Qlik Sense streams, or N to skip them. |
| Exclude UnPublished Apps(Y/N) | Select Y to exclude unpublished apps during crawling, or N to include them. |
| Exclude UnPublished Sheets(Y/N) | Select Y to exclude unpublished sheets during crawling, or N to include them. |
| Is Virtual Proxy Enabled(Y/N) | Select Y if a virtual proxy is configured in Qlik Sense, otherwise select N. |
| Enter Cookie | Enter the session cookie value when cookie-based authentication is used. |
| Field Name | Description |
|---|---|
| Connection url* | Enter the Hostname or IP address of the Qlik Sense (On-Prem) (Example: xxxx-sqlserver.xxxx4ijtzasl.xx-xxx-1.xxx.xxxx.com or 1xx.xxx.1.xx). |
| Qlik Sense User Id* | Provide the service account User ID with required permissions to connect to Qlik Sense. |
| Qlik Sense User Password* | Enter the password associated with the Qlik Sense service account. |
| Alias Host Name | Enter the alias host name of the Qlik Sense (On-Prem) server used for establishing connectivity. |
| Logs Path | Enter the directory path where Qlik Sense logs will be stored for monitoring and troubleshooting. |
| Proxy Enabled | Select Yes if a proxy server is required for connectivity, otherwise select No. |
| QVDs Path | Provide the path where QVD files are stored for metadata crawling. |
| Xml files generation path | Enter the path created in the OvalEdge server to generate metadata files by the node server. |
| Path to store QVDS | Enter path to save extension-modified QVD files for later use. |
| QVS Path | Enter the directory path where QVS script files are located. |
| Certificate Path | Enter the path where the Qlik Sense certificates are stored for secure authentication. |
| Certificates Password | Enter the password associated with the Qlik Sense certificates. |
| User Directory | Enter the Qlik Sense user directory name configured for authentication. |
| Crawl Streams | Select Y to enable crawling of Qlik Sense streams, or N to skip them. |
| Exclude UnPublished Apps(Y/N) | Select Y to exclude unpublished apps during crawling, or N to include them. |
| Exclude UnPublished Sheets(Y/N) | Select Y to exclude unpublished sheets during crawling, or N to include them. |
| Is Virtual Proxy Enabled(Y/N) | Select Y if a virtual proxy is configured in Qlik Sense, otherwise select N. |
| Enter Cookie | Enter the session cookie value when cookie-based authentication is used. |
| Field Name | Description |
|---|---|
| Connection url* | Enter the Hostname or IP address of the Qlik Sense (On-Prem) (Example: xxxx-sqlserver.xxxx4ijtzasl.xx-xxx-1.xxx.xxxx.com or 1xx.xxx.1.xx). |
| Qlik Sense User Id* | Provide the service account User ID with required permissions to connect to Qlik Sense. |
| Qlik Sense User Directory | Enter the Qlik Sense user directory name configured for authentication. |
| Qlik Sense Node Url | Enter the Qlik Sense node URL used to establish API connectivity. |
| Qlik Sense Node Url Read Timeout | Enter the read timeout (in seconds) for API calls made to the Qlik Sense node URL. |
| Qlik Sense User Password* | Enter the password associated with the Qlik Sense user account. |
| Alias Host Name | Enter the alias host name of the Qlik Sense (On-Prem) server used for establishing connectivity. |
| Node API version* | Enter the supported Qlik Sense Node API version to be used for the connection. |
| Qlik Sense Port | Enter the port number configured for the Qlik Sense node server connection. |
| Qlik Sense Certs Path | Enter the file system path where Qlik Sense certificates are stored for secure authentication. |
| Logs Path | Enter the directory path where Qlik Sense logs will be stored for monitoring and troubleshooting. |
| Proxy Enabled* | Select Yes if a proxy server is required for connectivity, otherwise select No. |
| QVDs Path | Provide the path where QVD files are stored for metadata crawling. |
| Xml files generation path | Enter the path created in the OvalEdge server to generate metadata files by the node server. |
| Path to store QVDS | Enter path to save extension-modified QVD files for later use. |
| QVS Path | Enter the directory path where QVS script files are located. |
| Certificate Path | Enter the path where the Qlik Sense certificates are stored for secure authentication. |
| Certificates Password | Enter the password associated with the Qlik Sense certificates. |
| User Directory | Enter the Qlik Sense user directory name configured for authentication. |
| Crawl Streams | Select Y to enable crawling of Qlik Sense streams, or N to skip them. |
| Exclude UnPublished Apps(Y/N) | Select Y to exclude unpublished apps during crawling, or N to include them. |
| Exclude UnPublished Sheets(Y/N) | Select Y to exclude unpublished sheets during crawling, or N to include them. |