# Looker

This article outlines the integration with the Looker connector, enabling streamlined metadata management through features such as crawling, report preview, and lineage building (Auto & Manual). It also ensures secure authentication via Credential Manager.

<figure><img src="https://content.gitbook.com/content/ztcvwwOJCeaE1n6oHp4C/blobs/jbiYOXSUE2ej26vPP9Ug/unknown.png" alt=""><figcaption></figcaption></figure>

## Overview

### Connector Details

| Connector Category                                                         | Reporting Tools         |
| -------------------------------------------------------------------------- | ----------------------- |
| Connector Version                                                          | Release6.3.x            |
| Releases Supported (Available from)                                        | Release6.3.x            |
| <p>Connectivity</p><p>\[How the connection is established with Looker]</p> | 
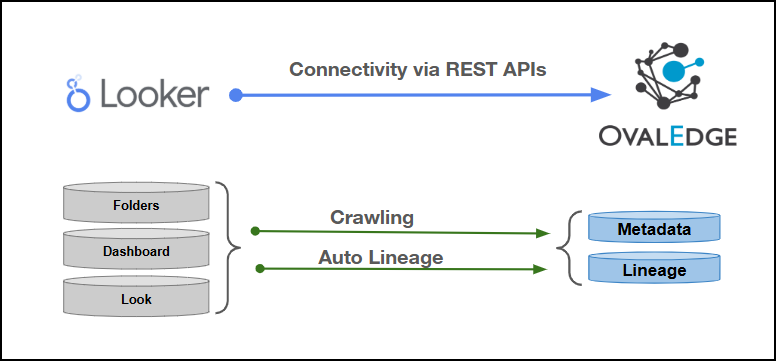
REST APIs               |
| Verified Looker Version                                                    | Looker API Version: 4.0 |

{% hint style="info" %}
The Looker connector validates with the listed “Verified Looker Version” and supports other compatible Looker versions. If there are any issues with validation or metadata crawling, please submit a support ticket for investigation and feedback.
{% endhint %}

### Connector Features

| Feature                                      | Availability |
| -------------------------------------------- | :----------: |
| Crawling                                     |       ✅      |
| Profiling                                    |      NA      |
| Query Sheet                                  |       ❌      |
| Report Preview                               |       ✅      |
| Auto Lineage                                 |       ✅      |
| Manual Lineage                               |       ✅      |
| Secure Authentication via Credential Manager |       ✅      |
| Data Quality                                 |       ❌      |
| DAM (Data Access Management)                 |       ❌      |
| Bridge                                       |       ✅      |

{% hint style="info" %}
'NA' indicates that the respective feature is 'Not Applicable.'
{% endhint %}

### Metadata Mapping

The following objects are crawled from Looker and mapped to the corresponding UI assets.

<table><thead><tr><th width="141.333251953125">Source Object</th><th width="161">Source Attribute</th><th width="146">OvalEdge Attribute</th><th width="135">OvalEdge Category</th><th>OvalEdge Type</th></tr></thead><tbody><tr><td>Folders</td><td>Folders</td><td>Report Group/Domain</td><td>Report Group/Domain</td><td>Report Group</td></tr><tr><td>Dashboard, Look</td><td>Dashboard, Look</td><td>Report</td><td>Report</td><td>Dashboard, Look</td></tr><tr><td>Dashboard Elements/Tiles (Various Types: Charts, Tables, Text, Merge Queries, etc.)</td><td>Dashboard Elements/Tiles (Various Types: Charts, Tables, Text, Merge Queries, etc.)</td><td>Report</td><td>Report</td><td>Dashboard Elements/Tiles</td></tr></tbody></table>

## Set up a Connection

### Prerequisites

The prerequisites to establish a connection:

### **Whitelisting Ports**

Whitelist the inbound port to allow OvalEdge to connect to the Looker server.

{% hint style="warning" %}
When any port is configured, specify the port number during connection setup, whitelist the port, and establish proper communication between the system and the Looker Server.
{% endhint %}

{% hint style="warning" %}
To enable embed functionality, ensure that Server IP whitelisting is configured under Admin > Server > IP Allowlist, and Domain whitelisting is configured under Admin > Embed Settings.
{% endhint %}

### Service Account User Permissions

{% hint style="warning" %}
It is recommended to use a separate service account to establish the connection to the data source, configured with the following minimum set of permissions.
{% endhint %}

{% hint style="info" %}
**👨‍💻 Who can provide these permissions?** The Looker administrator grants these permissions, since users may not have sufficient access to assign them.
{% endhint %}

<table><thead><tr><th width="228.6666259765625">Objects</th><th>Permissions</th></tr></thead><tbody><tr><td>Connector Validation</td><td>Validation = API3 Credentials Only</td></tr><tr><td>Crawling</td><td><p>See_looks</p><p>See_user_dashboards</p><p>See_lookml_dashboards</p><p>Model Set Access</p><p>Connection Access</p><p>Folder Access</p></td></tr><tr><td>Folders/Dashboards/Looks/Dashboard childs</td><td><p>See_looks</p><p>See_user_dashboards</p><p>See_lookml_dashboards</p><p>Model Set Access</p><p>Connection Access</p><p>Folder Access</p></td></tr><tr><td>Views</td><td>Create_embed_url</td></tr></tbody></table>

### Connection Configuration Steps

{% hint style="warning" %}
Users must have the Connector Creator role to configure a new connection.
{% endhint %}

1. Log into OvalEdge, go to Administration > Connectors, click + **(New Connector)**, search for **Looker**, and enter the required parameters.

{% hint style="info" %}
Fields marked with an asterisk (\*) are mandatory for establishing a connection.
{% endhint %}

<table><thead><tr><th width="220.6666259765625">Field Name</th><th>Description</th></tr></thead><tbody><tr><td>Connector Type</td><td>By default, "Looker" is displayed as the selected connector type.</td></tr><tr><td>Credential Manager*</td><td><p>Select the desired credentials manager from the drop-down list. Relevant parameters will be displayed based on the selection.</p><p>Supported Credential Managers:</p><ul><li>OE Credential Manager</li><li>AWS Secrets Manager</li><li>HashiCorp</li><li>Azure Key Vault</li></ul></td></tr><tr><td>License Add-On</td><td><p><br></p><ul><li>Select the Auto Lineage Add-On checkbox to automatically build data lineage.</li></ul></td></tr><tr><td>Connector Name*</td><td><p>Enter a unique name for the Looker connection              </p><p>(Example: "Looker_Prod").</p></td></tr><tr><td>Connector Environment</td><td>Select the environment (Example: PROD, STG) configured for the connector.</td></tr><tr><td>Connector Description</td><td>Enter the description related to the connector.</td></tr><tr><td>Looker API Host Name* </td><td>Enter the Looker API Host Name.</td></tr><tr><td>Looker Host Name</td><td>Enter the Looker Host Name that should contain the base URL of the Looker instance without the protocol (for example, company.looker.com)</td></tr><tr><td>Client Id*</td><td>Enter the Looker Client ID generated from the Looker Admin → API3 settings. This value uniquely identifies the API client configured for the connector. </td></tr><tr><td>Client Secret*</td><td>Enter the OAuth client secret generated in the Looker admin console when creating the API credentials. </td></tr><tr><td>Port</td><td>Enter the required port number to connect with the Looker database.</td></tr><tr><td>Connection String* </td><td><p>Configure the connection string for the Looker server:</p><ul><li>Automatic Mode: The system generates a connection string based on the provided credentials.</li><li>Manual Mode: Enter a valid connection string manually.</li></ul><p>Replace placeholders with actual server details:</p><ul><li>{server} refers to the Looker host or Domain.</li></ul><p>Authentication Plugins:<br>https://{server}/api/4.0/</p><p>This is the default connection string used for connecting to the Looker API. </p></td></tr><tr><td>Proxy Enabled*</td><td>Select Yes to route the connection through a configured proxy, or No to connect directly without a proxy.</td></tr></tbody></table>

**Default Governance Roles**

<table data-header-hidden><thead><tr><th width="220.6666259765625"></th><th></th></tr></thead><tbody><tr><td>Default Governance Roles*</td><td>Select the appropriate users or teams for each governance role from the drop-down list. All users and teams configured in OvalEdge Security are displayed for selection.</td></tr></tbody></table>

**Admin Roles**

<table data-header-hidden><thead><tr><th width="220.6666259765625"></th><th></th></tr></thead><tbody><tr><td>Admin Roles*</td><td>Select one or more users from the dropdown list for Integration Admin and Security &#x26; Governance Admin. All users configured in OvalEdge Security are available for selection.</td></tr></tbody></table>

**No of Archive Objects**

<table data-header-hidden><thead><tr><th width="220.6666259765625"></th><th></th></tr></thead><tbody><tr><td>No Of Archive Objects*</td><td><p>This shows the number of recent metadata changes to a dataset at the source. By default, it is off. To enable it, toggle the Archive button and specify the number of objects to archive.</p><p>Example: Setting it to 4 retrieves the last four changes, displayed in the 'Version' column of the 'Metadata Changes' module.</p></td></tr></tbody></table>

**Bridge**

<table data-header-hidden><thead><tr><th width="220.6666259765625"></th><th></th></tr></thead><tbody><tr><td>Select Bridge*</td><td><p>If applicable, select the bridge from the drop-down list.</p><p>The drop-down list displays all active bridges configured in OvalEdge. These bridges enable communication between data sources and OvalEdge without altering firewall rules.</p></td></tr></tbody></table>

2. After entering all connection details, the following actions can be performed:
   1. Click **Validate** to verify the connection.
   2. Click **Save** to store the connection for future use.
   3. Click **Save & Configure** to apply additional settings before saving.
3. The saved connection will appear on the Connectors home page.

## Manage Connector Operations

### Crawl

{% hint style="warning" %}
To perform crawl operations, users must be assigned the Integration Admin role.
{% endhint %}

The **Crawl/Profile** button allows users to select one or more schemas for crawling.&#x20;

1. Navigate to the **Connectors** page and click **Crawl/Profile**.
2. Select the schemas to crawl.
3. Click **Run** to collect metadata from the connected source and load it into the Data Catalog.
4. After a successful crawl, the information appears in the **Data Catalog > Report / Report Column** tab.

The **Schedule** checkbox allows automated crawling for a selected timeframe, from a minute to a year.

1. Click the Schedule checkbox to enable the **Select Period** drop-down.
2. Select a time period for the operation from the drop-down menu.
3. Click **Schedule** to initiate metadata collection from the connected source.
4. The system will automatically execute the crawl operation at the scheduled time.

#### Other Operations

The **Connectors page** provides a centralized view of all configured connectors and their health status.

**Managing connectors includes:**

* **Connectors Health**: Displays the current status of each connector, with a **green** icon for active connections and a **red** icon for inactive connections, helping monitor connectivity to data sources.
* **Viewing**: Click the **Eye** icon next to the connector name to view connector details, including Reports, Report Columns, Sheets, Dashboards, Analyses, Datasets, and Visuals

**Nine Dots Menu Options:**

To view, edit, validate, build lineage, configure, or delete connectors, click on the Nine Dots menu.

* **Edit Connector**: Update and revalidate the data source.
* **Validate Connector**: Check the integrity of the connection.
* **Settings**: Modify connector settings.
  * **Crawler**: Configure data extraction.
  * **Access Instructions**: Add notes on how data can be accessed.
  * **Business Glossary Settings**: Manage term associations at the connector level.
  * **Lineage**: Select server dialects for parsing and setting connector priority for table lineage.
  * **Others**: Configure notification recipients for metadata changes.
* **Build Lineage**: Automatically build data lineage using source code parsing.
* **Delete Connector**: Remove a connector with confirmation.

### Connectivity Troubleshooting

If incorrect parameters are entered, error messages may appear. Ensure all inputs are accurate to resolve these issues. If issues persist, contact the assigned support team.

<table><thead><tr><th width="83.6666259765625">S.No.</th><th>Error Message(s)</th><th>Error Description &#x26; Resolution</th></tr></thead><tbody><tr><td>1</td><td>Error while validating LOOKER connection Error occurred while logging in to Looker</td><td><p>Error Description: The system could not validate the Looker connection because the login request failed. This occurs when authentication details, API credentials, or Looker server settings are incorrect or unreachable.</p><p>Resolution: Verify the Looker API credentials, host URL, and authentication method configured in the connector. Ensure the Looker instance is accessible and retry validation after correcting any incorrect settings.</p></td></tr></tbody></table>

***

Copyright © 2025, OvalEdge LLC, Peachtree Corners, GA, USA.
