| Connector Category | RDBMS |
| Connector Version | Release7.2.4 |
| Releases Supported (Available from) | Release6.3.4 |
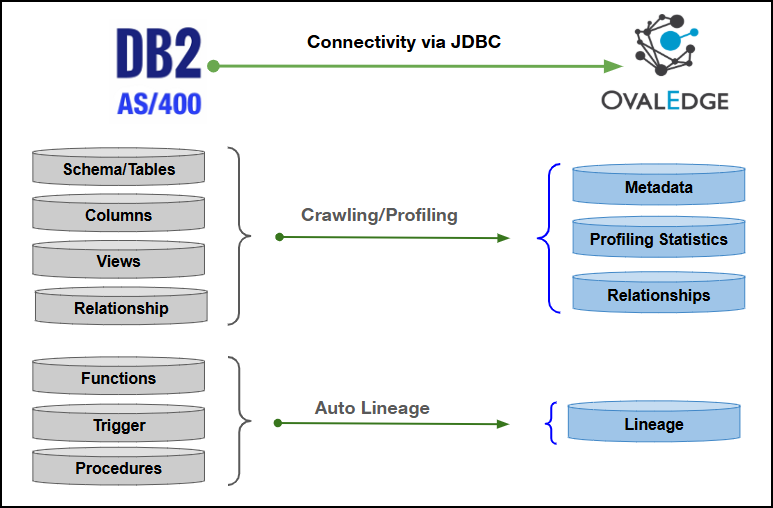
Connectivity [How the connection is established with the IBM DB2 (AS/400)] | JDBC driver |
| Verified IBM DB2 (AS/400) Version | 11.5.x |
| DB2 (AS/400) Object | DB2 (AS/400) Attribute | OvalEdge Attribute | OvalEdge Category | OvalEdge Type |
|---|---|---|---|---|
| Table | Table Name | Table Name | Tables | oetable |
| Table | Table Data Type | Table Type | Tables | oetable |
| Table | Table Comments | Table Description | Tables | oetable |
| Column | Column Name | Column Name | Table Columns | oecolumn |
| Column | Data Type | Data Type | Table Columns | oecolumn |
| Column | Length | Length | Table Columns | oecolumn |
| Column | Ordinal Position | Column Position | Table Columns | oecolumn |
| Column | Column Comments | Column Description | Table Columns | oecolumn |
| Column | Is Nullable | Nullable | Table Columns | oecolumn |
| Schema | Schema Name | Schema Name | Schemas | oeschema |
| View | View Name | Query Name | Queries | oequery |
| View | View Definition | Query Code | Queries | oequery |
| Procedure | Routine Name | Query Name | Queries | oequery |
| Procedure | Routine Type | Query Type | Queries | oequery |
| Procedure | Routine Definition | Query Code | Queries | oequery |
| Procedure | Long Comment | Query Description | Queries | oequery |
| Function | Routine Name | Query Name | Queries | oequery |
| Function | Routine Type | Query Type | Queries | oequery |
| Function | Routine Definition | Query Code | Queries | oequery |
| Function | Long Comment | Query Description | Queries | oequery |
| Trigger | Trigger Name | Query Name | Queries | oequery |
| Trigger | Action Statement | Query Code | Queries | oequery |
| Trigger | Long Comment | Query Description | Queries | oequery |
| Index | Index Name | Index Name | Indexes | - |
| Index | Table Name | Table Name | Indexes | - |
| Index | Column Name | Column Name | Indexes | - |
| Index | Uniqueness | Is Unique | Indexes | - |
| Foreign Key Relationship | Left Table | Source Table | Relationships | - |
| Foreign Key Relationship | Left Column | Source Column | Relationships | - |
| Foreign Key Relationship | Right Table | Target Table | Relationships | - |
| Foreign Key Relationship | Right Column | Target Column | Relationships | - |
| File Name | Description |
|---|---|
| jt400-21.0.6.jar | Use this file to enable DB2 (AS/400) JDBC connectivity for the application. Place the JAR file in the Third Party Jars or external JAR directory (ovaledge.jarpath) and restart the application to load the driver successfully. |
| Field Name | Description | ||||||||
|---|---|---|---|---|---|---|---|---|---|
| Connector Type | By default, "DB2AS400" is displayed as the selected connector type. | ||||||||
| Credential Manager* | Select the desired credentials manager from the drop-down list. Relevant parameters will be displayed based on the selection. Supported Credential Managers:
| ||||||||
| License Add Ons |
| ||||||||
| Connector Name* | Enter a unique name for the DB2 (AS/400) connection (Example: "DB2 (AS/400)_Prod"). | ||||||||
| Connector Environment | Select the environment (Example: PROD, STG) configured for the connector. | ||||||||
| Connector description | Enter a brief description of the connector. | ||||||||
| Server* | Enter the DB2 (AS/400) database server name or IP address (Example: xxxx-xxxx.xxxx4ijtzasl.xx-south-1.rds.amazonaws.com or 1xx.xxx.1.x0). | ||||||||
| Port* | By default, the port number for the DB2 (AS/400), "50005" is auto-populated. If required, the port number can be modified as per the custom port number that is configured for the DB2 (AS/400). | ||||||||
| Database* | Enter the database name to which the service account user has access within the DB2 (AS/400). | ||||||||
| Driver* | By default, the DB2 (AS/400) driver details are auto-populated. | ||||||||
| Username* | Enter the service account username set up to access the DB2 (AS/400) database (Example: "oesauser"). | ||||||||
| Password* | Enter the password associated with the service account user. | ||||||||
| Connection String | Configure the connection string for the DB2 (AS/400) database:
Replace placeholders with actual database details. {sid} refers to Database Name. | ||||||||
| Plugin Server | Enter the server’s name when running as a plugin server. | ||||||||
| Plugin Port | Enter the port number on which the plugin is running. |
| Default Governance Roles* | Select the appropriate users or teams for each governance role from the drop-down list. All users and teams configured in OvalEdge Security are displayed for selection. |
| Admin Roles* | Select one or more users from the dropdown list for Integration Admin and Security & Governance Admin. All users configured in OvalEdge Security are available for selection. |
| No Of Archive Objects* | This shows the number of recent metadata changes to a dataset at the source. By default, it is off. To enable it, toggle the Archive button and specify the number of objects to archive. Example: Setting it to 4 retrieves the last four changes, displayed in the 'Version' column of the 'Metadata Changes' module. |
| Select Bridge* | If applicable, select the bridge from the drop-down list. The drop-down list displays all active bridges configured in OvalEdge. These bridges enable communication between data sources and OvalEdge without altering firewall rules. |
| Sl. No. | Category | Error Message | Error Description & Resolution |
|---|---|---|---|
| 1 | Connection & Authentication | Access denied for user | Error Description: This error occurs when the provided DB2 AS400 credentials are incorrect, the user profile is disabled, or the user lacks required access privileges. Resolution:
|
| 2 | Connection & Authentication | Communications link failure / Connection refused | Error Description: This error occurs when the application cannot establish a network connection to the DB2 AS400 server. Resolution:
|
| 3 | Connection & Authentication | Invalid number format for port number | Error Description: This error occurs when an invalid or incorrectly formatted port number is provided for the DB2 connection. Resolution:
|
| 4 | Connection & Authentication | Unknown database | Error Description: This error occurs when the specified database or library name does not exist or is incorrectly specified in the connection settings. Resolution:
|
| 5 | Connection & Authentication | Failed to retrieve DataSource from DataSourceProvider | Error Description: This error occurs when the system fails to initialize the data source or connection pool for the DB2 AS400 connection. Resolution:
|
| 6 | Column Access & Visibility | Unsupported Data Type for Profile | Error Description: This error occurs when a column data type or length is not supported for profiling operations. Resolution:
|
| 7 | Data Profiling & Query Execution | Could not profile table. No Data found | Error Description: This error occurs when the profiling query returns no rows or an unexpected result structure. Resolution:
|