| AlloyDB Object | AlloyDB Attribute | OvalEdge Attribute | OvalEdge Category | OvalEdge Type |
|---|---|---|---|---|
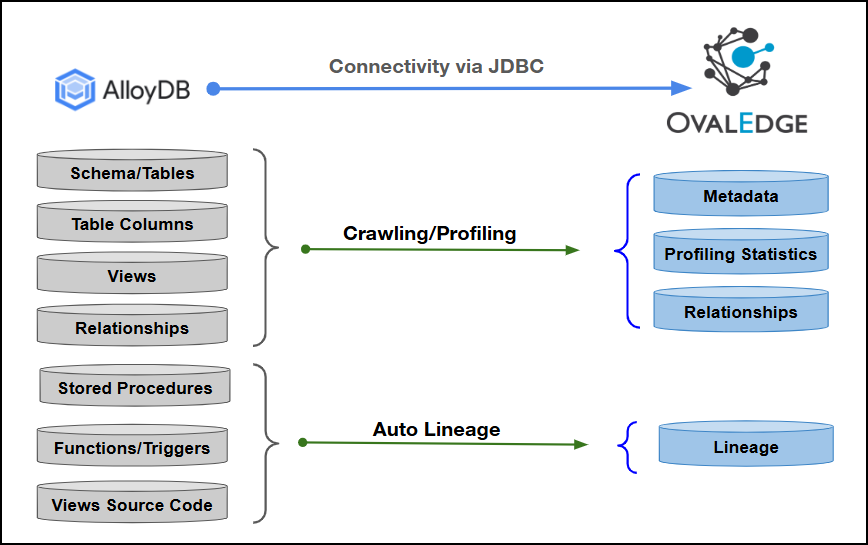
| Table | Table Name | Table | Tables | table |
| Table | Table Type | Table | Tables | table |
| Table | Table Comments | Source Description | Descriptions | Source Description |
| Columns | Column Name | Column | Table Columns | Columns |
| Columns | Data Type | Column Type | Table Columns | Columns |
| Columns | Description | Source Description | Table Columns | Columns |
| Columns | Ordinal Position | Column Position | Table Columns | Columns |
| Columns | Length | Data Type Size | Table Columns | Columns |
| Views | View Name | View | Tables | View |
| Views | View Definition/Definition | View Query | Views | View |
| Procedures | nspname | Name | Procedures | Procedures |
| Procedures | nspname | Source Description | Descriptions | Procedures |
| Procedures | Prosrc | Procedure | Procedures | Procedures |
| Functions | nspname | Name | Functions | Functions |
| Functions | Function Definition | Function | Functions | Functions |
| Functions | Description | Source Description | Descriptions | Functions |
| Triggers | Trigger Name | Name | Triggers | Triggers |
| Triggers | Action Statement | Trigger Data | Triggers | Triggers |
| Indexes | Index Name | Index | Indexes | Indexes |
| Indexes | If Unique | Yes/No | Indexes | Indexes |
| Operation | Objects | Sys Tables | Access Permissions |
|---|---|---|---|
| Crawling & Profiling | Schemas | Information_Schema.Schemata | USAGE |
| Crawling & Profiling | Tables | Information_Schema.Tables | SELECT |
| Crawling & Profiling | Tables | Pg_Matviews | SELECT |
| Crawling & Profiling | Table Columns | Pg_Attribute, Pg_Class, Pg_Namespace | SELECT |
| Crawling & Profiling | Table Columns | Information_Schema.Columns | SELECT |
| Crawling, Profiling, & Lineage Building | Views | Information_Schema.Views | SELECT |
| Crawling, Profiling, & Lineage Building | Views | Pg_Matviews | SELECT |
| Crawling, & Lineage Building | Functions | Pg_Proc | SELECT |
| Crawling, & Lineage Building | Functions | Pg_Namespace | SELECT |
| Crawling, & Lineage Building | Functions | Pg_Language | SELECT |
| Crawling, & Lineage Building | Functions | Pg_Type | SELECT |
| Crawling, & Lineage Building | Stored Procedures | Pg_Proc | SELECT |
| Crawling, & Lineage Building | Stored Procedures | Pg_Namespace | SELECT |
| Crawling, & Lineage Building | Stored Procedures | Pg_Language | SELECT |
| Crawling, & Lineage Building | Stored Procedures | Pg_Type | SELECT |
| Crawling | Triggers | Information_Schema.Triggers | SELECT |
| Crawling | Relationships | Information_Schema.Referential_Constraints | REFERENCES |
| Crawling | Relationships | Information_Schema.Key_Column_Usage | REFERENCES |
| Field Name | Description |
|---|---|
| Connector Type | By default, "PostgreSQL" is displayed as the selected connector type. |
| Credential Manager* | Select the desired credentials manager. Supported options: OE Credential Manager, AWS Secrets Manager, HashiCorp Vault, Azure Key Vault. |
| License Add Ons |
|
| Connector Name* | Enter a unique name for the AlloyDB connection. |
| Connector Environment | Select the environment (Example: PROD, STG) configured for the connector. |
| Connector Description | Enter a brief description of the connector. |
| Server* | Enter the AlloyDB database server name or IP address. (Example: xxxx-xxxxxxx.xxxx4ijtzasl.xx-south-1.xxx.xxxxx.com or 1xx.xxx.1.xx). |
| Port* | By default, the port number for AlloyDB, 5432, is auto-populated. If required, you can change it to a custom port number configured for the AlloyDB. |
| Database* | Enter the database name to which the service account user has access within the AlloyDB. |
| Driver* | By default, the AlloyDB driver details are auto-populated. |
| Username* | Enter the service account username configured to access the AlloyDB database (example: "oesauser"). |
| Password* | Enter the password associated with the service account user. |
| Connection String | Configure the connection string for the AlloyDB database:
Replace placeholders with actual database details. {sid} refers to the database name. |
| Plugin Server | Enter the server name when running as a plugin server. |
| Plugin Port | Enter the port number on which the plugin is running. |
| Default Governance Roles* | Select the appropriate users or teams for each governance role from the drop-down list. All users configured in the security settings are available for selection. |
| Admin Roles* | Select one or more users from the dropdown list for Integration Admin and Security & Governance Admin. All users configured in the security settings are available for selection. |
| No Of Archive Objects* | This shows the number of recent metadata changes to a dataset at the source. By default, it is off. To enable it, toggle the Archive button and specify the number of objects to archive. Example: Setting it to 4 retrieves the last four changes, displayed in the 'Version' column of the 'Metadata Changes' module. |
| Select Bridge* | If applicable, select the bridge from the drop-down list. The drop-down list displays all active bridges that have been configured. These bridges facilitate communication between data sources and the system without requiring changes to firewall rules. |
| S.No. | Error Message(s) | Error Description/Resolution |
|---|---|---|
| 1 | Error while validating connection: Exception occured while validating the PostgreSql Connection : Failed to obtain JDBC Connection; nested exception is xxx.postgresql.xxx.PSQLExxxxxx: FATAL: password authentication failed for user "xxxxx" | Error Description: Either username and password might be wrong. Resolution:
|
| 2 | Error while validating connection: Exception occured while validating the PostgreSql Connection : Failed to obtain JDBC Connection; nested exception is xxx.postgresql.xxx.PSQLException: FATAL: database "xxxxx" does not exist | Error Description: The database name provided is invalid. Resolution:
|