# Erwin Data Modeler

This article outlines the integration of the Erwin Data Modeler connector, enabling streamlined metadata management through features such as crawling. It also ensures secure authentication via Credential Manager.

<figure><img src="https://content.gitbook.com/content/ztcvwwOJCeaE1n6oHp4C/blobs/mTW9cSQZDvjme1qe8NB3/unknown.png" alt=""><figcaption></figcaption></figure>

## Overview

### Connector Details

| Connector Category                                                                     | Other       |
| -------------------------------------------------------------------------------------- | ----------- |
| Connector Version                                                                      | Release7.2  |
| Releases Supported (Available from)                                                    | Release6.0  |
| <p>Connectivity</p><p>\[How the connection is established with Erwin Data Modeler]</p> | 
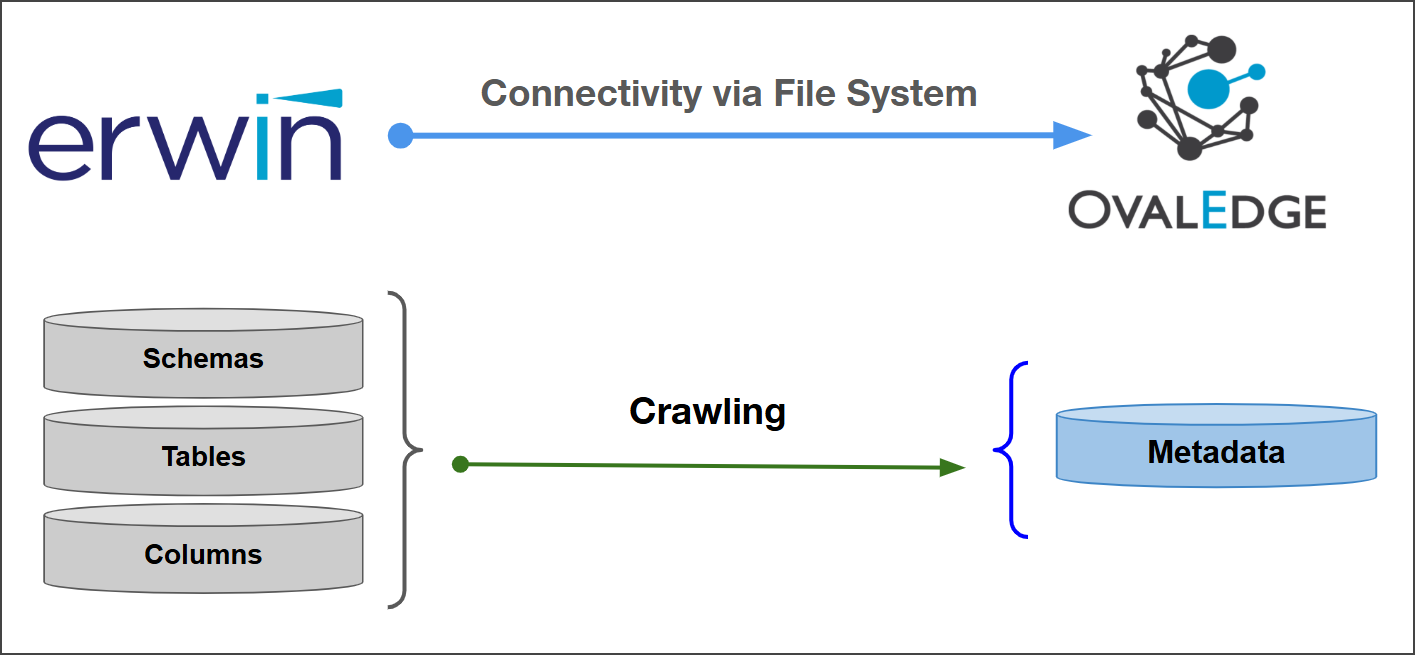
File System |

### Connector Features

| Feature                                      | Availability |
| -------------------------------------------- | :----------: |
| Crawling                                     |       ✅      |
| Delta Crawling                               |       ❌      |
| Profiling                                    |       ❌      |
| Query Sheet                                  |       ❌      |
| Data Preview                                 |       ❌      |
| Auto Lineage                                 |       ❌      |
| Manual Lineage                               |       ❌      |
| Secure Authentication via Credential Manager |       ✅      |
| Data Quality                                 |       ❌      |
| DAM (Data Access Management)                 |       ❌      |
| Bridge                                       |       ✅      |

### Metadata Mapping

The following objects are crawled from Erwin Data Modeler and mapped to the corresponding UI assets.

<table><thead><tr><th width="148">Erwin Object</th><th width="160">Erwin Attribute</th><th width="186.3333740234375">OvalEdge Attribute</th><th width="178.333251953125">OvalEdge Category</th><th width="168">OvalEdge Type</th></tr></thead><tbody><tr><td>Schema</td><td>CSV File Name</td><td>Schema</td><td>Databases</td><td>Schema</td></tr><tr><td>Schema</td><td>CSV File Path</td><td>Schema ID</td><td>Databases</td><td>Schema</td></tr><tr><td>Table</td><td>Table Name</td><td>Table</td><td>Tables</td><td>Table</td></tr><tr><td>Columns</td><td>Table Type</td><td>Type</td><td>Tables</td><td>Table</td></tr><tr><td>Columns</td><td>Table Comments</td><td>Source Description</td><td>Descriptions</td><td>Source Description</td></tr><tr><td>Columns</td><td><p>Table ID </p><p>(CSV Column 0)</p></td><td>Table ID</td><td>Tables</td><td>Table</td></tr><tr><td>Columns</td><td><p>Column Name </p><p>(CSV Column 6)</p></td><td>Column</td><td>Table Columns</td><td>-</td></tr><tr><td>Columns</td><td><p>Data Type </p><p>(CSV Column 7)</p></td><td>Column Type</td><td>Table Columns</td><td>-</td></tr><tr><td>-</td><td><p>Description </p><p>(CSV Column 8)</p></td><td>Source Description</td><td>Table Columns</td><td>-</td></tr><tr><td>-</td><td><p>Ordinal Position</p><p>(CSV Column 5)</p></td><td>Column Position</td><td>Table Columns</td><td>-</td></tr><tr><td>-</td><td>Length</td><td>Data Type Size</td><td>Table Columns</td><td>-</td></tr></tbody></table>

## Set up a Connection

### Prerequisites

The following are the prerequisites to establish a connection:

#### **Service Account User Permissions**

{% hint style="warning" %}
It is recommended to use a separate service account to establish the connection to the data source, configured with the following minimum set of permissions.
{% endhint %}

{% hint style="info" %}
👨‍💻Who can provide these permissions? These permissions are granted by the Erwin Data Modeler administrator, as users may not have the required access to assign them independently.
{% endhint %}

| Operation | Objects | Sys Tables                        | Access Permissions          |
| --------- | ------- | --------------------------------- | --------------------------- |
| Crawling  | Schemas | CSV Files (File System)           | Read access to the folder   |
| Crawling  | Tables  | CSV File Content (DWXT type rows) | Read access to the CSV file |
| Crawling  | Columns | CSV File Content (DWXC type rows) | Read access to the CSV file |

### Connection Configuration Steps

{% hint style="warning" %}
Users are required to have the Connector Creator role in order to configure a new connection.
{% endhint %}

1. Log into OvalEdge, go to **Administration** > **Connectors**, click **+ (New Connector)**, search for **Erwin Data Modeler,** and complete the required parameters.

{% hint style="info" %}
Fields marked with an asterisk (\*) are mandatory for establishing a connection.
{% endhint %}

<table><thead><tr><th width="219.3333740234375">Field Name</th><th>Description</th></tr></thead><tbody><tr><td>Connector Type</td><td>By default, "Erwin CSV Import" is displayed as the selected connector type.</td></tr><tr><td>Credential Manager*</td><td><p>Select the desired credentials manager from the drop-down list. Relevant parameters will be displayed based on your selection.</p><p>Supported Credential Managers:</p><ul><li>Database</li><li>HashiCorp Vault</li><li>AWS Secrets Manager</li><li>Azure Key Vault</li></ul></td></tr><tr><td>Connector Name*</td><td>Enter a unique name for the Erwin Data Modeler connection.</td></tr><tr><td>Connector Environment</td><td>Select the environment (Example: PROD, STG) configured for the connector.</td></tr><tr><td>Connector Description</td><td>Enter a brief description of the connector.</td></tr><tr><td>Erwin CSV Files Folder Path*</td><td>Enter the path where the Erwin-generated CSV files are stored. This path is required for the system to locate and process the files.</td></tr><tr><td>Plugin Server</td><td>Enter the server name when running as a plugin server.</td></tr><tr><td>Plugin Port</td><td>Enter the port number on which the plugin is running.</td></tr></tbody></table>

**Default Governance Roles**

<table data-header-hidden><thead><tr><th width="219.3333740234375"></th><th></th></tr></thead><tbody><tr><td>Default Governance Roles*</td><td>Select the appropriate users or teams for each governance role from the drop-down list. All users configured in the security settings are available for selection.</td></tr></tbody></table>

**Admin Roles**

<table data-header-hidden><thead><tr><th width="219.3333740234375"></th><th></th></tr></thead><tbody><tr><td>Admin Roles*</td><td>Select one or more users from the dropdown list for Integration Admin and Security &#x26; Governance Admin. All users configured in the security settings are available for selection.</td></tr></tbody></table>

**No Of Archive Objects**

<table data-header-hidden><thead><tr><th width="219.3333740234375"></th><th></th></tr></thead><tbody><tr><td>No Of Archive Objects*</td><td><p>This shows the number of recent metadata changes to a dataset at the source. By default, it is off. To enable it, toggle the Archive button and specify the number of objects to archive.</p><p>Example: Setting it to 4 retrieves the last four changes, displayed in the 'Version' column of the 'Metadata Changes' module.</p></td></tr></tbody></table>

**Bridge**

<table data-header-hidden><thead><tr><th width="219.3333740234375"></th><th></th></tr></thead><tbody><tr><td>Select Bridge*</td><td><p>If applicable, select the bridge from the drop-down list.</p><p>The drop-down list displays all active bridges that have been configured. These bridges facilitate communication between data sources and the system without requiring changes to firewall rules.</p></td></tr></tbody></table>

2. After entering all connection details, the following actions can be performed:
   1. Click **Validate** to verify the connection.
   2. Click **Save** to store the connection for future use.
   3. Click **Save & Configure** to apply additional settings before saving.
3. The saved connection will appear on the Connectors home page.

## Manage Connector Operations

### Crawl

{% hint style="warning" %}
To perform crawl operations, users must be assigned the Integration Admin role.
{% endhint %}

The **Crawl/Profile** button allows users to select one or more **schemas** for crawling.&#x20;

1. Navigate to the **Connectors** page and click **Crawl/Profile**.
2. Select the **schemas** to crawl.
3. The **Crawl** option is selected by default.
4. Click **Run** to collect metadata from the connected source and load it into the **Data Catalog**.
5. After a successful crawl, the information appears in the **Data Catalog > Databases** tab.

The **Schedule** checkbox allows automated crawling and profiling at defined intervals, from a minute to a year.

1. Click the **Schedule** checkbox to enable the **Select** Period drop-down.
2. Select a time interval for the operation from the drop-down menu.
3. Click **Schedule** to initiate metadata collection from the connected source.
4. The system will automatically execute the **Crawl** operation at the scheduled time.

### Other Operations

The **Connectors** page provides a centralized view of all configured connectors, along with their health status.

**Managing connectors includes:**

* **Connector Health:** Displays the current status of each connector using a **green** icon for active connections and a **red** icon for inactive connections, helping to monitor the connectivity with data sources.
* **Viewing**: Click the **Eye** icon next to the connector name to view connector details, including databases, tables, columns, and files.

**Nine Dots Menu Options:**

You can view, edit, validate, modify connector settings, and delete connectors using the **Nine Dots** menu.

* **Edit Connector**: Update and revalidate the data source.
* **Validate Connector**: Check the connection's integrity.
* **Settings**: Modify connector settings.
  * **Crawler**: Configure data extraction.
  * **Access Instructions:** Add notes on how data can be accessed.
  * **Business Glossary Settings**: Manage term associations at the connector level.
  * **Others**: Configure notification recipients for metadata changes.
* **Delete Connector**: Remove a connector with confirmation.

***

Copyright © 2025, OvalEdge LLC, Peachtree Corners GA USA
