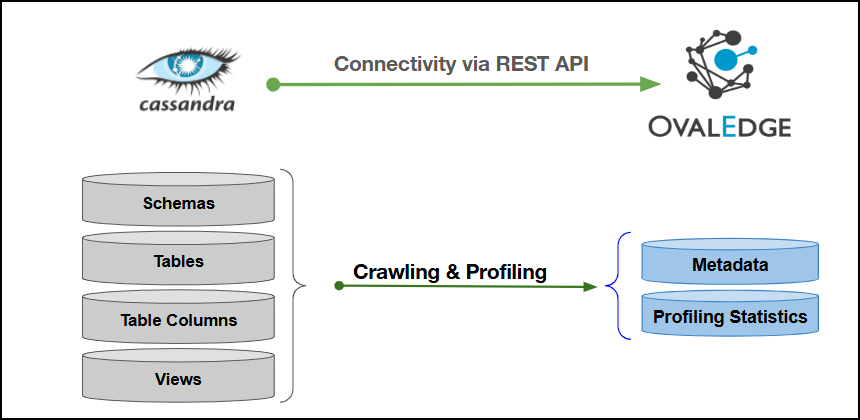
Connectivity
\[How the connection is established with Cassandra]
| REST APIs | ### Connector Features | Feature | Availability | | -------------------------------------------- | :----------: | | Crawling | ✅ | | Delta Crawling | ❌ | | Profiling | ✅ | | Query Sheet | ✅ | | Data Preview | ✅ | | Auto Lineage | ❌ | | Manual Lineage | ✅ | | Secure Authentication via Credential Manager | ✅ | | Data Quality | ❌ | | DAM (Data Access Management) | ❌ | | Bridge | ✅ | ### Metadata Mapping The following objects are crawled from the Cassandra and mapped to the corresponding UI assets. | Cassandra Object | Cassandra Attribute | OvalEdge Attribute | OvalEdge Category | OvalEdge Type | | ---------------- | ------------------- | ------------------ | ----------------- | ------------------ | | Table | Table Name | Table | Tables | Table | | Table | Table Type | Type | Tables | Table | | Table | Table Comments | Source Description | Descriptions | Source Description | | Columns | Column Name | Column | Table Columns | Columns | | Columns | Data Type | Column Type | Table Columns | Columns | | Columns | Description | Source Description | Table Columns | Columns | | Columns | Ordinal Position | Column Position | Table Columns | Columns | | Columns | Length | Data Type Size | Table Columns | Columns | ## Set up a Connection ### Prerequisites The prerequisites to establish a connection: ### **Whitelisting Ports** Whitelist the inbound port to allow OvalEdge to connect to the Cassandra Server database. {% hint style="warning" %} When any port is configured, specify the port number during connection setup, whitelist the port, and establish proper communication between the system and the Cassandra Server. {% endhint %} ### Service Account User Permissions {% hint style="warning" %} Use a dedicated service account to establish the connection to the data source, configured with the following minimum set of permissions. {% endhint %} {% hint style="info" %} 👨💻 Who can provide these permissions? The Cassandra administrator grants these permissions, as standard accounts may not have the required access to assign them independently. {% endhint %} | Objects | System Tables | Access Permission | | --------------------------- | ------------------------------------- | ----------------------- | | Schema (Keyspace) | system\_schema.keyspaces | Select on System schema | | Tables | system\_schema.tables | Select on System schema | | Table Columns | system\_schema.columns | Select on System schema | | Table Comments/ Description | system\_schema.tables (comment field) | Select on System schema | ### Connection Configuration Steps {% hint style="warning" %} Users must have the Connector Creator role to configure a new connection. {% endhint %} 1. Log in to OvalEdge, go to Administration > Connectors, click + **(New Connector)**, search for **Cassandra**, and complete the required parameters. {% hint style="info" %} Fields marked with an asterisk (\*) are mandatory for establishing a connection. {% endhint %} | Field Name | Description | | --------------------- | ------------------------------------------------------------------------------------------------------------------------------------------------------------------------------------------------------------------------------------------------------------------------- | | Connector Type | By default, "Cassandra" is displayed as the selected connector type. | | Credential Manager\* |Select the desired credentials manager from the drop-down list. Relevant parameters will be displayed based on the selection.
Supported Credential Managers:
Enter a unique name for the Cassandra connection
(Example: "Cassandra\_Prod").
| | Connector Environment | Select the environment (Example: PROD, STG) configured for the connector. | | Connector Description | Enter the description related to the connector. | | Server\* | Enter the IP address of the server where Cassandra is hosted. | | Port\* | Cassandra uses no port by default. Enter the required port number. | | Key Space\* | Enter the default keyspace name to establish the initial connection context for the Cassandra database. | | Username\* | Enter the Username for the Cassandra server. | | Password\* | Enter the Password associated with the Cassandra Username. | | Proxy Enabled\* | Enter True to enable proxy usage, or False to connect directly without a proxy. | | Plugin Server | Enter the server name when running as a plugin server. | | Plugin Port | Enter the port number on which the plugin is running. | **Default Governance Roles** | Default Governance Roles\* | Select the appropriate users or teams for each governance role from the drop-down list. All users and teams configured in OvalEdge Security are displayed for selection. | | -------------------------- | ------------------------------------------------------------------------------------------------------------------------------------------------------------------------ | **Admin Roles** | Admin Roles\* | Select one or more users from the dropdown list for Integration Admin and Security & Governance Admin. All users configured in OvalEdge Security are available for selection. | | ------------- | ----------------------------------------------------------------------------------------------------------------------------------------------------------------------------- | **No of Archive Objects** | No Of Archive Objects\* |This shows the number of recent metadata changes to a dataset at the source. By default, it is off. To enable it, toggle the Archive button and specify the number of objects to archive.
Example: Setting it to 4 retrieves the last four changes, displayed in the 'Version' column of the 'Metadata Changes' module.
| | ----------------------- | ------------------------------------------------------------------------------------------------------------------------------------------------------------------------------------------------------------------------------------------------------------------------------------------------------------------------------------ | **Bridge** | Select Bridge\* |If applicable, select the bridge from the drop-down list.
The drop-down list displays all active bridges configured in OvalEdge. These bridges enable communication between data sources and OvalEdge without altering firewall rules.
| | --------------- | --------------------------------------------------------------------------------------------------------------------------------------------------------------------------------------------------------------------------------------------------- | 2. After entering all connection details, the following actions can be performed: * Click **Validate** to verify the connection. * Click **Save** to store the connection for future use. * Click **Save & Configure** to apply additional settings before saving. 3. The saved connection will appear on the Connectors home page. ## Manage Connector Operations ### Crawl/Profile {% hint style="warning" %} To perform crawl and profile operations, users must be assigned the Integration Admin role. {% endhint %} The **Crawl/Profile** button allows users to select one or more schemas for crawling and profiling. 1. Navigate to the Connectors page and click **Crawl/Profile**. 2. Select the schemas to crawl. 3. The **Crawl** option is selected by default. Click the **Crawl & Profile** radio button to enable both operations. 4. Click **Run** to collect metadata from the connected source and load it into the **Data Catalog**. 5. After a successful crawl, the information appears in the **Data Catalog > Databases** tab. The **Schedule** checkbox allows automated crawling and profiling at defined intervals, from a minute to a year. 1. Click the **Schedule** checkbox to enable the **Select Period** drop-down. 2. Select a time period for the operation from the drop-down menu. 3. Click **Schedule** to initiate metadata collection from the connected source. 4. The system will automatically execute the selected operation (**Crawl** or **Crawl & Profile**) at the scheduled time. #### Other Operations The **Connectors page** in OvalEdge provides a centralized view of all configured connectors, including their health status. **Managing connectors includes:** * **Connectors Health**: Displays the current status of each connector, with a green icon for active connections and a red icon for inactive connections, helping monitor connectivity to data sources. * **Viewing**: Click the Eye icon next to the connector name to view connector details, including Tables, Views, and Columns. **Nine Dots Menu Options:** To view, edit, validate, configure, or delete connectors, click on the **Nine Dots** menu. * **Edit Connector**: Update and revalidate the data source. * **Validate Connector**: Check the integrity of the connection. * **Settings**: Modify connector settings. * **Crawler**: Configure data extraction. * **Profiler**: Customize data profiling rules and methods. * **Query Policies**: Define query execution rules based on roles. * **Access Instructions**: Add notes on how data can be accessed. * **Business Glossary Settings**: Manage term associations at the connector level. * **Connection Pooling**: Allows configuring parameters such as maximum pool size, idle time, and timeouts directly within the application. * **Others**: Configure notification recipients for metadata changes. * **Build Lineage**: Automatically build data lineage using source code parsing. * **Delete Connector**: Remove a connector with confirmation. *** Copyright © 2025, OvalEdge LLC, Peachtree Corners, GA, USA.