# Apache Impala

This article outlines the integration with the Apache Impala connector, enabling streamlined metadata management through crawling, profiling, data preview, and manual lineage building. It also ensures secure authentication via Credential Manager.

<figure><img src="https://content.gitbook.com/content/ztcvwwOJCeaE1n6oHp4C/blobs/yqNkHCpeRQRAWOigBkq2/unknown.png" alt=""><figcaption></figcaption></figure>

## Overview

### Connector Details

| Connector Category                                                                | Big Data Platform |
| --------------------------------------------------------------------------------- | ----------------- |
| Connector Version                                                                 | Release6.3.4      |
| Releases Supported (Available from)                                               | Legacy Connector  |
| <p>Connectivity</p><p>\[How the connection is established with Apache Impala]</p> | 
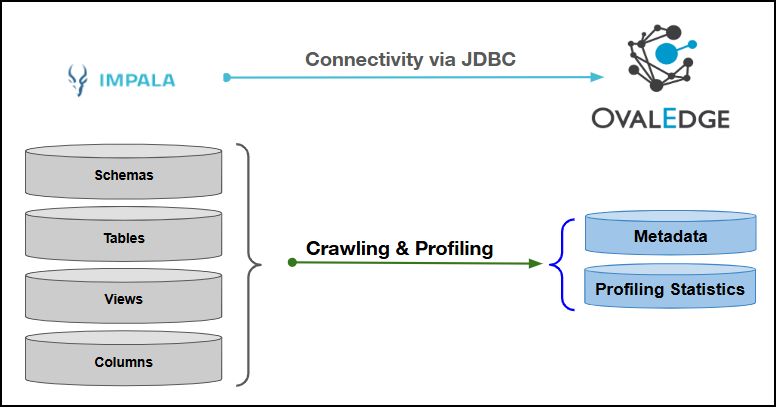
JDBC              |
| Verified Apache Impala Version                                                    | 2.5.31            |

### Connector Features

| Feature                                      | Availability |
| -------------------------------------------- | :----------: |
| Crawling                                     |       ✅      |
| Delta Crawling                               |       ❌      |
| Profiling                                    |       ✅      |
| Query Sheet                                  |       ✅      |
| Data Preview                                 |       ✅      |
| Auto Lineage                                 |      NA      |
| Manual Lineage                               |       ✅      |
| Secure Authentication via Credential Manager |       ✅      |
| Data Quality                                 |       ❌      |
| DAM (Data Access Management)                 |       ❌      |
| Bridge                                       |       ✅      |

{% hint style="info" %}
'NA' indicates that the respective feature is 'Not Applicable.'
{% endhint %}

### Metadata Mapping

The following objects are crawled from the Apache Impala and mapped to the corresponding UI assets.

<table><thead><tr><th width="198.3333740234375">Apache Impala Object</th><th width="210.3333740234375">Apache Impala Attribute</th><th width="184">OvalEdge Attribute</th><th width="186.6666259765625">OvalEdge Category</th><th width="149.333251953125">OvalEdge Type</th></tr></thead><tbody><tr><td>Schema</td><td>Schema name</td><td>Schema</td><td>Databases</td><td>Schema</td></tr><tr><td>Table</td><td>Table Name</td><td>Table</td><td>Tables</td><td>Table</td></tr><tr><td>Table</td><td>Table Type</td><td>Type</td><td>Tables</td><td>Table</td></tr><tr><td>Table</td><td>Table Comments</td><td>Source Description</td><td>Descriptions</td><td>Source Description</td></tr><tr><td>Columns</td><td>Column Name</td><td>Column</td><td>Table Columns</td><td>Columns</td></tr><tr><td>Columns</td><td>Data Type</td><td>Column Type</td><td>Table Columns</td><td>Columns</td></tr><tr><td>Columns</td><td>Description</td><td>Source Description</td><td>Table Columns</td><td>Columns</td></tr><tr><td>Views</td><td>View Name</td><td>View</td><td>Tables</td><td>Views</td></tr></tbody></table>

## Set up a Connection

### Prerequisites

The prerequisites to establish a connection:

### **Whitelisting Ports**

Whitelist the inbound port 21050 to allow OvalEdge to connect to the Apache Impala Server database.

{% hint style="warning" %}
Apache Impala uses port 21050 by default. When a different port is configured, specify the updated port number during connection setup, whitelist the port, and establish proper communication between the system and the Apache Impala Server.
{% endhint %}

### Service Account User Permissions

{% hint style="warning" %}
Use a dedicated service account to establish the connection to the data source, configured with the following minimum set of permissions.
{% endhint %}

{% hint style="info" %}
**👨‍💻 Who can provide these permissions?** The Apache Impala administrator grants these permissions, as standard accounts may not have the required access to assign them independently.
{% endhint %}

| Operation            | Objects                                 | System Tables                                                              | Access Permission |
| -------------------- | --------------------------------------- | -------------------------------------------------------------------------- | ----------------- |
| Crawling & Profiling | Schema                                  | USAGE on the database                                                      | USAGE             |
| Crawling & Profiling | Tables                                  | <ul><li>USAGE on the database</li><li>SELECT privilege on tables</li></ul> | SELECT & USAGE    |
| Crawling & Profiling | Table Columns                           | <ul><li>USAGE on the database</li><li>SELECT privilege on tables</li></ul> | SELECT & USAGE    |
| Crawling & Profiling | Primary Keys (PK) and Foreign Keys (FK) | <ul><li>USAGE on the database</li><li>SELECT privilege on tables</li></ul> | SELECT & USAGE    |

### Connection Configuration Steps

{% hint style="warning" %}
Users must have the Connector Creator role to configure a new connection.
{% endhint %}

1. Log in to OvalEdge, go to Administration > Connectors, click + (New Connector), search for Impala, and complete the required parameters.

{% hint style="info" %}
Fields marked with an asterisk (\*) are mandatory for establishing a connection.
{% endhint %}

<table><thead><tr><th width="220.666748046875">Field Name</th><th>Description</th></tr></thead><tbody><tr><td>Connector Type</td><td>By default, "Apache Impala" is displayed as the selected connector type.</td></tr><tr><td>Authentication*</td><td><p>The following two types of authentication are supported for Apache Impala Server:</p><ul><li>Kerberos Authentication</li><li>Non-Kerberos Authentication</li></ul></td></tr></tbody></table>

{% tabs %}
{% tab title="Kerberos" %}

<table><thead><tr><th width="221.333251953125">Field Name</th><th>Description</th></tr></thead><tbody><tr><td>Credential Manager*</td><td><p>Select the desired credentials manager from the drop-down list. Relevant parameters will be displayed based on the selection.</p><p>Supported Credential Managers:</p><ul><li>Database</li><li>HashiCorp</li><li>AWS Secrets Manager</li><li>Azure Key Vault</li></ul></td></tr><tr><td>Connector Name*</td><td><p>Enter a unique name for the Apache Impala connection              </p><p>(Example: "Apache Impala_Prod").</p></td></tr><tr><td>Connector Environment</td><td>Select the environment (Example: PROD, STG) configured for the connector.</td></tr><tr><td>Connector Description</td><td>Enter the description related to the connector.</td></tr><tr><td>Server*</td><td>Enter the IP address of the server where Apache Impala is hosted.</td></tr><tr><td>Port*</td><td>Apache Impala uses port 21050 by default. The port number can be modified as needed.</td></tr><tr><td>Database*</td><td><p>The ‘Database’ field specifies the default schema to connect to within the Impala server.</p><p></p><p>Example: If the target database is sales_db, enter sales_db to connect directly instead of the default schema.</p></td></tr><tr><td>Driver*</td><td>By default, Apache Impala uses ‘com.cloudera.impala.jdbc41.Driver.’ This field is not editable.</td></tr><tr><td>Principal </td><td>The Principal field specifies the Kerberos principal that the client will use to authenticate to the Impala service. It identifies the service account for Impala in the Kerberos realm.</td></tr><tr><td>Connection String</td><td><p>Configure the connection string for the Impala server:</p><ul><li>Automatic Mode: The system generates a connection string based on the provided credentials.</li><li>Manual Mode: Enter a valid connection string manually.</li></ul><p>Replace placeholders with actual server details:</p><ul><li>{server} refers to the Impala host or IP address.</li><li>{sid} refers to the database name (schema).<br></li></ul><p>Authentication Plugins:<br>jdbc:hive2://{server}:2xxx/{sid};principal=impala/undefined</p><p>This is the default authentication string used for connecting to Impala. The principal parameter specifies the Impala service principal for authentication.</p></td></tr><tr><td>Keytab</td><td>The Keytab field specifies the path to the Kerberos keytab file containing the principal’s credentials. It is used to securely authenticate the client to the Impala server without manual password entry.</td></tr><tr><td>Krb5-Configuration File*</td><td>The Krb5-Configuration File field specifies the path to the krb5.conf file used for Kerberos authentication. It provides the necessary Kerberos realm and KDC information for Impala to validate the user's credentials.</td></tr><tr><td>Plugin Server</td><td>Enter the server name when running as a plugin server.</td></tr><tr><td>Plugin Port</td><td>Enter the port number on which the plugin is running.</td></tr></tbody></table>
{% endtab %}

{% tab title="Non Kerberos" %}

<table><thead><tr><th width="221.333251953125">Field Name</th><th>Description</th></tr></thead><tbody><tr><td>Credential Manager*</td><td><p>Select the desired credentials manager from the drop-down list. Relevant parameters will be displayed based on the selection.</p><p>Supported Credential Managers:</p><ul><li>Database</li><li>HashiCorp</li><li>AWS Secrets Manager</li><li>Azure Key Vault</li></ul></td></tr><tr><td>Connector Name*</td><td><p>Enter a unique name for the Apache Impala connection              </p><p>(Example: "Apache Impala_Prod").</p></td></tr><tr><td>Connector Environment</td><td>Select the environment (Example: PROD, STG) configured for the connector.</td></tr><tr><td>Connector Description</td><td>Enter the description related to the connector.</td></tr><tr><td>Server*</td><td>Enter the IP address of the server where Apache Impala is hosted.</td></tr><tr><td>Port*</td><td>Apache Impala uses port 21050 by default. The port number can be modified as needed.</td></tr><tr><td>Database*</td><td><p>The ‘Database’ field specifies the default schema to connect to within the Impala server.</p><p></p><p><strong>Example:</strong> If the target database is sales_db, enter sales_db to connect directly instead of the default schema.</p></td></tr><tr><td>Driver*</td><td>By default, Apache Impala uses ‘com.cloudera.impala.jdbc41.Driver.’ This field is not editable.</td></tr><tr><td>Username* </td><td>The username field specifies the user account used to connect to the Impala server.</td></tr><tr><td>Password* </td><td>The Password field should contain the user’s password associated with the provided username. It is used to authenticate the connection when establishing a session with the Impala server.</td></tr><tr><td>Connection String</td><td><p>Configure the connection string for the Impala server:</p><ul><li>Automatic Mode: The system generates a connection string based on the provided credentials.</li><li>Manual Mode: Enter a valid connection string manually.</li></ul><p>Replace placeholders with actual server details:</p><ul><li>{server} refers to the Impala host or IP address.</li><li>{sid} refers to the database name (schema).<br></li></ul><p>Authentication Plugins:<br>jdbc:hive2://{server}:2xxx/{sid};principal=impala/undefined</p><p>This is the default authentication string used for connecting to Impala. The principal parameter specifies the Impala service principal for authentication.</p></td></tr><tr><td>Plugin Server</td><td>Enter the server name when running as a plugin server.</td></tr><tr><td>Plugin Port</td><td>Enter the port number on which the plugin is running.</td></tr></tbody></table>
{% endtab %}
{% endtabs %}

**Default Governance Roles**

<table data-header-hidden><thead><tr><th width="220.6666259765625"></th><th></th></tr></thead><tbody><tr><td>Default Governance Roles*</td><td>Select the appropriate users or teams for each governance role from the drop-down list. All users and teams configured in OvalEdge Security are displayed for selection.</td></tr></tbody></table>

**Admin Roles**

<table data-header-hidden><thead><tr><th width="220.6666259765625"></th><th></th></tr></thead><tbody><tr><td>Admin Roles*</td><td>Select one or more users from the dropdown list for Integration Admin and Security &#x26; Governance Admin. All users configured in OvalEdge Security are available for selection.</td></tr></tbody></table>

**No of Archive Objects**

<table data-header-hidden><thead><tr><th width="220.6666259765625"></th><th></th></tr></thead><tbody><tr><td>No Of Archive Objects*</td><td><p>This shows the number of recent metadata changes to a dataset at the source. By default, it is off. To enable it, toggle the Archive button and specify the number of objects to archive.</p><p>Example: Setting it to 4 retrieves the last four changes, displayed in the 'Version' column of the 'Metadata Changes' module.</p></td></tr></tbody></table>

**Bridge**

<table data-header-hidden><thead><tr><th width="220.6666259765625"></th><th></th></tr></thead><tbody><tr><td>Select Bridge*</td><td><p>If applicable, select the bridge from the drop-down list.</p><p>The drop-down list displays all active bridges configured in OvalEdge. These bridges enable communication between data sources and OvalEdge without altering firewall rules.</p></td></tr></tbody></table>

2. After entering all connection details, the following actions can be performed:
   * Click **Validate** to verify the connection.
   * Click **Save** to store the connection for future use.
   * Click **Save & Configure** to apply additional settings before saving.
3. The saved connection will appear on the Connectors home page.

## Manage Connector Operations

### Crawl/Profile

{% hint style="warning" %}
To perform crawl and profile operations, users must be assigned the Integration Admin role.
{% endhint %}

The Crawl/Profile button allows users to select one or more schemas for crawling and profiling.&#x20;

1. Navigate to the **Connectors** page and click **Crawl/Profile**.
2. Select the schemas to crawl.
3. The **Crawl** option is selected by default. Click the **Crawl & Profile** radio button to enable both operations.
4. Click **Run** to collect metadata from the connected source and load it into the Data Catalog.
5. After a successful crawl, the information appears in the Data Catalog > Databases tab.

The Schedule checkbox allows automated crawling and profiling at defined intervals, from a minute to a year.

1. Click the **Schedule** checkbox to enable the Select Period drop-down.
2. Select a time period for the operation from the drop-down menu.
3. Click **Schedule** to initiate metadata collection from the connected source.
4. The system will automatically execute the selected operation (**Crawl** or **Crawl & Profile**) at the scheduled time.

### Other Operations

The **Connectors page** in OvalEdge provides a centralized view of all configured connectors, including their health status.

**Managing connectors includes:**

* **Connectors Health**: Displays the current status of each connector, with a **green** icon for active connections and a **red** icon for inactive connections, helping monitor connectivity to data sources.
* **Viewing**: Click the **Eye** icon next to the connector name to view connector details, including Tables, Views, and Columns.

**Nine Dots Menu Options**:

To view, edit, validate, configure, or delete connectors, click on the **Nine Dots** menu.

* **Edit Connector**: Update and revalidate the data source.
* **Validate Connector**: Check the integrity of the connection.
* **Settings**: Modify connector settings.
  * **Crawler**: Configure data extraction.
  * **Profiler**: Customize data profiling rules and methods.
  * **Query Policies**: Define query execution rules based on roles.
  * **Access Instructions**: Add notes on how data can be accessed.
  * **Business Glossary Settings**: Manage term associations at the connector level.
  * **Connection Pooling**: Allows configuring parameters such as maximum pool size, idle time, and timeouts directly within the application.&#x20;
  * **Others**: Configure notification recipients for metadata changes.
* **Delete Connector**: Remove a connector with confirmation.

### Connectivity Troubleshooting

If incorrect parameters are entered, error messages may appear. Ensure all inputs are accurate to resolve these issues. If issues persist, contact the assigned support team.

<table><thead><tr><th width="87.1112060546875">S.No.</th><th width="212.111083984375">Error Message(s)</th><th>Error Description &#x26; Resolution</th></tr></thead><tbody><tr><td>1</td><td>Handler dispatch failed: java.lang.NoSuchFieldError: DEFAULT_MAX_WAIT</td><td><p>Description: This error occurs when the Impala connector (or a dependent library, such as the JDBC/ODBC driver or Hadoop/Hive libraries) tries to access a field named DEFAULT_MAX_WAIT that does not exist in the loaded version of the class.<br></p><p>Resolution: Ensure that the Impala JDBC/ODBC driver version matches the Impala server version. Confirm that any Hadoop/Hive libraries on the classpath are compatible with the connector.</p></td></tr></tbody></table>

***

Copyright © 2025, OvalEdge LLC, Peachtree Corners, GA, USA.
